1. Introduction
The LITEPUTER CX1C DMX Tester is a compact and essential tool for professionals working with DMX512 lighting control systems. It is designed to quickly and accurately test DMX signals, helping to diagnose issues with DMX lines, fixtures, and controllers. This manual provides comprehensive instructions for the safe and effective use of your CX1C DMX Tester.
2. Safety Information
- Always operate the device in a dry environment. Avoid exposure to moisture or liquids.
- Do not open the casing of the device. Refer all servicing to qualified personnel.
- Use only the specified power adapter (DC 12V) to prevent damage to the unit.
- Ensure proper ventilation around the device during operation.
- Keep the device away from strong magnetic fields.
3. Product Overview
The LITEPUTER CX1C DMX Tester features a clear LCD display and intuitive controls for easy operation. It supports 5-pin DMX connections.

Figure 3.1: Front View of the LITEPUTER CX1C DMX Tester. This image shows the main unit with its LCD screen and control buttons, including DMX IN, FUNC, DMX OUT, and LEVEL controls.
3.1 Front Panel Controls
- LCD Display: Shows DMX channel values, menu options, and status information.
- DMX IN Indicator: Illuminates when a DMX signal is detected at the input.
- FUNC Button: Used to cycle through different functions and menu options.
- DMX OUT Indicator: Illuminates when the tester is generating a DMX output signal.
- LEVEL Buttons (+/-): Used to adjust DMX channel levels or navigate menu options.
3.2 Rear Panel Connections

Figure 3.2: Rear View of the LITEPUTER CX1C DMX Tester. This image displays the rear panel, highlighting the DC 12V power input, DMX IN and DMX OUT ports (both RJ45 and 5-pin XLR connectors), and pinout diagrams.
- DC 12V Input: Power connection port for the unit.
- DMX IN (RJ45 & 5-pin XLR): Ports for receiving DMX signals from a controller or upstream device.
- DMX OUT (RJ45 & 5-pin XLR): Ports for sending DMX signals to fixtures or downstream devices.
3.3 Included Accessories
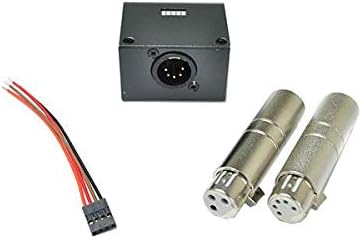
Figure 3.3: LITEPUTER CX1C DMX Tester Accessories. This image shows typical accessories that may be included with the DMX tester, such as a power cable and XLR adapters, facilitating various connection types.
The CX1C DMX Tester typically includes a power adapter and may come with various DMX adapters (e.g., 3-pin to 5-pin XLR) to ensure compatibility with different DMX setups.
4. Setup
Follow these steps to set up your LITEPUTER CX1C DMX Tester:
- Power Connection: Connect the provided DC 12V power adapter to the DC 12V input port on the rear panel of the CX1C. Plug the adapter into a suitable power outlet.
- DMX Input Connection: If you are testing an incoming DMX signal, connect your DMX cable from the DMX source (e.g., lighting console) to either the DMX IN RJ45 or 5-pin XLR port on the rear panel.
- DMX Output Connection (Optional): If you intend to generate a DMX signal from the tester to control fixtures, connect a DMX cable from either the DMX OUT RJ45 or 5-pin XLR port to your DMX fixtures.
- Power On: The device should power on automatically once connected to power. The LCD display will illuminate.
5. Operating Instructions
5.1 Basic DMX Signal Testing (Input)
- Ensure a DMX source is connected to the DMX IN port.
- The DMX IN indicator light should illuminate, confirming a signal is present.
- Use the FUNC button to navigate to the 'DMX Monitor' or 'Channel View' mode (exact naming may vary based on firmware).
- The LCD will display the DMX values for each channel. Use the LEVEL +/- buttons to scroll through channels or pages of channels.
5.2 DMX Signal Generation (Output)
- Connect the DMX OUT port to your DMX fixtures.
- Use the FUNC button to navigate to a 'DMX Output' or 'Test Pattern' mode.
- In this mode, you can typically select a specific DMX channel and adjust its level using the LEVEL +/- buttons.
- The DMX OUT indicator light should illuminate, confirming a signal is being generated.
- Some modes may allow for generating test patterns (e.g., all channels at full, chase patterns) to quickly test fixture responses. Refer to the on-screen menu for available options.
5.3 Advanced Functions
The CX1C may offer additional functions such as:
- Cable Test: Checks the continuity and wiring of DMX cables.
- DMX Timing Analysis: Provides information on DMX packet timing.
- Fixture Addressing: Assists in setting DMX addresses for fixtures.
Navigate through these functions using the FUNC button and follow the on-screen prompts.
6. Maintenance
- Cleaning: Use a soft, dry cloth to clean the exterior of the device. Do not use abrasive cleaners or solvents.
- Storage: Store the CX1C in a cool, dry place away from direct sunlight and extreme temperatures when not in use.
- Cable Inspection: Regularly inspect DMX cables and power adapters for any signs of wear or damage. Replace damaged cables immediately.
7. Troubleshooting
- Device does not power on:
- Ensure the DC 12V power adapter is securely connected to both the device and a working power outlet.
- Verify the power outlet is functional.
- No DMX IN signal detected:
- Check the DMX cable connection between the source and the CX1C.
- Verify that the DMX source (e.g., console) is powered on and transmitting a signal.
- Test the DMX cable for continuity using the CX1C's cable test function if available, or another known good cable.
- DMX OUT signal not controlling fixtures:
- Ensure the DMX OUT cable is correctly connected to the fixtures.
- Verify that the fixtures are powered on and correctly addressed.
- Check the DMX output settings on the CX1C to ensure a signal is being generated on the correct channels.
- Ensure the fixtures are terminated correctly if they are at the end of a DMX chain.
8. Specifications
- Model: CX1C
- Function: DMX Tester
- DMX Connection: 5-pin XLR and RJ45
- Dimensions (W x H x D): 97mm x 135mm x 38mm
- Weight: 750g
- Power Input: DC 12V
9. Warranty and Support
LITEPUTER products are designed for reliability and performance. For specific warranty information, please refer to the warranty card included with your product or contact your authorized LITEPUTER dealer. For technical support, troubleshooting assistance, or service inquiries, please contact LITEPUTER customer service or visit the official LITEPUTER website.

