1. Introduction
Thank you for choosing the MomMed Digital Non-Contact Infrared Thermometer E-001. This device is designed for safe, hygienic, and accurate temperature measurement of the human body (forehead) and objects. It provides fast results and includes features like a fever alarm and memory function. Please read this manual thoroughly before use to ensure proper operation and maintenance.

Image 1.1: The MomMed Digital Non-Contact Infrared Thermometer E-001 shown alongside its product packaging. The thermometer features a digital display and ergonomic design.
2. Product Features
- Non-Contact Design: Ensures hygienic and safe temperature measurement.
- Fast and Accurate: Provides reliable readings in approximately 1 second.
- Multi-Function: Measures forehead temperature for adults and children, as well as object and room temperatures.
- Fever Alarm: Visual and audible alerts for elevated temperatures.
- Memory Function: Stores up to 35 groups of readings for tracking.
- LCD Display: Large, backlit screen for easy reading, even in low light.
- Unit Switching: Easily switch between Celsius (°C) and Fahrenheit (°F).
- Silent Mode: Option to mute sounds for quiet operation.
- Auto Power-Off: Automatically shuts down after 15 seconds of inactivity to conserve battery.

Image 2.1: An infographic highlighting the six main functions of the MomMed thermometer: °C/°F switching, two modes (forehead/object), one-click test, fever alarm, 35 memory groups, and voice on/off (silent mode).
3. Setup
3.1 Battery Installation
- Locate the battery compartment cover on the back of the thermometer.
- Slide the cover downwards to open the compartment.
- Insert two AAA batteries, ensuring correct polarity (+ and -).
- Slide the battery compartment cover back into place until it clicks securely.

Image 3.1: The rear of the MomMed thermometer with the battery compartment open, showing two AAA batteries correctly inserted. The image also highlights the infrared sensor.
3.2 Initial Power On
After installing the batteries, press the measurement button (usually labeled "Start" or with a power symbol) to turn on the thermometer. The device will perform a self-test, and the display will show all segments briefly before entering standby mode, ready for measurement.
4. Operating Instructions
4.1 Taking a Forehead Temperature Measurement
- Ensure the thermometer is in Forehead Mode. If not, press the mode button to switch.
- Point the thermometer at the center of the forehead from a distance of 1-5 cm (0.4-2 inches).
- Press the measurement button.
- The reading will be displayed on the LCD screen within 1 second.
- The backlight color will indicate the temperature status:
- Green: Normal temperature (32°C~37.3°C / 89.6°F~99.2°F)
- Orange: Slightly elevated temperature (37.4°C~37.9°C / 99.3°F~100.3°F)
- Red: Fever (38°C~42.9°C / 100.4°F~109.2°F)

Image 4.1: The MomMed thermometer's LCD display illustrating the three backlight colors (green, orange, red) corresponding to normal, slightly elevated, and fever temperatures, respectively.

Image 4.2: A user taking a temperature reading from a sleeping baby using the MomMed thermometer, demonstrating its silent operation feature for nighttime use.
4.2 Taking an Object/Room Temperature Measurement
- Ensure the thermometer is in Object Mode. If not, press the mode button to switch.
- Point the thermometer at the object or area you wish to measure.
- Press the measurement button.
- The reading will be displayed on the LCD screen.
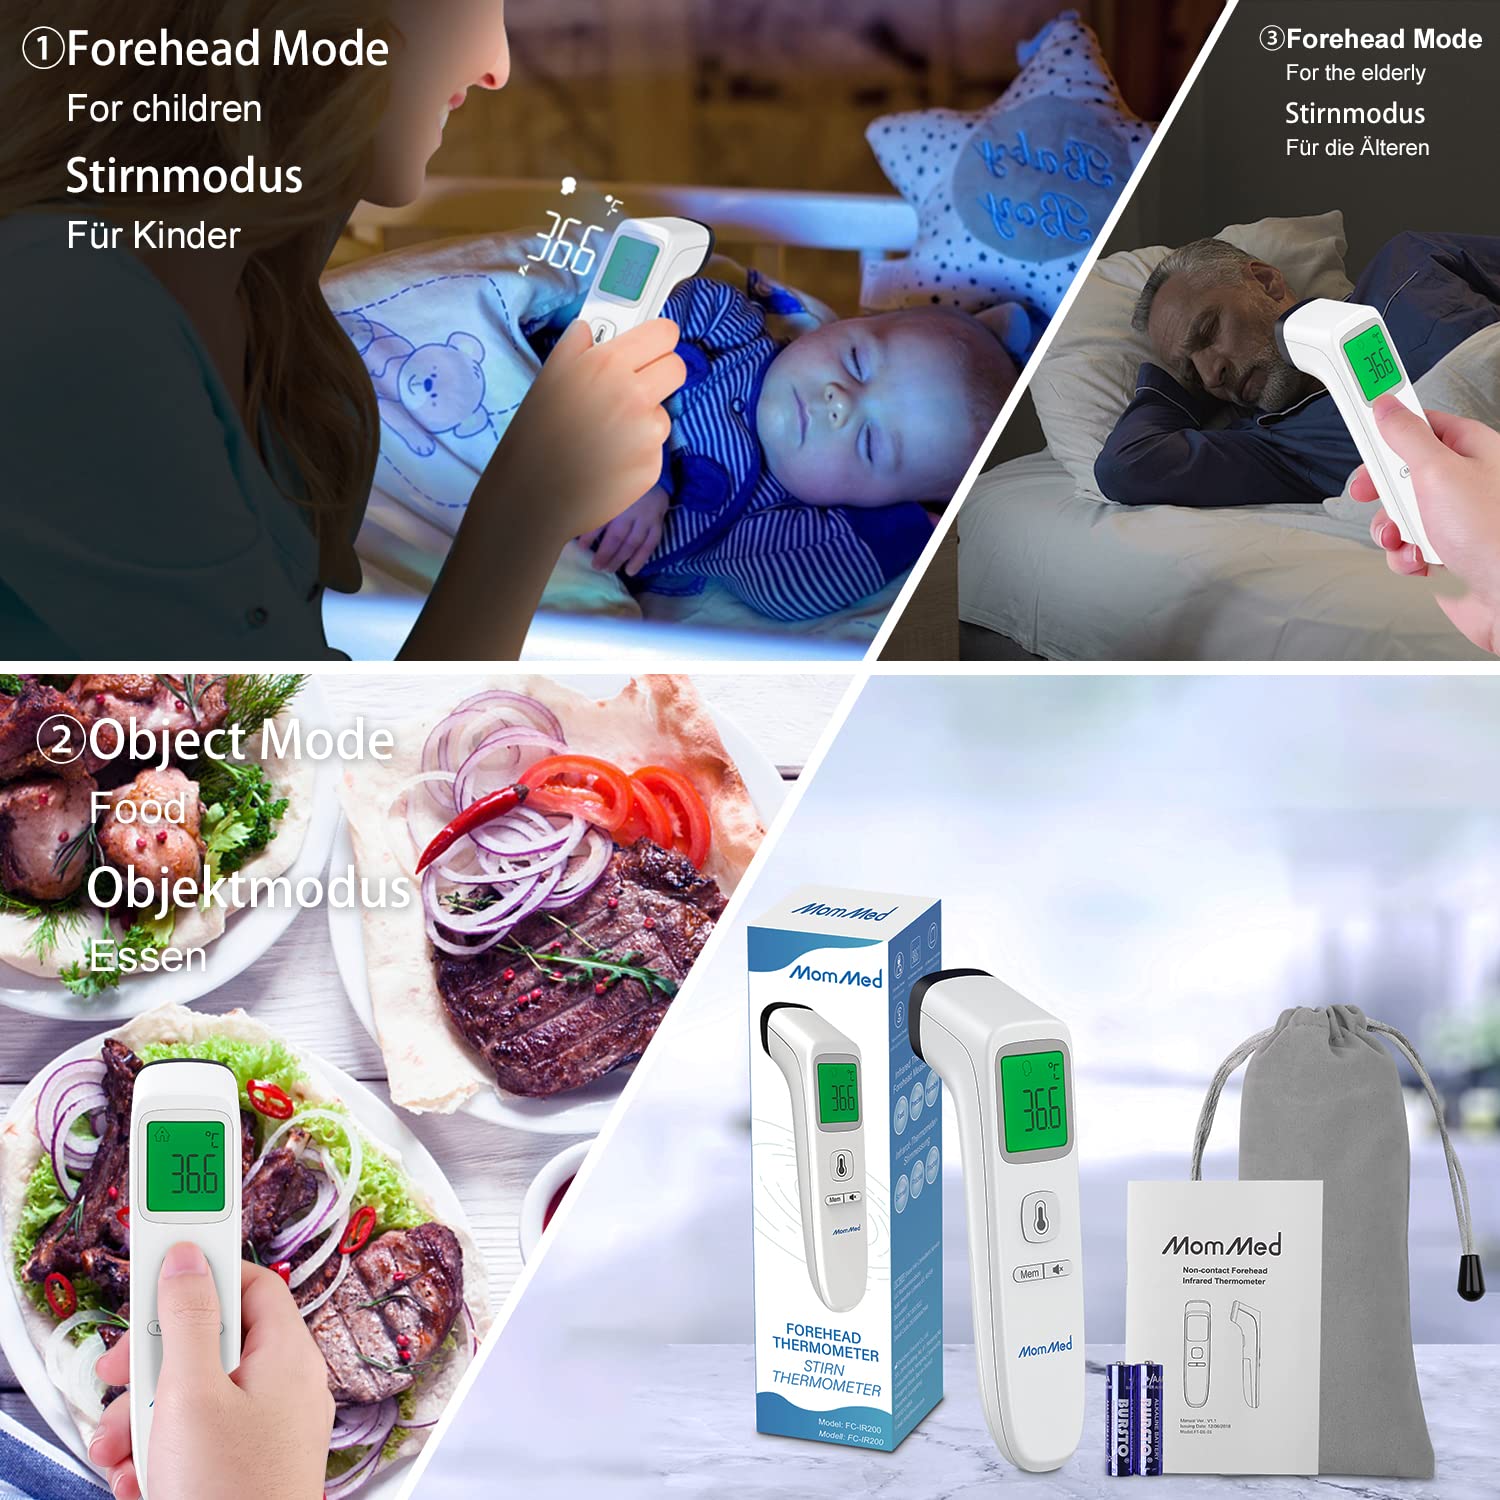
Image 4.3: A composite image demonstrating the versatility of the MomMed thermometer, showing its use for forehead temperature measurement on both children and elderly individuals, as well as for measuring the temperature of food in object mode.
4.3 Switching Between °C and °F
With the thermometer powered on and in standby mode, press and hold the mode button for a few seconds until the unit changes on the display. Release the button when your desired unit (°C or °F) is shown.
4.4 Memory Function
The thermometer automatically stores the last 35 temperature readings. To recall previous measurements, press the "Mem" button. Each press will cycle through the stored readings.
4.5 Silent Mode
To activate or deactivate silent mode, press the dedicated sound button (often indicated by a speaker icon). This allows for temperature measurement without audible beeps, ideal for use with sleeping individuals.
4.6 Usage Scenarios
The MomMed Digital Non-Contact Infrared Thermometer is suitable for various environments and users, including:
- Home Use: For monitoring family health.
- Office Environments: Quick temperature checks.
- Schools: For student and staff health screening.
- Public Spaces: General temperature monitoring.

Image 4.4: A collage depicting the MomMed thermometer in use across different environments, including a home, an office, a school classroom, and a restaurant, highlighting its versatility.
5. Maintenance
5.1 Cleaning the Thermometer
- Use a soft, dry cloth to clean the body of the thermometer.
- For the probe and lens, gently wipe with an alcohol swab or a cotton swab moistened with alcohol.
- Do not immerse the thermometer in water or any cleaning solutions.
- Ensure the thermometer is completely dry before storage or next use.
5.2 Storage
Store the thermometer in a cool, dry place, away from direct sunlight, dust, and extreme temperatures. If the thermometer will not be used for an extended period, remove the batteries to prevent leakage.
6. Troubleshooting
- No Power:
Check if batteries are inserted correctly with the right polarity. Replace with new AAA batteries if necessary.
- "Lo" or "Hi" Display:
"Lo" indicates a temperature below the measurable range, and "Hi" indicates a temperature above the measurable range. Ensure proper measurement technique and distance.
- Inaccurate Readings:
Ensure the sensor lens is clean. Avoid taking measurements immediately after strenuous activity, bathing, or exposure to extreme temperatures. Allow the thermometer to acclimatize to room temperature for at least 30 minutes before use.
- Error Message on Display:
Refer to the specific error code in the full user manual (if available) or try removing and reinserting the batteries to reset the device.
7. Specifications
| Feature | Detail |
|---|---|
| Model Name | E-001 |
| Brand | MOMMED |
| Measurement Method | Non-Contact Infrared |
| Response Time | 1 Second |
| Temperature Units | Celsius (°C) / Fahrenheit (°F) |
| Memory Storage | 35 readings |
| Display Type | Digital LCD with Backlight |
| Power Source | 2 x AAA Batteries |
| Auto Power Off | After 15 seconds of inactivity |
| Item Weight | 140 g |
| UPC | 619793536056 |
8. Warranty and Support
8.1 Warranty Information
The MomMed Digital Non-Contact Infrared Thermometer E-001 comes with a 1-year warranty. This warranty covers manufacturing defects and ensures product replacement or repair under normal use conditions. Please retain your purchase receipt as proof of purchase.
8.2 Customer Support
For any questions, technical assistance, or warranty claims, please contact MomMed customer support. You can find more information and contact details by visiting the official MomMed store on Amazon: Visit MOMMED Store.