Suntek HC-801LTE
Suntek HC-800LTE 4G Trail Camera User Manual
Model: HC-801LTE
Introduction
This user manual provides comprehensive instructions for the setup, operation, maintenance, and troubleshooting of your Suntek HC-800LTE 4G Trail Camera. Please read this manual carefully before using the device to ensure proper functionality and longevity.
Package Contents
Upon opening the package, please verify that all the following items are included:
- 1 x HC-801LTE Hunting Camera
- 1 x Antenna
- 1 x USB Cable
- 1 x Fixing Strap
- 1 x Printed User Manual (English)
- 1 x Mini CD with User Manual (German, English, French, Italian, Spanish)
Note: SIM card and AA batteries are not included and must be purchased separately.

Image: The complete package contents, showing the HC-800LTE camera, its antenna, a USB cable, and a mounting strap.
Setup
1. Battery Installation
The HC-800LTE camera requires 8 x 1.5V AA batteries for operation (not included). Alternatively, it can be powered by a 6V external power source.
- Open the camera casing by unlatching the side clips.
- Locate the battery compartment.
- Insert 8 AA batteries, ensuring correct polarity (+/-) as indicated inside the compartment.
- Close the battery compartment cover securely.
2. SIM Card and Micro SD Card Installation
A Micro SD card (up to 64GB, not included) is required to store photos and videos. A SIM card (not included) is necessary for 4G/3G/2G network functions like sending photos/videos via MMS/SMTP.
- With the camera casing open, locate the Micro SD card slot and the SIM card slot.
- Insert the Micro SD card into its designated slot until it clicks into place.
- Insert the SIM card into its designated slot, ensuring correct orientation.
- Close the camera casing and secure the side clips.

Image: The internal layout of the camera, highlighting the battery compartment for 8 AA batteries and the slot for a Micro SD card.
3. Antenna Attachment
Attach the provided 4G antenna to the antenna port located at the top of the camera. Screw it on clockwise until it is finger-tight.

Image: The Suntek HC-800LTE camera shown with its 4G antenna properly attached to the top.
4. Mounting the Camera
The camera can be mounted using the included fixing strap or by utilizing a tripod nail (not included) via the stand knob port at the bottom.
- Thread the fixing strap through the designated slots on the back of the camera.
- Secure the camera to a tree or pole at the desired height and angle.
- Ensure the camera is stable and has a clear view of the area you wish to monitor.
Operating Instructions
Camera Components Overview

Image: A detailed diagram illustrating the various components of the camera, including the color display screen, setup buttons, mode switch, USB port, Micro SD card slot, 8AA batteries depot, external power port, and stand knob port.
- Color Display Screen: For viewing settings, captured media, and live feed.
- Setup Buttons: Navigation and selection buttons (Menu, Replay, Up, Down, Left, Right, OK, Shot).
- Mode Switch: To switch between OFF, SETUP, and ON modes.
- USB Port: For connecting to a computer.
- Micro SD Card Slot: For memory card insertion.
- External Power Port: For connecting an external 6V power supply.
- Stand Knob Port: For tripod mounting.
Basic Operation
- Powering On: Switch the Mode Switch to 'SETUP' to access the menu and configure settings.
- Configuring Settings: Use the setup buttons to navigate the menu. Adjust parameters such as image resolution (24MP/20MP/16MP), video resolution (1080P/720P/VGA), trigger interval, number of photos per detection (1/3/6/9), time-lapse, and password protection.
- Activating Camera: Once settings are configured, switch the Mode Switch to 'ON'. The camera will enter monitoring mode and begin capturing based on its PIR sensor detection.
Photo and Video Capture
The HC-800LTE features a 0.3-second trigger speed and a 120-degree PIR sensor for wide detection. It captures high-quality images and videos even in low light conditions.
- Image Resolution: Selectable from 24MP, 20MP, or 16MP.
- Video Resolution: 1080P, 720P, or VGA.
- Trigger Speed: Approximately 0.3 seconds.
- PIR Detection Distance: Up to 65 feet (20 meters).
- Night Vision: Equipped with 42 invisible black IR LEDs, providing illumination up to 65 feet (20 meters) without visible flash.
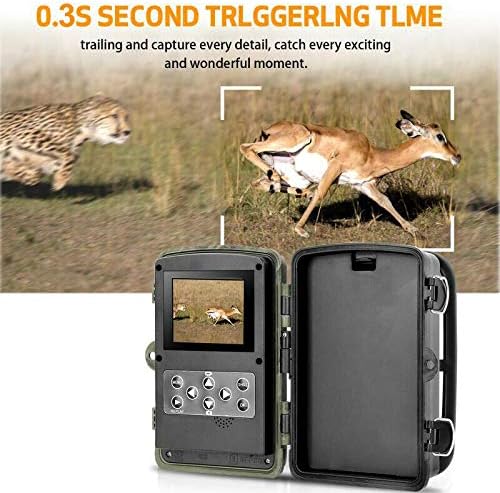
Image: This visual highlights the camera's rapid 0.3-second trigger time, showcasing its ability to capture fast-moving wildlife effectively.
4G Connectivity and Remote Functions
The camera supports 4G/3G/2G networks, allowing for remote transmission of captured media.
- MMS/SMTP Transmission: Configure the camera to send photos and videos to up to 4 phone numbers via MMS or 4 email addresses via SMTP.
- SMS Remote Control: Control certain camera functions remotely via SMS commands.
- GPRS Function: Enables email sending via MMC.
Special Functions
The camera includes various advanced features for versatile monitoring:
- Multiple Recording: Capture multiple images per trigger.
- Interval Shooting: Set specific time intervals for photo capture.
- Time-Lapse: Capture images over extended periods to create time-lapse sequences.
- Timer: Schedule specific operating times for the camera.
- Password Protection: Secure your camera settings with a numeric PIN.
- Timestamp: Imprint date and time on captured media.
- Low Battery Alarm: Receive alerts when battery levels are low.
- Local Recording: All captured media is stored on the Micro SD card.
Maintenance
Cleaning
Regular cleaning helps maintain optimal performance and image quality.
- Gently wipe the camera lens and PIR sensors with a soft, lint-free cloth.
- Do not use abrasive cleaners or solvents.
- Ensure the camera casing is free from dirt, dust, and debris, especially around seals, to maintain its IP66 waterproof rating.
Battery Replacement
Replace all 8 AA batteries when the low battery alarm is triggered or when performance degrades. Always use fresh, high-quality batteries.
SD Card Management
Periodically check the Micro SD card for storage capacity. It is recommended to format the SD card within the camera's menu settings before first use and after transferring files to a computer, to ensure optimal performance and prevent data corruption.
Troubleshooting
If you encounter issues with your HC-800LTE camera, refer to the following common problems and solutions:
| Problem | Possible Cause | Solution |
|---|---|---|
| Camera does not power on | Low or dead batteries; incorrect battery polarity; external power issue. | Replace all 8 AA batteries with new ones, ensuring correct polarity. Check external power connection if used. |
| No images/videos captured | SD card full or corrupted; PIR sensor blocked or sensitivity too low; incorrect trigger interval settings. | Format or replace the Micro SD card. Adjust PIR sensitivity. Check trigger interval settings. Ensure no obstructions in front of the PIR sensor. |
| Connectivity issues (MMS/Email) | No SIM card or incorrect installation; poor network coverage; incorrect APN/SMTP settings. | Ensure SIM card is correctly inserted and activated. Check network signal strength. Verify APN, SMTP, and recipient settings in the camera menu. |
| Poor image/video quality | Dirty lens; low light conditions; incorrect resolution settings. | Clean the camera lens. Ensure adequate lighting or rely on night vision. Adjust image/video resolution settings to higher quality. |
| Issues saving images to SD card | SD card slot damage; incompatible or faulty SD card. | Try a different, known-good Micro SD card. Ensure the card is inserted correctly and fully. |
Specifications
| Feature | Detail |
|---|---|
| Brand | Suntek |
| Model Number | HC-801LTE |
| Image Sensor | 5 Megapixel Color CMOS |
| Image Resolution | 24MP / 20MP / 16MP (selectable) |
| Video Resolution | 1080P / 720P / VGA |
| Trigger Speed | 0.3 seconds |
| PIR Detection Angle | 120 degrees |
| PIR Detection Distance | 65ft (20 meters) |
| Night Vision Range | 65ft (20 meters) with 42 invisible black IR LEDs |
| Memory | Micro SD Card up to 64GB (not included) |
| Display Screen | 2.0 inch TFT |
| Connectivity | 4G / 3G / 2G GSM / MMS / SMTP / SMS (Wired, Wireless) |
| Power Supply | 8 x AA Batteries (not included) or 6V External DC |
| Voltage | 9 Volts |
| Standby Time | Up to 6 months |
| Water Resistance Level | IP66 (Waterproof) |
| Dimensions (L x W x H) | 13.5 x 9 x 8.6 cm |
| Weight | 540 grams |
| Recommended Uses | Game and Trail, Security |
| Special Features | Local Recording, Multiple Recording, Interval, Time-Lapse, Timer, Password Protection, Timestamp, Low Battery Alarm |
Warranty and Support
Warranty Information
Specific warranty details for the Suntek HC-800LTE camera are not provided in this manual. Please refer to the warranty information provided by your retailer at the time of purchase or contact Suntek directly for warranty terms and conditions.
Customer Support
For further assistance or technical support, please refer to the comprehensive user manual provided on the included Mini CD. If you require additional support, please contact Suntek customer service through their official website or the contact information provided with your product documentation.
Ask a question about this manual
Ask about setup, troubleshooting, compatibility, parts, safety, or missing instructions. Manuals+ will review the question and use this page’s manual context to help answer it.