AbleHome cbe4ded2-3e7c-4c5e-8804-15ef10260e62
AbleHome Electronic Digital Cash Drop Depository Safe
Model: cbe4ded2-3e7c-4c5e-8804-15ef10260e62
Product Overview
The AbleHome Electronic Digital Cash Drop Depository Safe is designed for secure cash handling in retail environments and businesses. Its robust construction and electronic locking mechanism provide reliable protection for your valuables. The top slot allows for convenient and secure deposits without needing to open the main compartment.
- Digital Entry: Features an electronic keypad for secure access.
- Master Key Override: Includes a master key for access in case of forgotten or lost codes.
- Durable Construction: Made from thick solid steel for enhanced security.
- Secure Deposit Slot: Top-loading slot for quick and secure cash or document deposits.
- Mounting Options: Can be mounted to a wall or floor using the included anchor bolts.
Setup Instructions
1. Unpacking and Inspection
Carefully remove the safe from its packaging. Inspect the safe for any signs of damage. Ensure all components, including the safe, master keys, and anchor bolts, are present.

Image: The AbleHome Electronic Digital Cash Drop Depository Safe, showcasing its compact design and electronic keypad.
2. Battery Installation
The electronic keypad requires batteries for operation. Locate the battery compartment, typically on the inside of the door or behind the keypad. Insert the required batteries (usually AA or AAA, refer to the compartment for exact type and quantity) ensuring correct polarity. Close the compartment securely.
3. Initial Code Programming
Upon first use, you will need to program your personal identification number (PIN). Refer to the specific instructions provided on the keypad or inside the safe door for the exact programming sequence. PIN numbers can be programmed to be 3 to 8 digits long. It is recommended to choose a strong, memorable code.

Image: A detailed view of the electronic keypad, showing the number buttons and indicator lights.
4. Master Key Usage
The safe comes with a master key for emergency access. This key can override the electronic lock. Locate the hidden keyhole, usually behind a removable cover on the keypad. Insert the master key and turn to open the safe. It is crucial to keep the master keys in a secure location, separate from the safe.

Image: The electronic keypad with the cover removed, revealing the hidden keyhole for master key access.
5. Mounting the Safe
For enhanced security, the safe can be mounted to a wall or floor. Pre-drilled holes are provided on the back and bottom of the safe. Use the included anchor bolts to secure the safe to a solid surface. Ensure the mounting location is stable and can support the weight of the safe and its contents.
Operating Instructions
1. Opening the Safe with Digital Code
- Enter your programmed PIN on the electronic keypad.
- Press the 'PROCEED' or 'ENTER' button (refer to your specific keypad for the exact button).
- If the code is correct, the safe will unlock, and you can turn the handle to open the door.
2. Opening the Safe with Master Key
- Locate the hidden keyhole on the keypad (usually under a small cover).
- Insert the master key into the keyhole.
- Turn the key clockwise or counter-clockwise (depending on the lock mechanism) while simultaneously turning the handle to open the door.
3. Making Deposits
The safe features a top-loading deposit slot, allowing you to securely drop cash, envelopes, or small documents without opening the main door. This feature enhances security by preventing unauthorized access to the safe's contents during deposits.

Image: A close-up view of the top deposit slot, indicating its dimensions for various items.

Image: The top deposit slot, highlighting its anti-fishing design to prevent removal of deposited items.
4. Closing and Locking the Safe
After placing items inside, close the door firmly. The safe will automatically lock once the door is closed, or you may need to turn the handle to engage the bolts. Always ensure the door is fully secured before leaving the safe unattended.
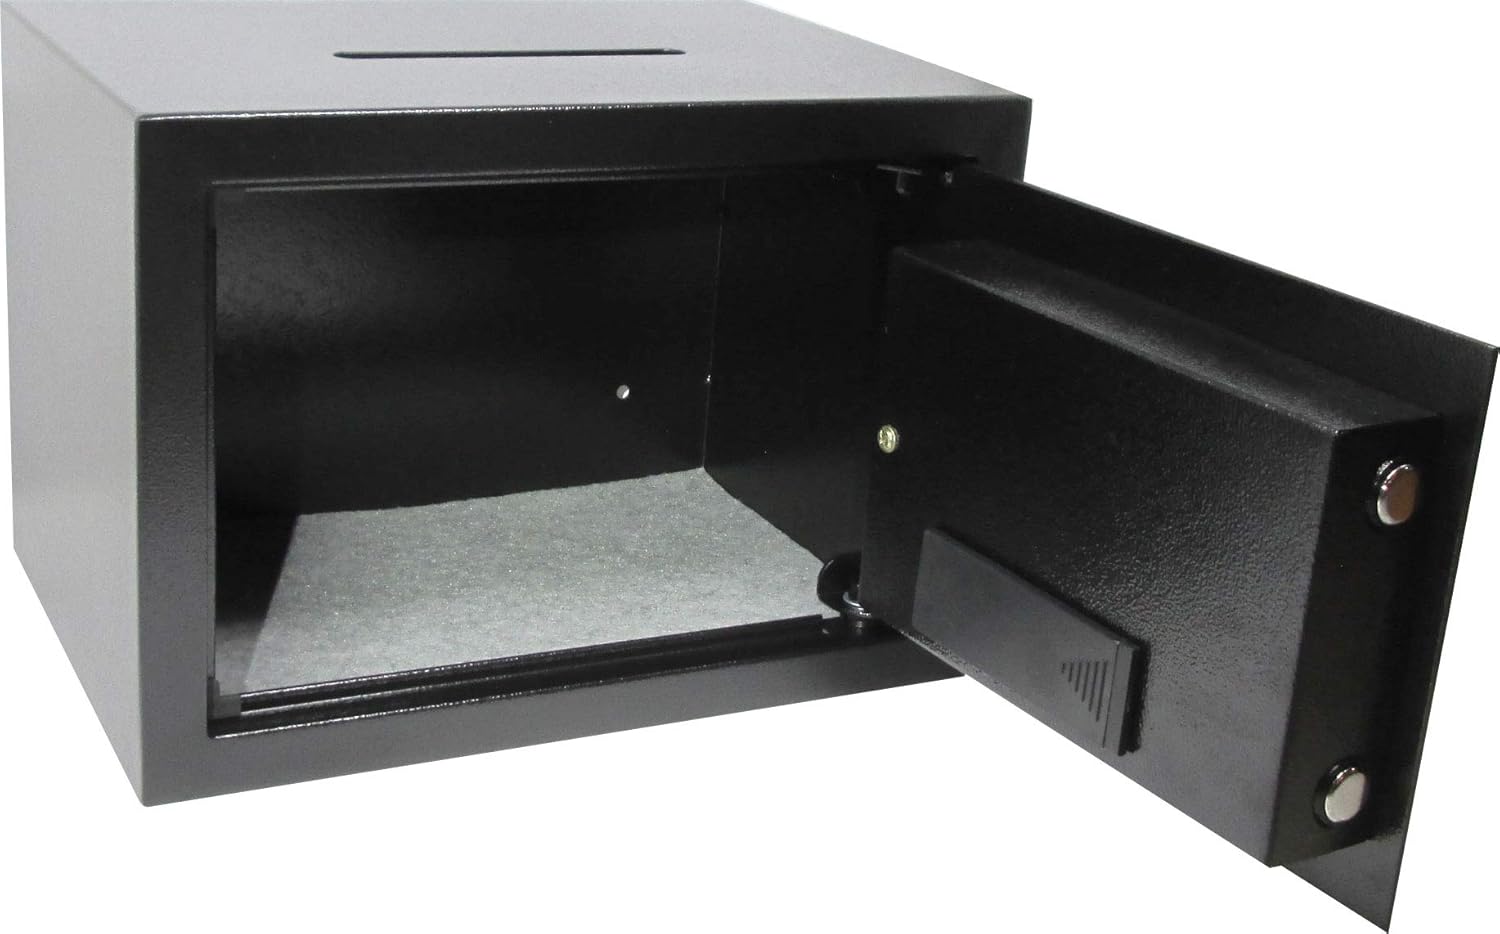
Image: The interior of the safe, showing the two shelves for organized storage of valuables.
Maintenance
1. Battery Replacement
When the 'LOW BATTERY' indicator on the keypad illuminates, it is time to replace the batteries. Promptly replace all batteries with new ones of the correct type to ensure continuous operation of the electronic lock. Do not mix old and new batteries.
2. Cleaning
Clean the exterior of the safe with a soft, damp cloth. Avoid using abrasive cleaners or solvents, as these can damage the finish. Ensure the keypad and lock mechanism are kept free of dust and debris.
3. Key Management
Always keep the master keys in a secure location, separate from the safe itself. Do not store the master keys inside the safe, as this defeats the purpose of having an emergency override.
Troubleshooting
Safe Will Not Open with Digital Code
- Incorrect Code: Ensure you are entering the correct PIN. Try re-entering the code carefully.
- Low Batteries: Check the 'LOW BATTERY' indicator. If illuminated, replace the batteries.
- Keypad Malfunction: If the keypad is unresponsive, try removing and reinserting the batteries. If the issue persists, use the master key to open the safe.
Forgotten Digital Code
If you forget your digital code, use the master key to open the safe. Once open, you can reset or reprogram a new digital code following the instructions in the 'Setup Instructions' section.
Door Does Not Close Properly
- Obstruction: Check for any items or debris obstructing the door or locking bolts.
- Alignment: Ensure the safe is on a level surface and the door is properly aligned with the frame.
Specifications
| Feature | Detail |
|---|---|
| Brand | AbleHome |
| Model Number | cbe4ded2-3e7c-4c5e-8804-15ef10260e62 |
| Lock Type | Electronic, Key |
| Material | Alloy Steel |
| Item Weight | 15 pounds |
| Package Dimensions | 15 x 12 x 11 inches |
| Mounting Type | Wall Mount |
| Included Components | Keys, Bolts |
| Special Feature | Portable |
| Water Resistance Level | Not Water Resistant |

Image: The safe with key dimensions indicated: 13.75" (width), 10" (depth), 9.75" (height).
Warranty and Support
This product is manufactured by AbleHome. For specific warranty information and support inquiries, please refer to the documentation included with your purchase or contact AbleHome customer service directly. Standard return policies typically allow for returns within 30 days of purchase, subject to seller terms.
Related Documents - cbe4ded2-3e7c-4c5e-8804-15ef10260e62
 |
MEDION P5110 D Multimedia PC User Manual Comprehensive user manual for the MEDION P5110 D Multimedia PC, covering setup, operation, safety, troubleshooting, and warranty information for home use. |
 |
Philips 8804 Series Smart TV User Manual Comprehensive user guide for Philips 8804 Series Smart TVs (models 50PUS8804 and 55PUS8804), covering setup, operation, features, connectivity, and troubleshooting. |
 |
Rittal VX25 Enclosure System: Assembly, Operation, and Technical Data Comprehensive guide for the Rittal VX25 enclosure baying system, covering assembly instructions, operating procedures, safety guidelines, technical specifications, and maintenance for industrial electrical installations. |
 |
iOptron SmartStar® Cube™-G Series Telescope Mount Instruction Manual Comprehensive instruction manual for the iOptron SmartStar® Cube™-G Series Mount and Telescopes (models 8800, 8802, 8803, 8804), covering assembly, setup, operation, and maintenance for astronomical observation. |
 |
16-inch NUT RIVETER - Model DY-8804 User Manual User manual for the 16-inch NUT RIVETER, model DY-8804. Provides details on intended use, safety precautions, included components, hole size guide, and operation instructions for installing various rivet nuts. |
 |
Krausmann 8804 Angle Grinder Operation Manual Comprehensive operation manual for the Krausmann 8804 Angle Grinder, covering safety regulations, specifications, assembly, operation, maintenance, warranty, and disposal. |