Introduction
The Blackmagic Design ATEM Mini Pro ISO is a powerful four-input live production switcher designed for multi-camera live streaming and recording. This device allows you to connect multiple HDMI sources, such as cameras or computers, and switch between them seamlessly for professional-quality live productions. The ISO model uniquely records all individual input streams along with the program output, creating a DaVinci Resolve project file for flexible post-production.
This manual provides detailed instructions on setting up, operating, maintaining, and troubleshooting your ATEM Mini Pro ISO to ensure optimal performance.

Image: The ATEM Mini Pro ISO switcher, accompanied by a 6-foot HDMI cable and a 10-pack of fastener straps.
Setup
1. Unpacking and Initial Inspection
Carefully remove all components from the packaging. Verify that all items listed in the "What's in the box" section of your product description are present:
- Blackmagic Design ATEM Mini Pro ISO HDMI Switcher
- 12V Power Supply
- HDA-106 High Speed HDMI Cable with Ethernet (Black, 6ft)
- 10 Pack Fastener Straps
- 1 Year Warranty Information

Image: Included High-Speed HDMI cables for connecting video sources.

Image: One of the included fastener straps for cable management.
2. Connecting Power
Connect the included 12V power supply to the 'POWER' input on the rear panel of the ATEM Mini Pro ISO. Plug the power supply into a suitable electrical outlet.
3. Connecting Video Sources
The ATEM Mini Pro ISO features four HDMI inputs. Connect your cameras, computers, or other video sources to the HDMI inputs labeled '1' through '4' on the rear panel using high-quality HDMI cables. Ensure your sources are set to a compatible video format (e.g., 1080p, 720p).

Image: Rear panel connections of the ATEM Mini Pro ISO, highlighting the HDMI inputs.
4. Connecting to a Monitor (Program Output)
Connect a monitor to the 'HDMI OUT' port on the rear panel to view your program output. This output displays the live switched video feed.
5. Connecting to a Computer (Control & Recording)
For full control and recording capabilities, connect the ATEM Mini Pro ISO to your computer via the USB-C port. Download and install the latest ATEM Software Control from the Blackmagic Design website. This software allows for advanced control, media management, and configuration.
For ISO recording, connect an external USB drive (SSD recommended) to the USB-C port. The ATEM Mini Pro ISO will record individual input streams and the program output directly to this drive.
6. Connecting Audio
Connect microphones or other audio sources to the 'MIC 1' and 'MIC 2' 3.5mm stereo input jacks. You can also embed audio from your HDMI sources. Audio levels can be adjusted using the ATEM Software Control.
Operating Instructions
1. Powering On
Once all connections are made, the ATEM Mini Pro ISO will power on automatically when connected to the 12V power supply.
2. Basic Switching
The front panel features large buttons for direct switching between your HDMI inputs. Press the numbered buttons (1-4) to select the desired input for your program output. Use the 'CUT' button for an instant transition or 'AUTO' for a smooth, pre-set transition.
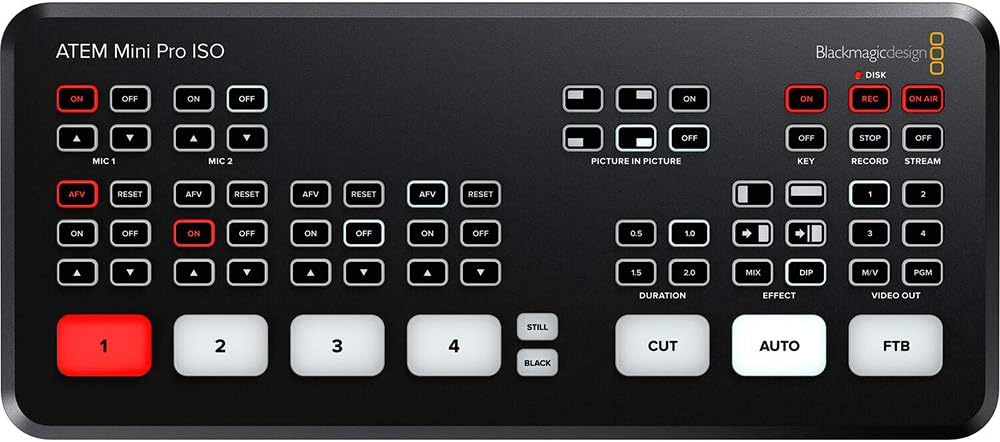
Image: The control panel of the ATEM Mini Pro ISO, showing input selection and transition buttons.
3. Recording and Streaming
To begin recording, ensure an external USB drive is connected and press the 'REC' button on the front panel. The 'ON AIR' button initiates live streaming via the Ethernet connection, provided you have configured streaming settings in the ATEM Software Control.
4. Advanced Features (via ATEM Software Control)
The ATEM Mini Pro ISO supports a variety of advanced features accessible through the ATEM Software Control, including:
- Up/Down Keyers: For layering graphics or video.
- Advanced Chroma Keyer: For green screen/blue screen effects.
- Picture-in-Picture (DVE): For displaying one video source within another.
- Media Player: For storing and playing still images (PNG, TGA, BMP, JPEG, TIFF formats supported, up to 20 stills).
- Audio Mixer: Comprehensive control over all audio inputs.
- Color Generators: For creating solid color backgrounds.
Maintenance
To ensure the longevity and optimal performance of your ATEM Mini Pro ISO, follow these simple maintenance guidelines:
- Cleaning: Use a soft, dry cloth to clean the exterior of the unit. Avoid abrasive cleaners or solvents.
- Ventilation: Ensure the unit has adequate ventilation to prevent overheating. Do not block any vents.
- Cable Management: Use the included fastener straps to keep cables tidy and prevent strain on ports.
- Software Updates: Regularly check the Blackmagic Design website for firmware and software updates to ensure you have the latest features and bug fixes.
Troubleshooting
| Problem | Possible Cause | Solution |
|---|---|---|
| No video output on monitor. | Incorrect HDMI cable connection; monitor input not selected; incompatible video format. | Check HDMI cable connections. Ensure monitor is set to the correct HDMI input. Verify source video format is compatible with ATEM Mini Pro ISO. |
| Cannot connect to ATEM Software Control. | USB cable issue; software not installed or outdated; network configuration (for Ethernet). | Ensure USB-C cable is securely connected. Reinstall or update ATEM Software Control. Check network settings if connecting via Ethernet. |
| Recording fails or stops unexpectedly. | USB drive not connected or full; drive speed too slow; drive format issue. | Verify USB drive is connected and has sufficient free space. Use a high-speed SSD. Ensure drive is formatted correctly (e.g., exFAT). |
| No audio from microphones. | Microphones not connected properly; audio levels too low in software; microphone type mismatch. | Check microphone connections. Adjust audio levels in ATEM Software Control. Ensure microphones are compatible (e.g., TRS for stereo). |
Specifications
| Feature | Detail |
|---|---|
| Model Number | SWATEMMINIBPRISO |
| Inputs | 4 x HDMI (Video), 2 x 3.5mm Stereo (Audio) |
| Outputs | 1 x HDMI (Program Out), 1 x USB-C (Webcam Out/Recording) |
| Connectivity | Ethernet (for control and streaming), USB-C (for control and external drive recording) |
| Recording | ISO recording of all inputs + program output to external USB drive (DaVinci Resolve project file generation) |
| Dimensions | 10.9 x 5.9 x 5.2 inches (Package Dimensions) |
| Weight | 2.74 pounds (Item Weight) |
| Supported Still Image Formats | PNG, TGA, BMP, JPEG, TIFF (up to 20 stills) |
Warranty and Support
The Blackmagic Design ATEM Mini Pro ISO comes with a 1 Year Warranty. For technical support, software downloads, and additional resources, please visit the official Blackmagic Design website. Keep your proof of purchase for warranty claims.
For the most up-to-date information and comprehensive guides, refer to the official Blackmagic Design support pages.


