
CREA 40104BN
CREA 3-Way Kitchen Faucet Model 40104BN User Manual
Brushed Chrome, Pull-Out, Single Lever Control
1. Introduction
Thank you for choosing the CREA 3-Way Kitchen Faucet, Model 40104BN. This innovative faucet combines a standard kitchen faucet with a filtered drinking water dispenser, offering convenience and efficiency. It features a durable stainless steel body, a pull-out sprayer with two modes, and a single lever for precise control of water temperature and flow.

Figure 1: Comparison of CREA 3-Way Faucet with traditional separate faucets, highlighting the integrated design.

Figure 2: The CREA 3-Way Kitchen Faucet is suitable for various installations, including kitchen, bar counter, and RV sinks.

Figure 3: Key features include a High Arc Gooseneck, Smooth Retract Technology, Magnetic Docking Arm, Dual Function Sprayer, Drinking Water Spout, Smart Single Handle, Superior Ceramic Valve, Lead-Free Stainless Steel Construction, and 360° Swivel Spout & Sprayer.
2. Safety Information
- Always turn off the main water supply before beginning any installation or maintenance.
- Wear appropriate personal protective equipment, such as safety glasses and gloves, during installation.
- Ensure all connections are secure to prevent leaks. Do not overtighten.
- If you are unsure about any part of the installation process, consult a qualified plumber.
- Keep small parts out of reach of children.
3. Package Contents
Verify that all components are present before installation:
- CREA 3-Way Kitchen Faucet (Main Unit)
- Deck Plate
- Filter Connector Tube
- Mounting Hardware (nuts, washers, gaskets)
- Quick Install Guide
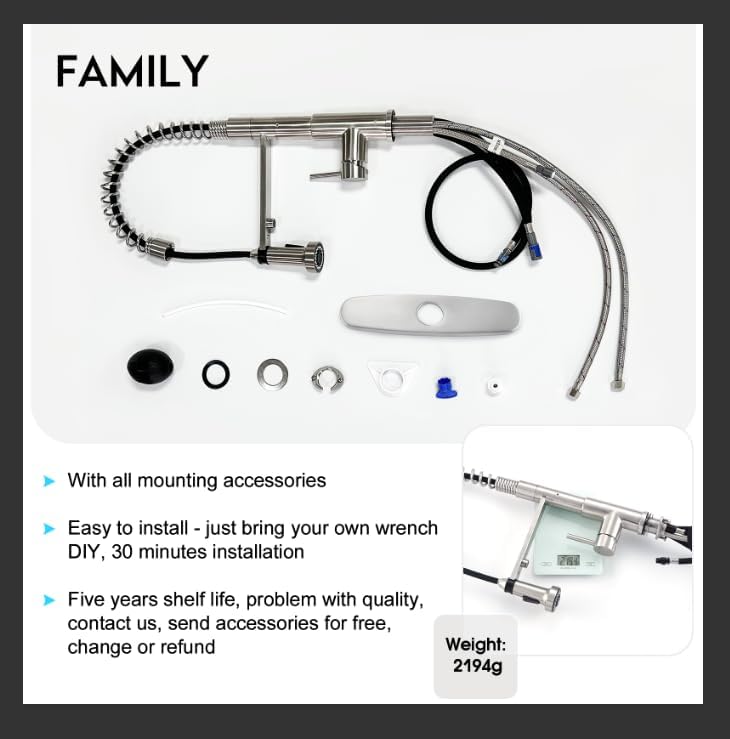
Figure 4: All included components for installation.
4. Specifications
| Feature | Detail |
|---|---|
| Brand | CREA |
| Model Name | 40104BN |
| Material | Stainless Steel |
| Finish Type | Brushed |
| Mounting Type | Deck Mount (Single Hole) |
| Number of Handles | 1 (Lever) |
| Spout Design | High Arc Gooseneck |
| Special Features | 360° Swivel, Filtered Water Dispenser, Pull Down Sprayer, Spring Spout |
| Spout Height | 7 inches |
| Spout Reach | 8.3 inches |
| Mounting Hole Diameter | 1.34 - 1.77 inches (34mm - 45mm) |
| Max Countertop Thickness | 1.57 inches (40mm) |
| Supply Hose Length | 23.62 inches (600mm) |

Figure 5: Detailed dimensions and installation requirements for the faucet.

Figure 6: The faucet features a 304 stainless steel body with upgraded surface technology for enhanced durability and resistance to rust, wear, and fingerprints.
5. Setup and Installation
Before you begin, ensure you have the necessary tools: adjustable wrench, plumber's tape, and a bucket. Turn off the main water supply to your kitchen sink.
- Prepare the Mounting Hole: Ensure your sink or countertop has a mounting hole with a diameter between 1.34 inches (34mm) and 1.77 inches (45mm). The maximum countertop thickness should not exceed 1.57 inches (40mm).
- Install the Faucet Body: Insert the faucet body through the mounting hole. If using the deck plate, place it on the sink/countertop before inserting the faucet.
- Secure the Faucet: From underneath the sink, slide the rubber gasket, metal washer, and mounting nut onto the threaded shank. Tighten the mounting nut securely with an adjustable wrench.
- Connect Water Supply Lines: Connect the hot and cold water supply lines to your existing hot and cold water valves. Use plumber's tape on the threads for a watertight seal.
- Connect Filtered Water Line: Connect your reverse osmosis (RO) or water filter system's output line to the dedicated filtered water inlet on the faucet using the provided filter connector tube. The quick-connect adapter simplifies this process.
- Install the Sprayer Hose and Weight: Feed the pull-out sprayer hose through the faucet body. Attach the counterweight to the hose underneath the sink to ensure smooth retraction.
- Test for Leaks: Turn on the main water supply slowly and check all connections for leaks. Operate the faucet in all modes to ensure proper function.

Figure 7: Diagram showing the connections for hot, cold, and filtered drinking water lines.
6. Operating Instructions
6.1. Hot and Cold Water Control
The single lever controls both water flow and temperature. Move the lever forward for cold water and backward for hot water. Adjust the lever's position to achieve your desired temperature and flow rate.
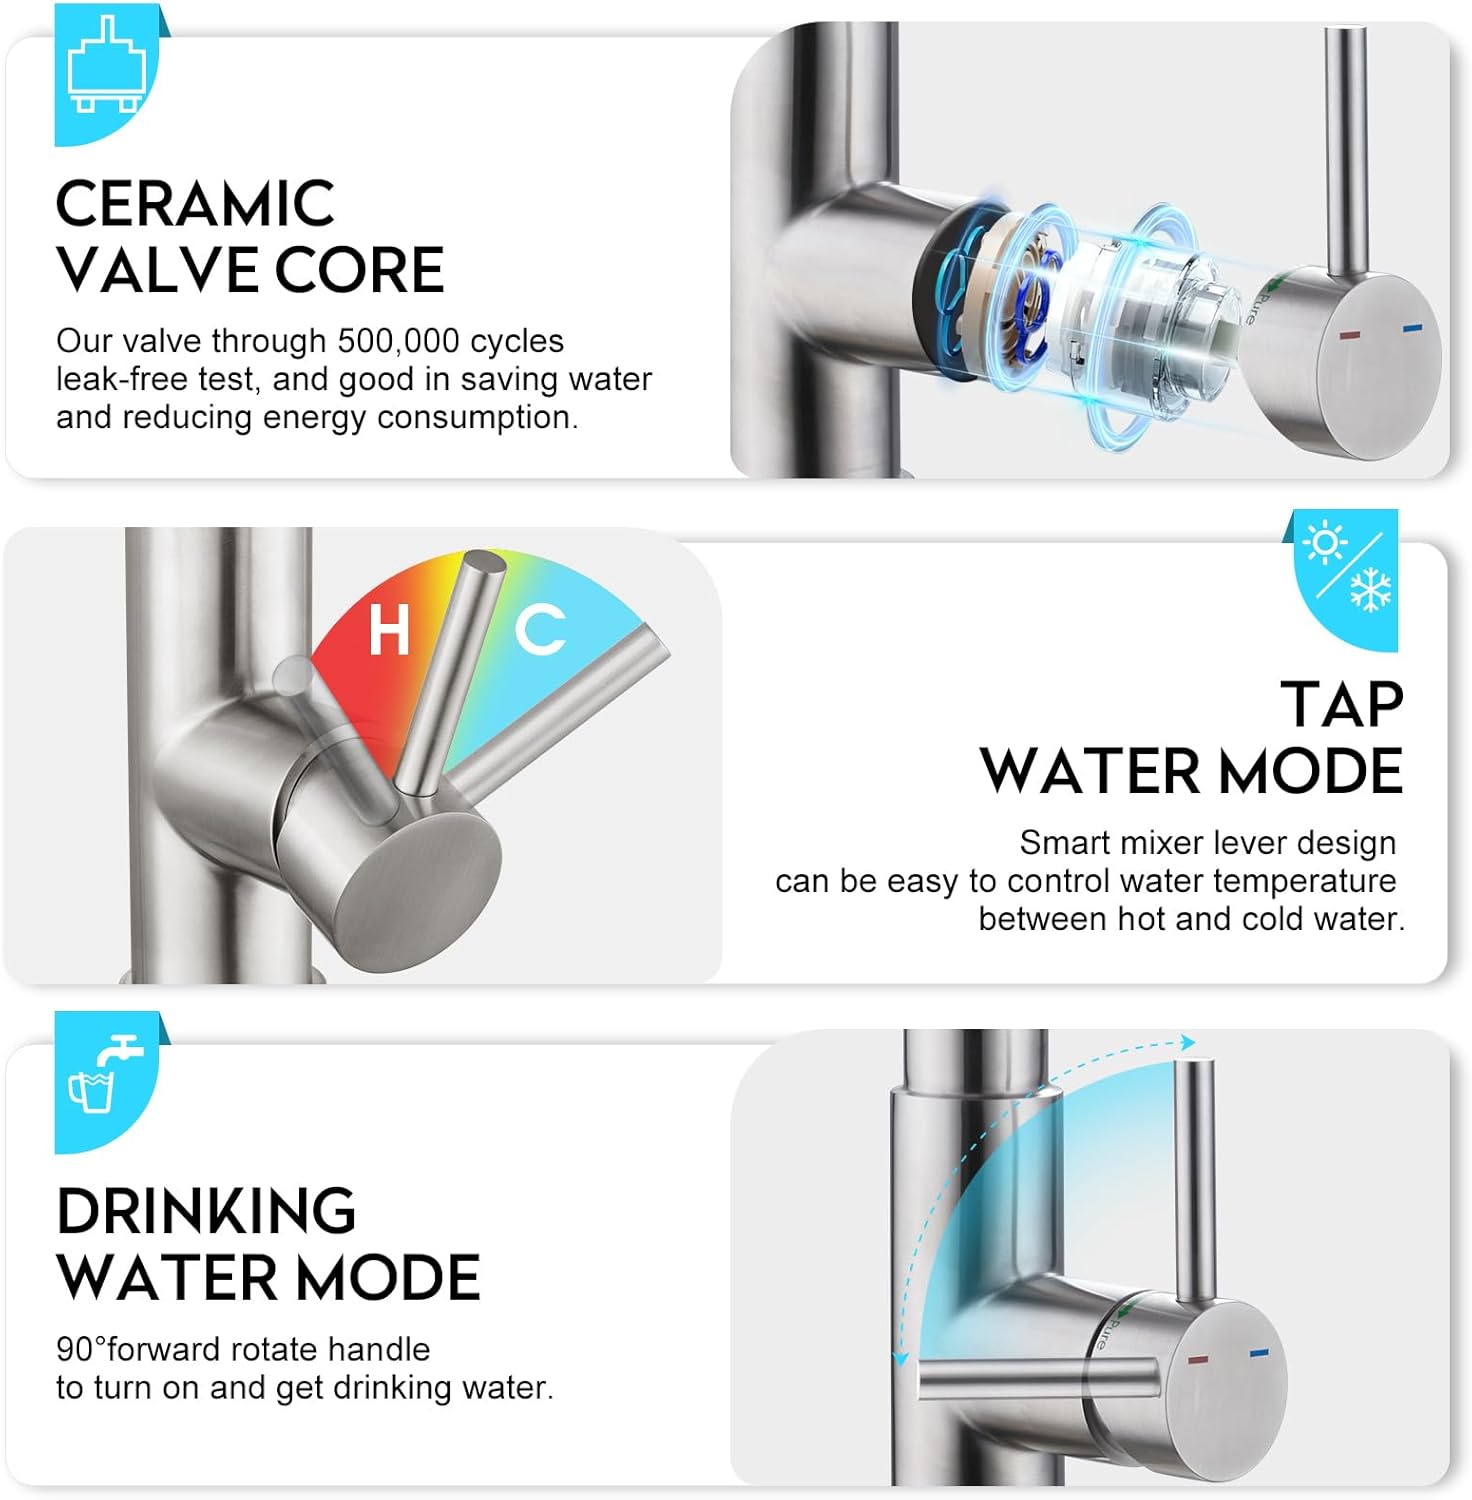
Figure 8: The smart mixer lever allows easy control of hot and cold water.
Video 1: Official demonstration of the CREA 3-Way Kitchen Faucet's features and operation.
6.2. Filtered Drinking Water Mode
To access filtered drinking water, rotate the smaller handle 90 degrees forward. This activates the dedicated filtered water spout, providing clean water directly from your RO or filter system.

Figure 9: The faucet delivers 1.7 GPM filtered water, filling a cup in approximately 3 seconds.
Video 2: Official video showcasing the 3-in-1 functionality of the CREA Kitchen Faucet, including the drinking water feature.
6.3. Pull-Out Sprayer with Dual Modes
The faucet features a pull-out sprayer with a 20-inch flexible hose and 360-degree swivel for extended reach and full sink coverage. It offers two water modes:
- Stream Mode: Provides a steady, aerated flow for filling pots and general washing, minimizing splashing.
- Spray Mode: Delivers a powerful, wide spray for rinsing dishes and cleaning the sink effectively.
The sprayer head retracts smoothly back into the spout thanks to its magnetic docking arm and counterweight system.

Figure 10: The pull-out sprayer offers both stream and spray modes for versatile cleaning.

Figure 11: The faucet's 360-degree rotatable spout optimizes kitchen workflow.
7. Maintenance
7.1. Cleaning
To maintain the brushed chrome finish, clean the faucet regularly with a soft cloth and mild soap. Avoid abrasive cleaners, harsh chemicals, or scouring pads, as these can damage the finish. The upgraded surface technology is designed to be anti-fingerprint and easy to clean.
7.2. Ceramic Valve Core
The faucet is equipped with an advanced ceramic valve core, tested for over 500,000 leak-free cycles. This ensures long-lasting performance and helps reduce water and energy consumption. No regular maintenance is required for the valve core.

Figure 12: The ceramic valve core ensures leak-free operation and durability.
7.3. Sprayer Nozzle Cleaning
The sprayer features easy-to-clean rubber nozzles. If mineral deposits accumulate, gently rub the rubber nozzles to dislodge them. The smart sprayer also has a removable and washable aerator for thorough cleaning.

Figure 13: The smart sprayer features a removable aerator and easy-to-clean rubber nozzles to prevent mineral buildup.
8. Troubleshooting
| Problem | Possible Cause | Solution |
|---|---|---|
| Low Water Flow | Clogged aerator; partially closed shut-off valve; kinked supply line. | Clean or replace aerator; ensure shut-off valves are fully open; check supply lines for kinks. |
| Leaks from Faucet Base | Loose mounting nut; improperly seated gasket; damaged O-rings. | Tighten mounting nut; ensure gaskets are correctly positioned; inspect and replace O-rings if damaged. |
| Sprayer Does Not Retract Fully | Improperly positioned counterweight; obstruction under the sink; weak magnetic docking. | Adjust counterweight position; clear any obstructions; ensure the magnetic docking arm is clean and free of debris. |
| Water Temperature Issues | Incorrect hot/cold supply line connection; issue with water heater. | Verify hot and cold lines are connected correctly; check water heater settings. |
9. Warranty and Support
9.1. Warranty Information
The CREA 3-Way Kitchen Faucet comes with a limited 5-year warranty. This warranty covers defects in materials and workmanship under normal use. If you encounter any quality issues within this period, please contact CREA customer support for assistance, including free accessories, replacement, or refund.
9.2. Customer Support
For technical assistance, warranty claims, or any questions regarding your CREA product, please visit the official CREA website or contact their customer service department. Refer to your purchase documentation for specific contact details.
Online Resources: Visit the CREA Store on Amazon
Ask a question about this manual
Ask about setup, troubleshooting, compatibility, parts, safety, or missing instructions. Manuals+ will review the question and use this page’s manual context to help answer it.