1. Introduction
This manual provides instructions for the proper use and maintenance of your YIQI Adjustable Camber Gauge. This tool is designed to accurately measure the camber and castor angles on a vehicle's wheel hub or brake disc. It assists in maintaining correct wheel alignment, ensuring even tire wear, and returning the strut to its original camber position after suspension work.
2. Safety Information
Always exercise caution when working on vehicles. Ensure the vehicle is securely supported on a level surface using appropriate jack stands. Wear personal protective equipment, such as safety glasses and gloves. Do not use the tool if it appears damaged. Keep hands and clothing clear of moving parts.
3. Product Overview
The YIQI Adjustable Camber Gauge is a compact and precise tool for automotive wheel alignment. It features a magnetic base for secure attachment and a clear level indicator for angle measurement.
- Dimensions: Approximately 12.7 cm (5 inches) in length and 5 cm (1.97 inches) in diameter.
- Material: Durable Aluminum construction.
- Measurement Range: Adjustable leveling from -5 degrees to 5 degrees.
- Attachment: Magnetic base for secure mounting on wheel hubs or brake discs.

Figure 3.1: The YIQI Adjustable Camber Gauge, illustrating its main components including the level indicator and magnetic base.

Figure 3.2: A detailed view of the gauge's level indicator, showing the negative and positive degree markings for camber measurement.

Figure 3.3: Side profile of the camber gauge, highlighting the knurled adjustment knob used for zeroing the level.

Figure 3.4: A close-up view of the magnetic base, designed for secure attachment to metallic surfaces.

Figure 3.5: Diagram showcasing the fillet angle design and adjustable panel, which contribute to the gauge's precision and ease of use.
4. Setup
Before using the camber gauge, ensure your vehicle is on a level surface and properly secured. The gauge requires no complex assembly. It is ready for use directly out of the packaging.
- Prepare the vehicle by removing the wheel and any four-wheel positioning sensors or clamps that might obstruct access to the brake disc or wheel hub.
- Clean the surface where the gauge will be attached to ensure a strong magnetic connection.
5. Operating Instructions
Follow these steps to accurately measure camber and castor angles:
- Attach the Gauge: Carefully attach the magnetic base of the gauge to the side of the brake disc or wheel hub. Ensure it is firmly seated and stable.
- Zero the Gauge: Adjust the gauge's internal level mechanism until the bubble indicates a zero-degree reading. This calibrates the tool to the current surface.
- Install Positioning Parts (if applicable): For specific alignment procedures, install any required special positioning parts or tools as per your vehicle's service manual.
- Measure and Adjust: Use appropriate special tools to adjust the vehicle's suspension components. Observe the level indicator on the camber gauge to achieve the desired measurement angle. The gauge allows for adjustments within a range of -5 to 5 degrees.
- Fine-Tuning: If a slight deviation is observed with other alignment locators, minor adjustments can be made to the vehicle's undercarriage. Small deviations typically do not cause significant alignment faults.
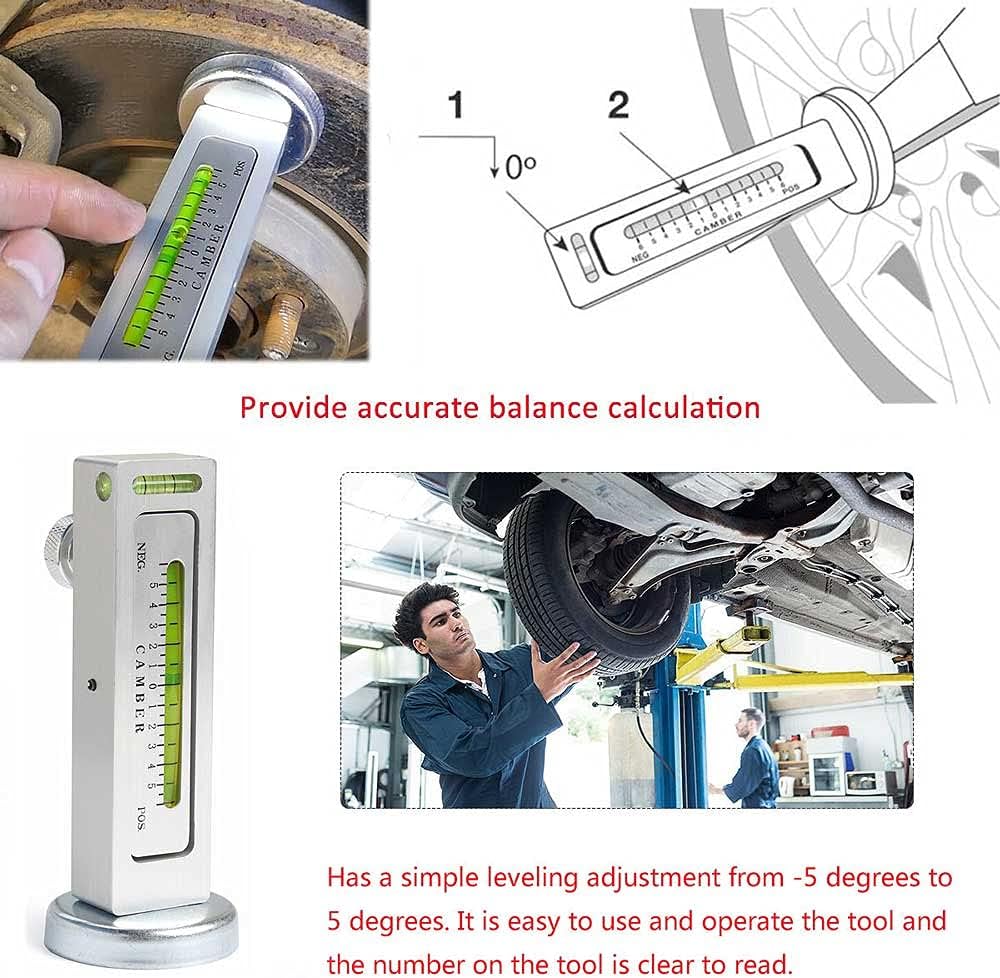
Figure 5.1: The camber gauge attached to a wheel hub, demonstrating its application in measuring wheel angles. An accompanying diagram illustrates suspension components.

Figure 5.2: The camber gauge in position on a brake disc, providing a visual representation of how measurements are taken during wheel alignment.
6. Maintenance
To ensure the longevity and accuracy of your YIQI Adjustable Camber Gauge, follow these maintenance guidelines:
- Cleaning: After each use, wipe the gauge clean with a soft, dry cloth to remove any dirt, grease, or debris. Do not use abrasive cleaners or solvents.
- Storage: Store the gauge in a dry, cool place, away from direct sunlight and extreme temperatures. Keep it in its original packaging or a protective case to prevent damage.
- Inspection: Periodically inspect the gauge for any signs of damage, such as cracks, dents, or a compromised magnetic base. Ensure the level indicator is clear and functional.
7. Troubleshooting
If you encounter issues while using the YIQI Adjustable Camber Gauge, consider the following:
- Inaccurate Readings:
- Ensure the gauge is securely attached to a clean, flat metallic surface.
- Verify that the gauge was properly zeroed on a level surface before taking measurements.
- Confirm the vehicle is on a level surface.
- Gauge Not Attaching Securely:
- Check the magnetic base for debris or damage.
- Ensure the attachment surface on the vehicle is clean and free of rust or paint that might interfere with the magnetic connection.
For persistent issues, please refer to the support information in Section 9.
8. Specifications
| Feature | Detail |
|---|---|
| Manufacturer | YIQI |
| Part Number | 5" x 1.97" (Size reference) |
| Item Weight | 9.9 ounces |
| Package Dimensions | 7.48 x 3.07 x 2.24 inches |
| Material | Aluminum |
| Measurement Range | -5 to 5 degrees |
| ASIN | B08G8L4FGT |
| Date First Available | August 19, 2020 |
9. Warranty and Support
For warranty information or technical support regarding your YIQI Adjustable Camber Gauge, please contact the manufacturer directly through their official website or customer service channels. Keep your purchase receipt as proof of purchase.