1. Product Overview
This manual provides instructions for the JIARUIXIN JR1958RX-2S 2.4G Bluetooth Remote Control and Receiver Kit, designed as a replacement part for children's electric ride-on cars. The kit includes one control box and one remote control.
The JR1958RX-2S control box operates at 12V with a maximum load current of 30A and utilizes 2.4G Bluetooth for control. It is compatible with JR1958RX and JR1758RX versions.

Image 1.1: JIARUIXIN JR1958RX-2S Control Box and Remote Control. This image displays the main components of the kit, including the black control box with its specifications label and the white remote control.
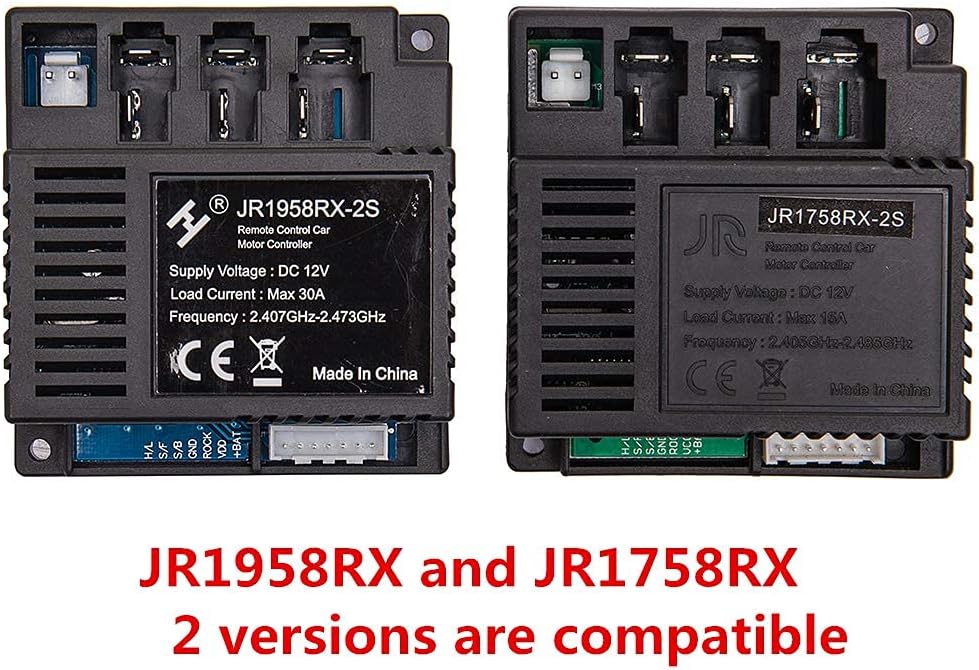
Image 1.2: Comparison of JR1958RX-2S and JR1758RX Control Boxes. This image shows two control boxes side-by-side, highlighting their similar appearance and confirming compatibility between the JR1958RX-2S and JR1758RX models.
2. Safety Information
- WARNING: Not for children under 3 years. Contains small parts which pose a choking hazard.
- Always load two AAA (1.5V) batteries into the remote control according to the polarity diagram.
- Non-rechargeable batteries must not be recharged.
- Do not mix different types of batteries, or new and used batteries.
- Batteries must be inserted with the correct polarity.
- Exhausted batteries must be removed from the toy.
- The supply terminals must not be short-circuited.
- The positive and negative poles of the power supply (battery) for the control box cannot be reversed. Reversing them will burn out the controller.
- Retain the product packaging as it contains important information.

Image 2.1: Remote Control Battery Safety Warning. This image shows a warning label detailing battery installation and general safety precautions for the remote control.
3. Setup and Installation
3.1 Control Box Installation
To ensure compatibility, open your electric ride-on car and visually compare your existing control box with the JR1958RX-2S. If the appearance is identical, this replacement part should fit your car.
Refer to the wiring diagram below for correct connection of the control box to your ride-on car's components. Ensure all connections are secure and observe correct polarity, especially for the main power supply.

Image 3.1: JR1958RX-2S Wiring Diagram. This diagram illustrates how to connect the control box to various components of the ride-on car, including the power switch, accelerator, motors, and 12V power supply. It also shows the pinout for H/L, S/F, S/B, GND, ROCK, VDD, and +BAT connections.
3.2 Remote Control Battery Installation
- Locate the battery compartment on the back of the remote control.
- Use a screwdriver to loosen the screw securing the battery compartment cover.
- Insert two AAA (1.5V) batteries, ensuring they are placed according to the polarity markings inside the compartment.
- Replace the cover and tighten the screw.

Image 3.2: Remote Control Battery Installation Diagram. This image shows the back of the remote control, indicating where to loosen a screw and how to insert two AAA (1.5V) batteries into the compartment.
4. Operating Instructions
4.1 Pairing the Remote Control (Matching Frequency)
The remote control needs to be paired with the control box for the first use or after replacing the batteries. Follow these steps:
- Ensure the remote controller has two AAA batteries installed (refer to Section 3.2).
- Turn OFF the power switch on the electric ride-on vehicle.
- On the remote control, press and hold the '▲' (Forward) and '▼' (Back) keys simultaneously for 3 seconds to initiate the matching code process. The red indicator light on the remote will begin to flicker.
- While the remote's indicator light is flickering, turn ON the power switch on the vehicle.
- The red indicator light on the remote control should stop flashing, indicating that the pairing process is successful.
4.2 Remote Control Functions
The remote control features several buttons for operating the ride-on car:
- 'S' Button: Sets the speed.
- One LED lit: Low speed
- Two LEDs lit: Medium speed
- Three LEDs lit: High speed
- '▲' Button: Forward movement.
- '▼' Button: Backward movement.
- '◀' Button: Turn Left.
- '▶' Button: Turn Right.
- 'P' Button: Press and hold to engage the brake. All LEDs on the remote will flicker when the brake is active.

Image 4.1: Remote Control Front View. This image displays the front of the white remote control, showing the 'S' button for speed, directional arrows (forward, back, left, right), and the 'P' button for brake.
5. Maintenance
- Keep the control box and remote control clean and dry. Avoid exposure to moisture or extreme temperatures.
- Regularly check all wiring connections to the control box to ensure they are secure and free from corrosion.
- Replace remote control batteries promptly when they are exhausted to prevent leakage and damage.
- Store the product in a cool, dry place when not in use.
6. Troubleshooting
- Remote Control Not Responding:
- Check if the remote control batteries are correctly installed and not exhausted. Replace if necessary.
- Perform the pairing (matching frequency) procedure as described in Section 4.1.
- Vehicle Not Powering On/Functioning:
- Verify that the control box is correctly wired according to the diagram in Section 3.1. Ensure the positive and negative poles of the power supply are not reversed, as this can damage the controller.
- Confirm that the vehicle's main power switch is in the ON position.
- Check the vehicle's battery for charge and proper connection.
- Incorrect Part Fit:
- Ensure the appearance of the purchased control box matches your original unit. Refer to Image 1.2 for compatibility information.
7. Specifications
| Brand | JIARUIXIN |
| Model Number | JR1958RX-2S (Compatible with JR1758RX) |
| Supply Voltage | DC 12V |
| Load Current | Max 30A |
| Frequency | 2.407GHz-2.473GHz |
| Control Method | 2.4G Bluetooth |
| Material | Plastic |
| Item Weight | 5.9 Ounces |
| Item Dimensions | 4.2 x 3.2 x 3.2 inches |
| Remote Control Batteries | 2 x AAA (1.5V) (not included) |
8. Warranty and Support
For warranty information or technical support, please contact the seller or manufacturer directly through your purchase platform. Keep your purchase records and product packaging, as they may be required for warranty claims or support inquiries.