1. Introduction
Thank you for choosing the Qiuge XJ-01 Wireless Fish Finder. This device is designed to assist anglers by providing real-time information about underwater environments, including fish location, water depth, and bottom contours. Utilizing advanced sonar technology, it offers a convenient and effective way to enhance your fishing experience. Please read this manual thoroughly before operating the device to ensure proper use and optimal performance.

Image 1.1: The Qiuge XJ-01 Wireless Fish Finder, showing the handheld display unit with an antenna and the spherical wireless sonar sensor.
2. Product Features
- Depth Range: 0.6 to 36 meters (approximately 2 to 118 feet).
- Sonar Frequency: 125KHz for accurate detection.
- Radio Frequency: 2.4 GHz for stable wireless communication.
- Sonar Beam Angle: 45 degrees, providing a wide detection area.
- Wireless Operating Range: Up to 100 meters (approximately 328 feet) from the display unit.
- Display: 2.4-inch LCD screen with an 11-level white LED backlight for visibility in various conditions.
- Operating Modes: Supports both sonar graphic mode and stationary floating mode.
- Sensitivity Levels: 10 adjustable sensitivity levels for varied water conditions.
- Adjustable Settings: Customizable fish alarm, depth alarm, contrast, scroll speed (10 levels), fish display, and unit settings (depth: meters/feet, temperature: Celsius/Fahrenheit).
- Data Display: Shows water bottom contours, structure, water depth, fish size, and location.
- Operating Temperature: -10°C to 70°C (14°F to 158°F).
- Automatic Activation: The sonar sensor automatically activates when placed in water.
- Memory Function: The device retains previous settings upon power-off.
3. Package Contents
Please verify that all items are present in the package:
- Qiuge XJ-01 Fish Finder Display Unit
- Wireless Sonar Sensor
- USB Charging Cable
- Antenna for Display Unit
- Neck Strap
- User Manual (this document)

Image 3.1: The complete package contents, including the fish finder display, wireless sonar sensor, USB cable, antenna, and user manual.
4. Setup
4.1 Charging the Display Unit
Before first use, fully charge the display unit. Connect the provided USB cable to the charging port on the display unit and plug the other end into a USB power source (e.g., computer USB port, USB wall adapter, or portable power bank). The charging indicator will show the charging status.
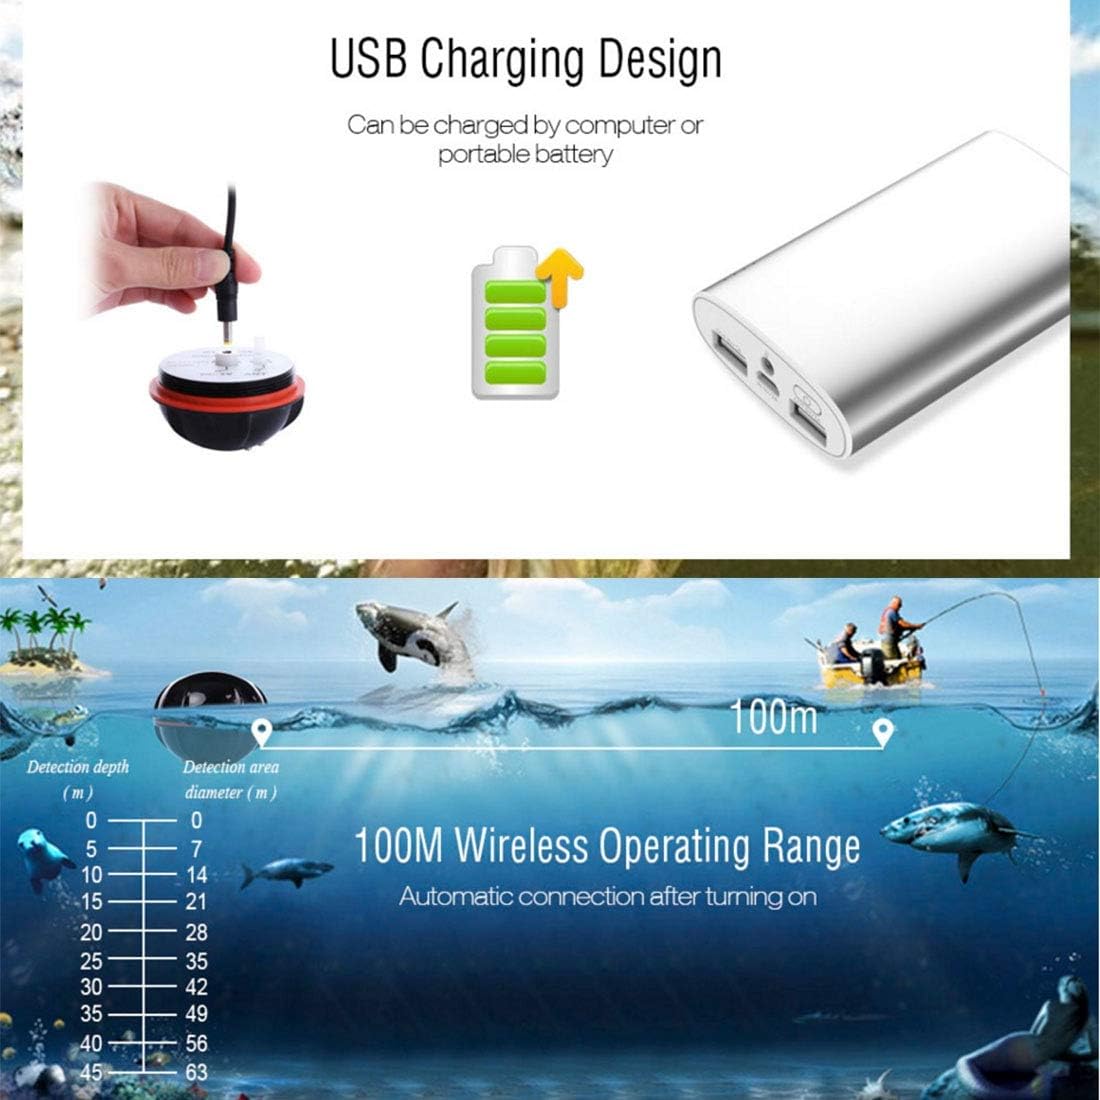
Image 4.1: Illustration of the USB charging method for the fish finder, showing connection to a portable battery.
4.2 Attaching the Antenna
Screw the antenna firmly into the designated port at the top of the display unit. Ensure it is securely attached for optimal wireless signal reception from the sonar sensor.
4.3 Preparing the Sonar Sensor
The wireless sonar sensor is designed to activate automatically when its two metal contacts are submerged in water. No manual power button is required for the sensor. Ensure the sensor is clean and dry before storage to prevent continuous power drain.

Image 4.2: Close-up view of the wireless sonar sensor, indicating its sonar frequency (125KHz) and voltage requirements (DC-5V, 3.3V).
5. Operation
5.1 Powering On/Off
Press and hold the power button (usually marked with a power symbol) on the display unit to turn it on or off.
5.2 Deploying the Sonar Sensor
Cast or place the wireless sonar sensor into the water. Ensure it floats freely with the bottom facing downwards. The sensor will automatically activate and begin transmitting data to the display unit.

Image 5.1: The fish finder display unit being held while the sonar sensor is deployed in the water, with a person fishing in the background.
5.3 Interpreting the Display
The LCD screen provides various information:
- Water Depth: Shown numerically, typically at the top or side of the screen.
- Fish Icons: Represent fish detected, often categorized by size (small, medium, large).
- Bottom Contour: Displays the shape and structure of the lakebed or riverbed.
- Water Temperature: Indicated numerically.
- Battery Indicator: Shows the remaining battery life of the display unit and sometimes the sensor.

Image 5.2: The fish finder display illustrating how different fish icons represent small, medium, and large fish sizes.

Image 5.3: Diagram showing the 45-degree sonar beam angle and its ability to detect fish at various depths, up to 45 meters.
5.4 Adjusting Settings
Use the navigation buttons on the display unit to access the menu and adjust settings such as:
- Sensitivity: Increase for clearer readings in deep or murky water, decrease to filter out noise.
- Fish Alarm: Turn on/off to be alerted when fish are detected.
- Depth Alarm: Set an alarm for specific depth ranges.
- Units: Switch between meters/feet for depth and Celsius/Fahrenheit for temperature.
- Backlight: Adjust the brightness of the LED backlight.
- Scroll Speed: Control how quickly the sonar graph scrolls across the screen.

Image 5.4: Illustration of the 100-meter wireless operating range and a table detailing detection depth versus detection area diameter.
6. Maintenance
6.1 Cleaning
After each use, especially in saltwater, rinse the sonar sensor and display unit with fresh water. Wipe them dry with a soft cloth. Do not use abrasive cleaners or solvents.
6.2 Drying the Sonar Sensor
It is crucial to thoroughly dry the two metal contacts on the sonar sensor after use. If these contacts remain wet, the sensor may continue to draw power, leading to battery depletion. Ensure the sensor is completely dry before storage.
6.3 Storage
Store the device in a cool, dry place away from direct sunlight and extreme temperatures. If storing for an extended period, ensure the display unit's battery is partially charged (around 50%) to prolong its lifespan.
7. Troubleshooting
7.1 No Signal from Sonar Sensor
- Ensure the sonar sensor is fully submerged in water and its metal contacts are wet.
- Check that the display unit is powered on and the antenna is securely attached.
- Verify that the distance between the sensor and the display unit is within the 100m operating range.
- Check for any obstructions between the sensor and the display unit.
7.2 Inaccurate Depth Readings
- Adjust the sensitivity setting. Too high sensitivity can pick up noise, too low can miss details.
- Ensure the sonar sensor is floating stably and not obstructed by weeds or debris.
- Check for strong currents or excessive boat movement that might affect readings.
7.3 Display Unit Not Turning On
- Ensure the battery is charged. Connect to a USB power source and allow it to charge for at least 30 minutes before attempting to power on again.
- Press and hold the power button for several seconds.
8. Specifications
| Feature | Specification |
|---|---|
| Model | XJ-01 (Manufacturer Reference: QiuGe5874) |
| Brand | Tuzi |
| Depth Range | 0.6 - 36 meters (2 - 118 feet) |
| Sonar Frequency | 125KHz |
| Radio Frequency | 2.4 GHz |
| Sonar Beam Angle | 45 degrees |
| Wireless Operating Range | Up to 100 meters (328 feet) |
| Display Type | 2.4-inch LCD with LED Backlight |
| Operating Temperature | -10°C to 70°C (14°F to 158°F) |
| Power Source | Rechargeable (via USB) |
| Item Weight | 442 Grams |
9. Warranty and Support
This product is covered by a standard manufacturer's warranty. For specific warranty terms and conditions, please refer to the documentation provided at the time of purchase or contact your retailer. For technical support, troubleshooting assistance, or spare parts inquiries, please contact the customer service department of your original point of purchase. Please have your product model number (XJ-01) and purchase details ready when contacting support.