1. Introduction
This manual provides comprehensive instructions for the safe installation, operation, and maintenance of your Home Decorators Collection Hansfield 56-inch LED Outdoor Natural Iron Ceiling Fan. Please read this manual thoroughly before installation and retain it for future reference. This ceiling fan is designed for both indoor and outdoor use, offering efficient air circulation and integrated LED lighting.

Image 1.1: The Hansfield 56-inch LED Outdoor Natural Iron Ceiling Fan with its remote control.
2. Safety Information
WARNING: To reduce the risk of fire, electric shock, or personal injury, always follow these instructions:
- Ensure the installation site is structurally sound and can support the fan's weight (approximately 24 lbs).
- All wiring must be in accordance with national and local electrical codes. Consult a qualified electrician if you are unsure.
- Disconnect power at the main circuit breaker before installation or servicing.
- Do not operate the fan with damaged blades or housing.
- Avoid placing objects in the path of the fan blades.
- This fan is wet-rated, suitable for outdoor use in covered areas.
3. Package Contents
Verify that all components listed below are included in your package:
- Ceiling Fan Motor Housing
- 5 Seasoned Wood Plastic Blades
- Dome Style Light Kit with Frosted Glass
- 4.5-inch Downrod
- Mounting Hardware
- Handheld Remote Control (with battery)
- Receiver for Remote Control (pre-installed)
- Decorative Canopy Ring and Coupling Cover
4. Setup and Installation
Before You Begin: Ensure power is disconnected at the circuit breaker. Read all instructions carefully.

Image 4.0: The Hansfield ceiling fan installed, demonstrating its appearance with a downrod.
4.1 Mounting Options
The Hansfield fan supports Angled Mount, Downrod Mount, and Flush Mount installations. A 4.5-inch downrod is included. For higher ceilings, longer downrods may be required for optimal performance.

Image 4.1: Recommended downrod lengths based on ceiling height for optimal air circulation.
4.2 Wiring
The receiver for the remote control is pre-installed for simplified wiring. Follow the detailed wiring diagrams provided in the separate installation guide (if applicable) or consult a qualified electrician. Ensure all connections are secure.
4.3 Blade Attachment
Attach the five seasoned wood plastic blades securely to the motor housing. Ensure all screws are tightened to prevent wobbling during operation.

Image 4.2: Detail of blade attachment to the fan motor housing.
4.4 Light Kit Installation
The dome-style light kit features frosted glass and a twist-and-lock mechanism for quick installation. Ensure the integrated 14-Watt Samsung LED module is properly seated before securing the glass dome.

Image 4.3: View of the fan's motor housing and the integrated LED light fixture.
5. Operating Instructions
Your Hansfield ceiling fan is operated using the included handheld remote control.
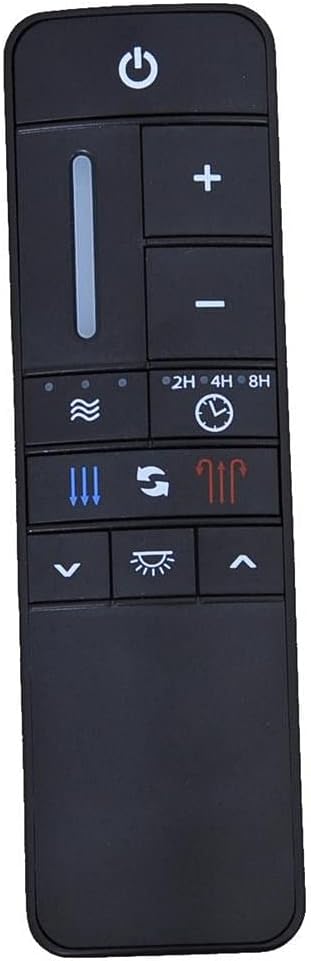
Image 5.1: The handheld remote control for the Hansfield ceiling fan.
5.1 Remote Control Functions
- Power Button: Turns the fan and light on/off.
- Fan Speed Control (+/-): Adjusts between 9 fan speeds.
- Light Dimming (Up/Down arrows): Adjusts the brightness of the integrated LED light.
- Reverse Function (Arrow icon): Changes the direction of blade rotation for summer (downward airflow) or winter (upward airflow) operation.
- Timer (2H, 4H, 8H): Sets the fan to turn off automatically after 2, 4, or 8 hours.
- Random Breeze Function: Simulates a natural breeze by varying fan speeds.
The DC motor provides up to 70% energy efficiency compared to conventional AC motors and allows for 9 speeds and reverse function directly from the remote.
6. Maintenance
Regular maintenance ensures optimal performance and longevity of your ceiling fan.
- Cleaning: To clean the fan, wipe with a soft, damp cloth. Do not use abrasive cleaners or solvents. Ensure power is off before cleaning.
- Blade Care: The seasoned wood plastic blades are designed for wet weather use. Periodically check for dust buildup and clean as needed.
- Tighten Fasteners: Periodically check all screws and fasteners on the fan and mounting hardware to ensure they are secure.
- Light Kit: The integrated LED module is designed for long life and typically does not require replacement. If issues arise, consult customer support.
7. Troubleshooting
If you experience issues with your fan, refer to the following common problems and solutions:
| Problem | Possible Cause | Solution |
|---|---|---|
| Fan does not start | No power to the fan; loose wire connections; remote control battery low. | Check circuit breaker. Ensure all wiring connections are secure. Replace remote control battery. |
| Fan wobbles | Loose blade screws; unbalanced blades; loose mounting hardware. | Tighten all blade screws. Check for balanced blades (use a balancing kit if necessary). Ensure mounting hardware is secure. |
| Light does not work | Loose wire connection to light kit; LED module issue. | Check light kit wiring. Contact customer support if the integrated LED module is faulty. |
| Remote control not responding | Low battery; remote not paired. | Replace remote battery. Refer to the installation guide for remote pairing instructions. |
8. Specifications
| Feature | Detail |
|---|---|
| Model Number | YG656-NI |
| Fan Size | 56 inches |
| Motor Type | DC Motor |
| Number of Blades | 5 |
| Blade Material | Acrylonitrile Butadiene Styrene (ABS) - Seasoned Wood Plastic |
| Light Type | Integrated LED |
| LED Wattage | 14 Watts (Samsung LED module) |
| Color Temperature | 3000K (Warm White) |
| Airflow (CFM) | 6411 CFM |
| Control Type | Remote Control (9 speeds, light dimming, timer, random breeze, reverse) |
| Indoor/Outdoor Use | Indoor, Outdoor (Wet Rated) |
| Mounting Options | Angled Mount, Downrod Mount, Flush Mount |
| Product Weight | 19.36 lbs (Fan), 24 lbs (Package) |
| UPC | 792145372127 |

Image 8.1: Key dimensions of the Hansfield 56-inch ceiling fan.
9. Warranty and Support
For warranty information or technical support, please refer to the documentation included with your purchase or contact Home Decorators Collection customer service. Keep your proof of purchase for warranty claims.
For further assistance, visit the Home Decorators Collection website or contact their support line.