1. Introduction
This manual provides comprehensive instructions for the installation, operation, maintenance, and troubleshooting of the Dorman 920-024 Front Driver Side Master Window Switch Assembly. This component is designed as a direct replacement for the factory switch in specific Chevrolet and GMC models, aiming to restore original equipment functionality for power windows and door locks.
The Dorman 920-024 switch assembly is engineered to match the fit, function, and performance of the original part, ensuring a seamless integration into your vehicle's interior. It addresses common issues such as non-functional windows, inoperable door locks, or damaged internal electrical components of the original switch.

Figure 1: Angled view of the Dorman 920-024 Master Window Switch Assembly, showing the five buttons and mirror control.
2. Vehicle Compatibility
The Dorman 920-024 is compatible with the following Chevrolet and GMC models. Always verify fitment for your specific vehicle trim using a compatibility tool before installation.
- Chevrolet Silverado 1500: 2003, 2004, 2005, 2006
- Chevrolet Silverado 1500 Classic: 2007
- Chevrolet Silverado 2500: 2003, 2004, 2005, 2006
- Chevrolet Silverado 2500 HD: 2003, 2004, 2005, 2006
- Chevrolet Silverado 2500 HD Classic: 2007
- Chevrolet Silverado 3500: 2003, 2004, 2005, 2006
- Chevrolet Silverado 3500 Classic: 2007
- GMC Sierra 1500: 2003, 2004, 2005, 2006
- GMC Sierra 1500 Classic: 2007
- GMC Sierra 2500: 2003, 2004
- GMC Sierra 2500 HD: 2003, 2004, 2005, 2006
- GMC Sierra 2500 HD Classic: 2007
- GMC Sierra 3500: 2003, 2004, 2005, 2006
- GMC Sierra 3500 Classic: 2007
3. Installation Instructions
Replacing the master window switch assembly typically involves removing the old unit and connecting the new one. It is recommended to consult a vehicle-specific service manual for detailed instructions or seek professional assistance if you are unfamiliar with automotive electrical work.
- Safety First: Disconnect the vehicle's negative battery terminal before beginning any electrical work to prevent short circuits or electrical shock.
- Access the Switch: Carefully pry the old switch assembly from its housing in the door panel. This often requires a plastic trim removal tool to avoid damaging the surrounding trim.
- Disconnect Wiring: Once the old switch is loose, carefully disconnect all electrical connectors attached to it. Note the orientation of each connector if there are multiple.
- Connect New Switch: Connect the electrical connectors to the new Dorman 920-024 switch assembly. Ensure all connections are secure and properly seated.
- Install New Switch: Carefully align the new switch assembly with the opening in the door panel and press it firmly into place until it snaps securely.
- Reconnect Battery: Reconnect the vehicle's negative battery terminal.
- Test Functionality: Test all functions of the new switch, including all power windows, door locks, and mirror adjustments, to ensure proper operation.

Figure 2: Using a trim removal tool to carefully detach the switch assembly from the door panel.

Figure 3: Detaching the wiring harness from the rear of the switch assembly.

Figure 4: Connecting the wiring harness to the new Dorman 920-024 switch.

Figure 5: Testing the functionality of the newly installed Dorman window switch.
4. Operating Instructions
The Dorman 920-024 Master Window Switch Assembly provides control over the vehicle's power windows, door locks, and side mirrors from the driver's side. The layout is designed to replicate the original equipment for intuitive use.
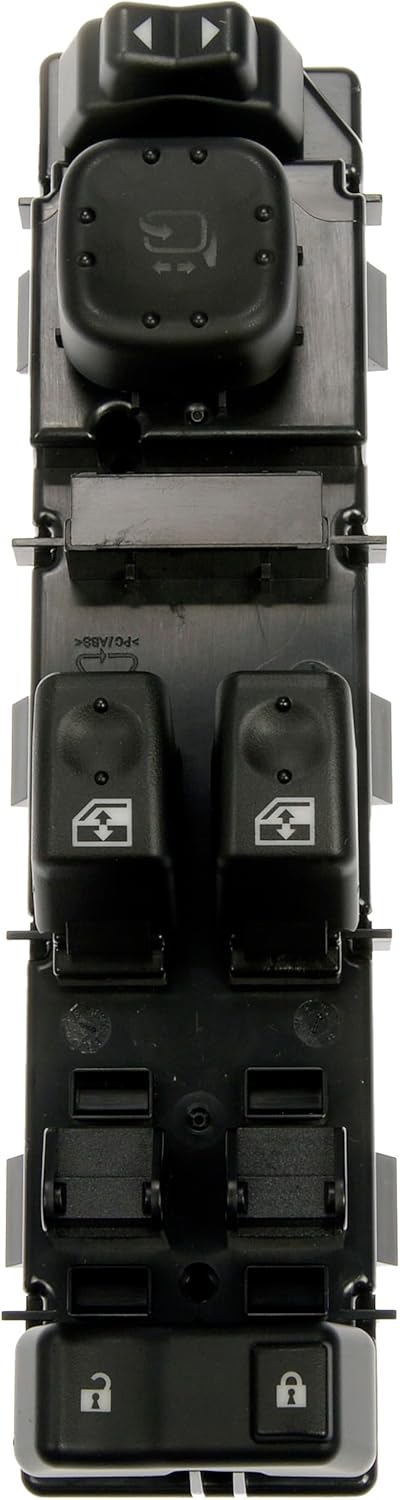
Figure 6: Top view of the switch assembly, highlighting button functions.
- Window Controls: Each window switch operates its corresponding window. Press down to lower the window, pull up to raise it. The driver's window typically features an auto-down function (press fully down and release).
- Window Lock: The window lock button (often depicted with a window icon and a diagonal line through it) disables the passenger window controls, preventing passengers from operating their windows. The driver's window control remains active.
- Door Lock/Unlock: The lock and unlock buttons control the central locking system for all doors. Press the lock button to secure all doors, and the unlock button to open them.
- Mirror Adjustment: The mirror control joystick or directional pad allows for adjustment of the left (L) and right (R) side mirrors. Select the desired mirror (L or R) and then use the directional control to position the mirror.
5. Maintenance
The Dorman 920-024 Master Window Switch Assembly is designed for durability and requires minimal maintenance. To ensure its longevity and proper function:
- Keep Clean: Periodically wipe the surface of the switch with a soft, dry cloth to remove dust and debris. Avoid using harsh chemicals or abrasive cleaners, which can damage the plastic or markings.
- Avoid Liquid Exposure: Prevent liquids from spilling onto or entering the switch assembly, as this can cause electrical malfunctions.
- Gentle Operation: Operate the buttons and controls with gentle, firm pressure. Excessive force is unnecessary and can lead to premature wear.
6. Troubleshooting
If you experience issues with your Dorman 920-024 Master Window Switch Assembly, consider the following troubleshooting steps:
- No Functionality (Windows, Locks, Mirrors):
- Check Connections: Ensure all electrical connectors at the back of the switch are securely plugged in.
- Check Fuses: Consult your vehicle's owner's manual for the location of the power window, door lock, or mirror fuses and check if any are blown. Replace if necessary.
- Battery Connection: Verify the vehicle's battery terminals are clean and securely connected.
- Intermittent Operation:
- Intermittent issues can sometimes be caused by loose connections or minor debris. Re-seat the connectors and ensure the switch is clean.
- Mirror Adjustment Issues (e.g., no telescoping, lights staying on):
- Some vehicle configurations, particularly those with factory towing mirrors or advanced mirror features, may exhibit unexpected behavior with aftermarket switches. If specific mirror functions (like telescoping or heating) do not work as expected, or if mirror lights remain illuminated, this may indicate a compatibility nuance with certain vehicle sub-systems.
- Verify the part number and compatibility specifically for your vehicle's exact mirror options.
- Battery Drain:
- If a battery drain occurs after installation, it could indicate an internal fault within the switch assembly or an incompatibility causing a component to remain active. Disconnect the switch and observe if the battery drain ceases. If so, the switch may be faulty or incompatible.
If troubleshooting steps do not resolve the issue, contact Dorman customer support or a qualified automotive technician.
7. Specifications
| Feature | Detail |
|---|---|
| Model Number | 920-024 |
| Brand | Dorman |
| Operation Mode | ON-OFF |
| Current Rating | 1 Amps |
| Operating Voltage | 12 Volts |
| Contact Type | Normally Open |
| Connector Type | Clamp |
| Terminal Type | Screw |
| Dimensions (L x W x H) | 8 x 3 x 2 inches |
| Circuit Type | 5-way |
| Mounting Type | Plug-In Mount |
| Actuator Type | Push Button |
| Contact Material | Metal |
| Number of Positions | 5 |
| Color | Black |
| Item Weight | 11.3 ounces |
| OEM Part Numbers | 1S15661; 1S17415; DWS-248; DWS226; DWS248; WSC1029; WSC1079; WST348; 10398567; 15112969; 15125140; 15162500; 15173691; 15186212; 15195298; 15202848; 15745880; 15883322 |
8. Warranty and Support
Dorman products are manufactured to high-quality standards. For specific warranty information regarding your Dorman 920-024 Master Window Switch Assembly, please refer to the documentation included with your purchase or visit the official Dorman website.
For technical assistance, troubleshooting guidance beyond this manual, or warranty claims, please contact Dorman customer support directly. Contact information can typically be found on the Dorman website or product packaging.
Dorman Official Website: www.dormanproducts.com