1. Introduction
Thank you for choosing the Ginour Line Laser Level Model 34. This manual provides essential information for the safe and effective operation, maintenance, and troubleshooting of your device. Please read it thoroughly before use and retain it for future reference.

Image: Ginour Line Laser Level Model 34, showing its compact design and green laser lines.
2. Safety Information
WARNING: This device emits Class II laser radiation. Direct eye exposure to the laser beam can cause eye injury. Always follow these safety guidelines:
- Do not stare directly into the laser beam.
- Do not point the laser beam at people or animals.
- Use the provided protective glasses to reduce glare and protect your eyes, especially during extended use or in bright conditions.
- Do not attempt to modify or disassemble the laser level. Repairs should only be performed by authorized personnel.
- Keep the device out of reach of children.
- Operate the device in a safe environment, away from flammable materials.

Image: The Ginour Line Laser Level package contents, including the laser level, protective glasses, and reflector. The glasses are essential for eye protection.
3. Package Contents
Verify that all items are present in your package:
- Ginour Line Laser Level Model 34
- Protective Glasses
- Reflector Plate
- L-shaped Magnetic Bracket
- USB Type-C Charging Cable
- User Manual (this document)
- Storage Pouch/Package
4. Specifications
| Laser Class | Class II, Green Laser |
| Working Distance | Up to 30m (100ft); up to 50m (164ft) with receiver (not included) |
| Line Accuracy | ±3mm / 15m (±0.2mm/m) |
| Plumb Point Accuracy | Upper: 3mm/15m; Downward: 6mm/15m |
| Laser Extension Angle | 110° (Horizontal & Vertical) |
| Self-Leveling Range | ±4° ±1° |
| Power Source | Rechargeable Lithium-Ion Battery |
| Charging Interface | USB Type-C |
| Charging Time | Approximately 3 hours |
| Operating Time | Up to 8 hours (continuous use) |
| IP Rating | IP54 (Dustproof and Splashproof) |
| Material | Plastic with TPR soft rubber exterior |
| Mounting Thread | 1/4 inch and 5/8 inch |
| Dimensions (L x W x H) | 13.1 x 12.8 x 13.7 cm |
| Weight | 680 g |
5. Setup
5.1 Charging the Device
Before first use, fully charge the laser level. Connect the provided USB Type-C cable to the charging port on the device and to a compatible USB power source (e.g., wall adapter, computer, power bank). The charging indicator will show the charging status.

Image: The Ginour Line Laser Level connected to various USB power sources for charging, highlighting the USB-C port.
5.2 Mounting Options
The Ginour Line Laser Level offers versatile mounting options:
- Magnetic Base: Attach the L-shaped magnetic bracket to the bottom of the laser level. The strong magnets allow it to be securely mounted on most metal surfaces, such as steel studs or beams. The bracket also allows for 360° horizontal rotation.
- Tripod Mounting: The device features standard 1/4 inch and 5/8 inch threaded apertures on its base and the magnetic bracket, making it compatible with most tripods or laser poles.
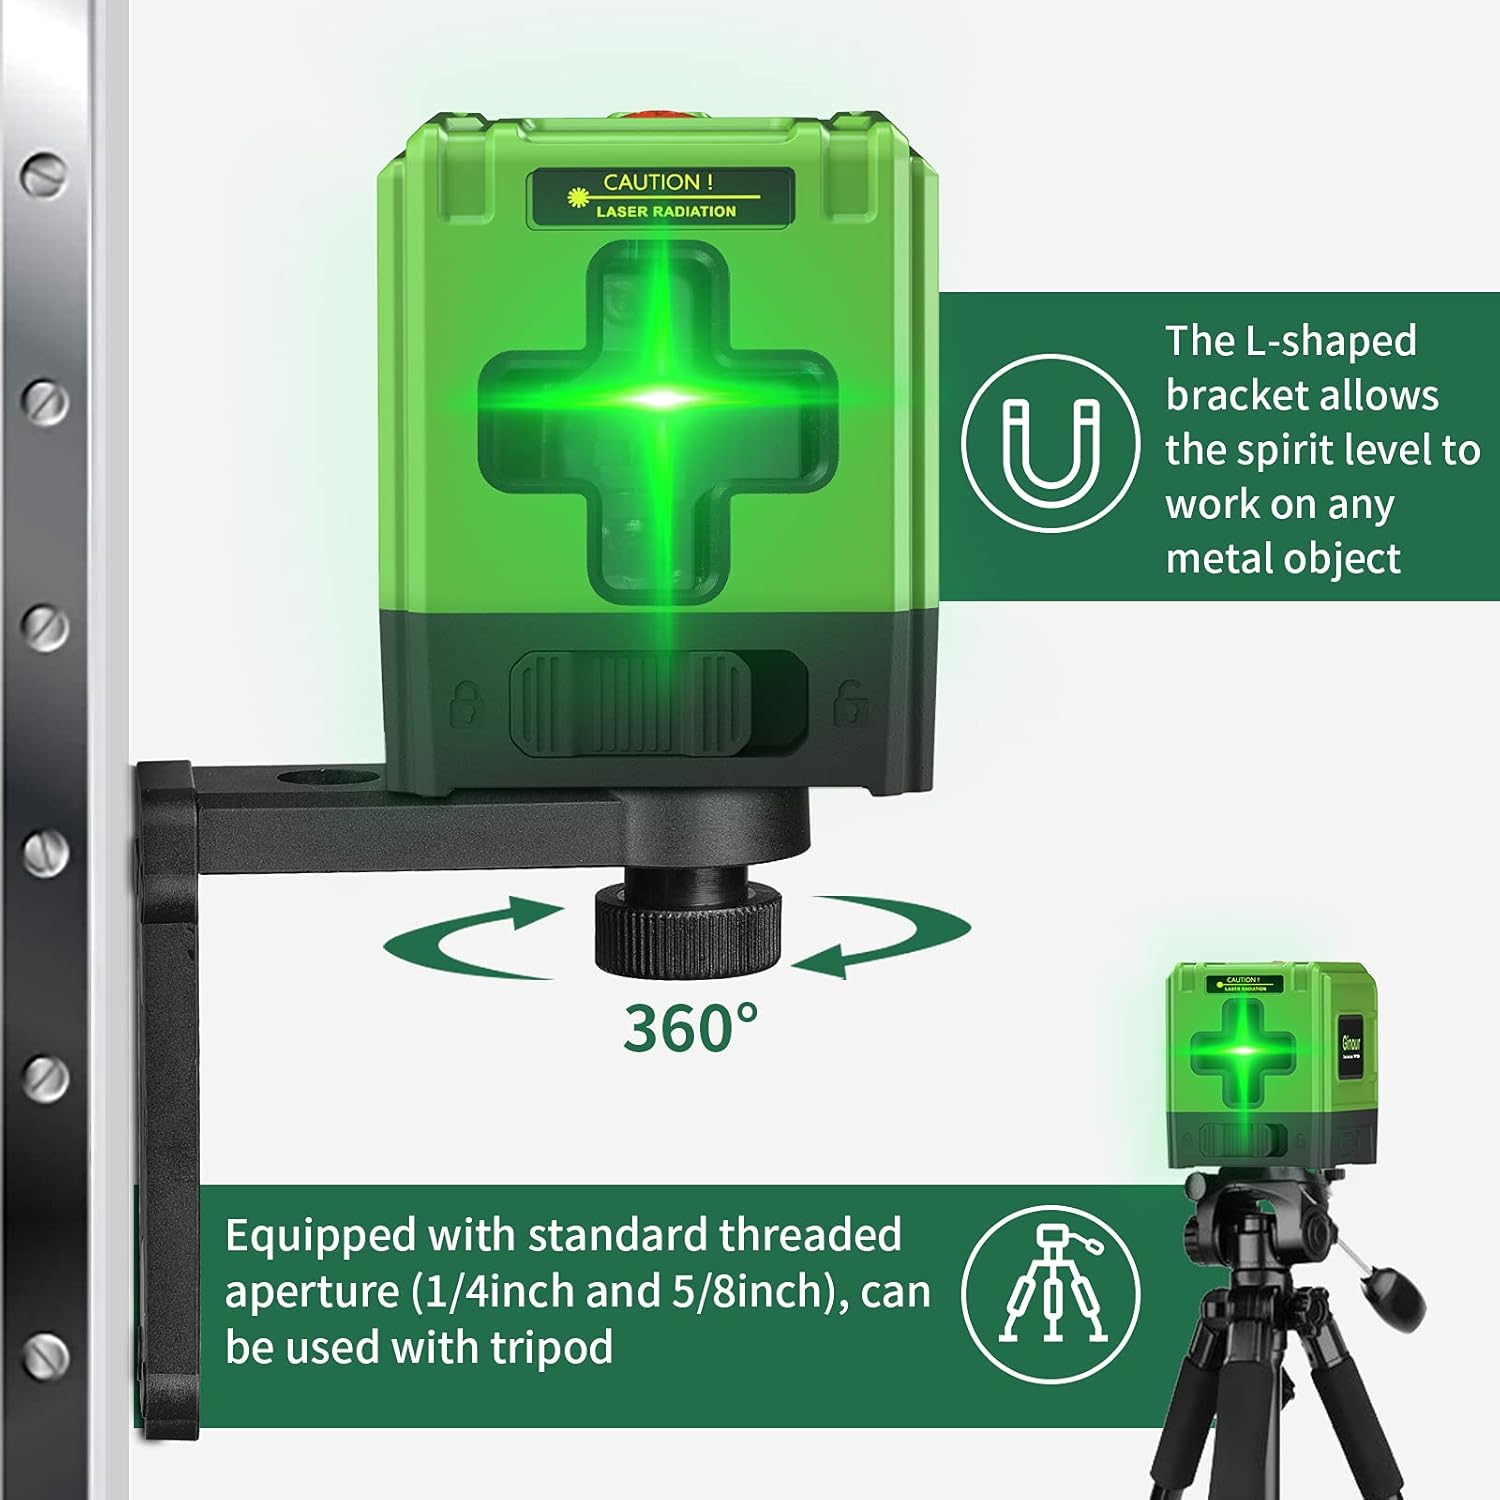
Image: The Ginour Line Laser Level shown mounted on its L-shaped magnetic bracket attached to a metal surface, and also on a tripod, demonstrating its versatile mounting capabilities.
6. Operation
6.1 Powering On/Off and Mode Selection
- Power On: Press and hold the power button on the top of the device for 2 seconds to turn it on.
- Select Mode: Use the lock button (slider switch) on the side of the device to select the desired working mode.

Image: Close-up view of the Ginour Line Laser Level, illustrating the power button on top and the lock/unlock slider switch on the side for mode selection.
6.2 Automatic Leveling Mode
When the lock button is adjusted to the unlock position, the instrument enters automatic leveling mode by default. The device will self-level within a range of ±4° ±1°.
- If the surface on which the instrument is placed is tilted more than 4° ±1° in the unlocked state, the laser lines will flash to indicate that the device is not in a horizontal state. Adjust the position of the device until the laser lines stop flashing and become steady.

Image: Comparison showing the laser lines before and after automatic leveling, demonstrating how the device corrects for minor tilts to project a perfectly level line.
6.3 Manual Mode
To enter manual mode, press and hold the power button for 2 seconds while the device is on. In manual mode, the self-leveling function is deactivated, allowing you to project laser lines at any desired angle. The laser lines will flash once every 5 seconds to indicate that it is in manual mode.
- Manual mode is useful for tasks such as installing handrails on stairs or creating angled designs.
6.4 Using the Reflector Plate
The included reflector plate enhances the visibility of the laser line, especially over longer distances or in bright conditions. Place the reflector plate at the target location to make the laser line more prominent for precise positioning.
6.5 Applications
The Ginour Line Laser Level is suitable for various indoor and outdoor applications, including:
- Paving tiles
- Installing doors, windows, or furniture
- Hanging wallpaper or pictures
- General construction and DIY projects requiring precise leveling and alignment.

Image: The Ginour Line Laser Level being used for various tasks such as tiling, hanging pictures, and aligning objects on a staircase, demonstrating its versatility.
7. Maintenance
- Cleaning: Wipe the device with a soft, damp cloth. Do not use abrasive cleaners or solvents.
- Storage: Store the laser level in its protective pouch in a cool, dry place when not in use.
- Battery Care: To prolong battery life, avoid fully discharging the battery frequently. Recharge the device regularly, even if not in use for extended periods.
- Durability: The device features a TPR soft rubber exterior for anti-fall protection and has an IP54 rating for dust and splash resistance. While robust, avoid dropping it from significant heights or submerging it in water.

Image: Visual representation of the Ginour Line Laser Level's durability features, including its dustproof, waterproof (IP54), and anti-fall design.
8. Troubleshooting
| Problem | Possible Cause | Solution |
|---|---|---|
| Laser lines are flashing rapidly. | Device is outside its self-leveling range (tilted more than ±4° ±1°). | Place the device on a more level surface or adjust its position until the lines become steady. |
| Laser lines are flashing slowly (once every 5 seconds). | Device is in manual mode. | If automatic leveling is desired, ensure the lock button is in the unlock position and restart the device. |
| Device does not power on. | Battery is depleted. | Charge the device using the provided USB Type-C cable. |
| Laser lines are dim or not visible. | Bright ambient light or long distance. | Use the reflector plate to enhance visibility. For outdoor use or very bright conditions, a laser receiver (not included) may be required. Ensure protective glasses are clean. |