1. Introduction
This manual provides essential information for the safe and efficient installation, operation, and maintenance of your Zoeller M53 Mighty-mate Submersible Sump Pump. Please read all instructions carefully before installation and use. Retain this manual for future reference.

Image 1.1: The Zoeller M53 Mighty-mate Submersible Sump Pump. This image displays the complete sump pump unit, highlighting its compact design and the integrated float switch mechanism.
2. Safety Information
WARNING: Risk of electric shock. This pump is supplied with a grounding conductor and grounding-type attachment plug. To reduce the risk of electric shock, be certain that it is connected only to a properly grounded, grounding-type receptacle.
- Always disconnect power to the pump before handling or servicing.
- Do not operate the pump in areas where flammable liquids or explosive gases are present.
- Ensure all electrical connections are made by a qualified electrician and comply with local codes.
- Do not use the pump for pumping potable water or in applications involving human contact.
- Keep hands clear of the impeller and discharge opening when the pump is connected to power.
- Do not lift the pump by its power cord.
3. Product Overview and Features
The Zoeller M53 pump is designed for reliable removal of clear water from sump pits. Key features include:
- Automatic Operation: Equipped with a float-activated switch for automatic on/off cycling.
- Non-Clogging Design: Features a vortex impeller to prevent clogging from small solids.
- Durable Construction: Built with a robust cast iron switch case, motor, and pump housing for extended life.
- Corrosion Resistance: Utilizes stainless steel hardware for enhanced durability.
- Efficient Discharge: Standard 1-1/2 inch NPT discharge for effective water removal.
- Thermoplastic Base: Includes a durable plastic base.

Image 3.1: Stainless Steel Hardware. This image highlights the stainless steel components used in the pump's construction, indicating corrosion resistance.

Image 3.2: Thermoplastic Base. This image shows the pump's base, which is made from durable thermoplastic material.

Image 3.3: 1 1/2 NPT Discharge. This image focuses on the pump's discharge port, indicating its standard size for plumbing connections.
4. Specifications
| Attribute | Value |
|---|---|
| Brand | Zoeller |
| Model Number | 53-0001 (M53) |
| Horsepower | 1/3 HP (0.33 HP) |
| Voltage | 115 Volts (AC) |
| Hertz | 60 Hz |
| Phase | 1 Ph |
| Amps | 9.7 Amps |
| Maximum Lifting Height | 19.25 Feet |
| Discharge Size | 1-1/2 inch NPT |
| Impeller Type | Vortex Impeller |
| Impeller Material | Engineered Plastic |
| Solids Handling | 1/2 inch (12 mm) spherical solids |
| Gallons Per Hour (GPH) | 2580 GPH |
| Gallons Per Minute (GPM) | 43 GPM |
| Cord Length | 9 feet (2.7 m) |
| Product Dimensions (L x W x H) | 9.96" x 7.95" x 10.16" |
| Item Weight | 21 Pounds |
| Material | Cast Iron, Plastic (Base) |
| Power Source | Corded Electric |
| Specific Uses | Inside (Sump Pump applications) |
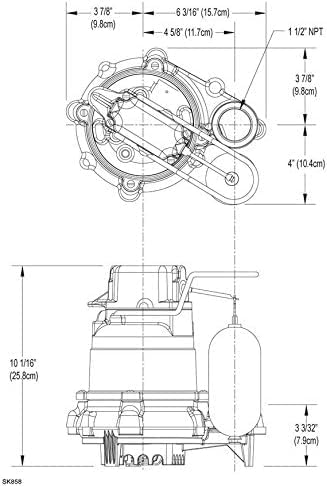
Image 4.1: Dimensional Drawing of the Zoeller M53 Sump Pump. This diagram provides precise measurements of the pump from top and side views, including the float mechanism.
5. Setup and Installation
Proper installation is crucial for the safe and effective operation of your sump pump. It is recommended that installation be performed by a qualified professional.
5.1 Pre-Installation Checklist
- Verify that the sump pit is clean and free of debris.
- Ensure the sump pit is large enough to accommodate the pump and allow for proper float operation.
- Confirm that a properly grounded 115V AC electrical outlet is available within reach of the pump's power cord.
- Acquire necessary plumbing fittings, including a check valve and discharge pipe.
5.2 Installation Steps
- Position the Pump: Place the pump on a solid, level surface at the bottom of the sump pit. Ensure the float switch can move freely without obstruction from the pit walls or other components.
- Connect Discharge Piping: Attach a 1-1/2 inch NPT discharge pipe to the pump's outlet. Use appropriate thread sealant.
- Install Check Valve: Install a check valve in the discharge line above the pump to prevent water from flowing back into the sump pit when the pump turns off.
- Route Discharge Line: Extend the discharge line to an appropriate outdoor drainage area, ensuring it slopes away from the foundation.
- Electrical Connection: Plug the pump's power cord into a properly grounded 115V AC outlet. Do not use extension cords.
- Test Operation: Fill the sump pit with water to activate the float switch and ensure the pump turns on, discharges water, and turns off correctly.

Image 5.1: Illuminated Power Plug. This image shows the pump's power plug with an integrated light, indicating power is supplied to the unit.
6. Operation
The Zoeller M53 pump operates automatically via its integrated float switch. When water in the sump pit rises to a predetermined level, the float switch activates the pump. The pump will then discharge water until the level drops, at which point the float switch deactivates the pump.
- Ensure the float switch has a clear path of travel and is not hindered by debris or the sump pit walls.
- Periodically check the pump's operation by pouring water into the sump pit to observe its on/off cycle.
Video 6.1: Sump Pump Operation Overview. This video demonstrates the typical operation of a submersible sump pump, including the activation and deactivation cycle based on water levels.
7. Maintenance
Regular maintenance ensures optimal performance and extends the life of your sump pump.
7.1 Monthly Checks
- Inspect Sump Pit: Remove any debris, dirt, or sediment that may have accumulated in the pit.
- Check Float Switch: Ensure the float switch moves freely and is not obstructed. Manually lift the float to verify the pump turns on and off.
- Examine Power Cord: Inspect the power cord for any signs of damage, fraying, or wear.
- Listen for Unusual Noises: Pay attention to any abnormal sounds during operation, which could indicate a problem.
7.2 Annual Checks
- Clean Impeller: Disconnect power, remove the pump from the pit, and inspect the impeller for debris. Clean as necessary.
- Check Check Valve: Ensure the check valve is functioning correctly and not allowing backflow.
8. Troubleshooting
Before attempting any repairs, always disconnect the pump from the power source.
| Problem | Possible Cause | Solution |
|---|---|---|
| Pump does not turn on. | No power; tripped circuit breaker; faulty float switch; clogged impeller. | Check power supply and breaker. Inspect float switch for obstruction. Disconnect power and inspect/clean impeller. |
| Pump runs continuously. | Float switch stuck in "on" position; faulty check valve; pump undersized. | Check float switch for obstruction. Inspect/replace check valve. Consult a professional for pump sizing. |
| Pump runs but no water discharges. | Clogged discharge pipe; clogged impeller; air lock. | Clear discharge pipe. Disconnect power and clean impeller. Relieve air lock by tilting pump or drilling a small relief hole in discharge pipe below check valve. |
| Pump cycles too frequently. | Sump pit too small; faulty check valve; water backflowing. | Consider a larger sump pit. Inspect/replace check valve. Ensure discharge pipe slopes away from foundation. |
9. Warranty and Support
For specific warranty details and terms, please refer to the warranty card included with your product or visit the official Zoeller website. If you require technical assistance or have questions regarding your Zoeller M53 sump pump, please contact Zoeller customer support directly.
Zoeller Company Contact Information:
- Official Website
- Refer to product packaging or official website for phone numbers and service hours.


