
1. Introduction
This manual provides essential instructions for the installation, operation, and maintenance of your HIKVISION T7208U2TA6 5MP TurboHD Security System. This kit includes one DS-7208HUI-K2-2TB 8-Channel DVR with a 2 TB HDD and six DS-2CE56H0T-ITMF 5MP EXIR Outdoor Analog Cameras. Please read this manual thoroughly before using the product to ensure proper setup and functionality.
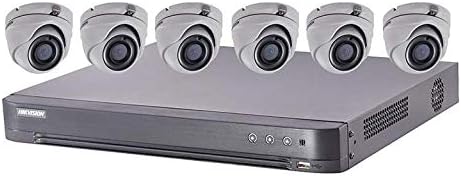
Image 1.1: HIKVISION T7208U2TA6 5MP TurboHD Security System Kit, showing the DVR unit and six dome cameras.
2. Setup
2.1 Package Contents
Verify that all components are present in your package:
- 1 x DS-7208HUI-K2-2TB 8-Channel DVR with 2 TB HDD
- 6 x DS-2CE56H0T-ITMF 5MP EXIR Outdoor Analog Cameras
- Power Adapters for DVR and Cameras
- BNC Cables for Camera Connection
- USB Mouse
- Quick Start Guide
2.2 DVR Physical Installation
- Placement: Place the DVR on a flat, stable surface in a well-ventilated area, away from direct sunlight, heat sources, and moisture.
- Connect Monitor: Connect a monitor to the DVR's HDMI or VGA output port.
- Connect Mouse: Plug the included USB mouse into a USB port on the DVR.
- Network Connection: Connect an Ethernet cable from the DVR's LAN port to your network router or switch.
- Power Connection: Connect the DVR's power adapter to the power input port and then to a power outlet.

Image 2.1: Rear panel of the DS-7208HUI-K2 DVR, illustrating various input and output ports for analog cameras, audio, video, network, and power connections.
DVR Rear Panel Port Descriptions:
| No. | Item | Description |
|---|---|---|
| 1 | Analog Camera Inputs | BNC connectors for analog input |
| 2 | Audio In | RCA connectors |
| 3 | Audio Out | RCA connectors |
| 4 | VGA | DB-15 connector for VGA output. Displays local video output and menu. |
| 5 | HDMI | HDMI video output connector |
| 6 | USB Interface | Universal Serial Bus port for additional devices |
| 7 | LAN | Network connector |
| 8 | RS-485 | Connector for RS-485 devices: T+ and T- pins connect to R+ and R- pins of PTZ receiver respectively. Connect D+, D- pins to controller's Ta, Tb pins (for cascading devices, connect first DVR's D+, D- pins to next DVR's D+, D- pins) |
| 9 | Power Input | Input: 100 to 240 VAC, Output: 12 VDC |
| 10 | Power Switch | Switch for turning device on/off |
| 11 | Ground | Grounding screw |
| 12 | Video Out | BNC connector for CVBS signal out |
2.3 Camera Physical Installation
- Mounting: Choose appropriate locations for your cameras, ensuring optimal viewing angles and coverage. Mount cameras securely using the provided hardware.
- Cabling: Connect one end of the BNC cable to the camera's video output and the other end to an available Analog Camera Input (1-8) on the DVR's rear panel.
- Power: Connect the camera's power adapter to the camera's power input and then to a power outlet.
2.4 Initial Power-Up and Configuration
- After connecting all components, power on the DVR using the power switch.
- The DVR will boot up, and you should see the HIKVISION logo on your connected monitor.
- Follow the on-screen prompts to set up the administrator password, date/time, network settings, and hard drive initialization.
- Ensure the hard drive is initialized for recording functionality.
3. Operating the System
3.1 Live View
Once the system is set up, the DVR will display the live feed from all connected cameras on the monitor. You can switch between single-camera view, multi-camera view, and customize display layouts using the on-screen menu and mouse.
3.2 Recording Settings
The DVR supports various recording modes:
- Continuous Recording: Records 24/7.
- Motion Detection Recording: Records only when motion is detected in the camera's field of view.
- Scheduled Recording: Records during specific time periods.
Access the Recording menu via the main interface to configure these settings for each camera. Adjust sensitivity and areas for motion detection as needed.
3.3 Playback
To review recorded footage:
- From the main menu, select Playback.
- Choose the desired camera(s) and date/time range.
- Use the timeline to navigate through recordings. You can pause, fast-forward, and rewind footage.
3.4 Remote Access
For remote viewing and management, download the official HIKVISION client software or mobile application. Follow the instructions provided with the software to add your DVR using its serial number or IP address. Ensure your DVR is connected to the internet and network settings are correctly configured for remote access.
4. Maintenance
- Regular Cleaning: Periodically clean camera lenses and DVR vents to prevent dust buildup. Use a soft, dry cloth.
- Firmware Updates: Check the official HIKVISION website for firmware updates. Keeping your DVR's firmware updated ensures optimal performance and security.
- Hard Drive Management: The DVR is configured to overwrite older footage when the hard drive is full. Regularly back up important footage to an external storage device if needed.
- Password Security: Change your administrator password regularly and use a strong, unique password to protect your system from unauthorized access.
5. Troubleshooting
- No Video Display:
- Check power connections for the DVR and cameras.
- Verify BNC cable connections between cameras and DVR.
- Ensure the monitor is correctly connected to the DVR and set to the correct input source.
- No Recording:
- Check if the hard drive is initialized and healthy in the DVR settings.
- Verify recording schedules and motion detection settings.
- Ensure sufficient hard drive space is available.
- Remote Access Issues:
- Confirm the DVR is connected to the internet.
- Check network settings (IP address, gateway, DNS).
- Ensure port forwarding (if applicable) is correctly configured on your router.
- Poor Image Quality:
- Clean camera lenses.
- Check cable integrity; damaged cables can cause signal degradation.
- Ensure cameras are within their optimal operating range.
6. Specifications
| Feature | Specification |
|---|---|
| Model Number | T7208U2TA6 |
| Brand | HIKVISION ORIGINAL US VERSION |
| DVR Model | DS-7208HUI-K2-2TB |
| Camera Model | DS-2CE56H0T-ITMF |
| Number of Channels | 8 |
| Camera Resolution | 5 MP (2560 x 1944) High Performance CMOS |
| Camera Lens | 2.8 mm Fixed Lens |
| Night Vision Range | 65 Feet (EXIR technology) |
| DVR IP Camera Input | Up to 8-ch 6 MP (16-ch if Analog Channels Are Disabled) |
| Video Compression | H.265 Pro+/H.265 Pro/H.265/H.264+/H.264 |
| HDD Capacity | 2 TB (pre-installed), 1 SATA Interface (up to 10 TB capacity) |
| Connectivity Technology | Wired |
| Frame Rate | 30 fps |
| Recording Mode | Continuous, Motion Detection |
| USB Ports | 2 |
| Video Input | BNC, RCA (CVBS) |
| Power Source | Corded Electric |
7. Warranty and Support
7.1 Product Warranty
This HIKVISION product is covered by a manufacturer's warranty. Please refer to the warranty card included in your package or visit the official HIKVISION website for detailed warranty terms and conditions. Keep your proof of purchase for warranty claims.
7.2 Technical Support
For technical assistance, troubleshooting beyond this manual, or service inquiries, please contact HIKVISION customer support. Contact information can typically be found on the official HIKVISION website or in your product documentation.
Online Resources:
- Official HIKVISION Website: www.hikvision.com
- Support Portal: Refer to the website for regional support contacts and FAQs.