LINSY HOME L-Shaped Computer Desk with Shelves and Monitor Stand
LINSY HOME L-Shaped Computer Desk Instruction Manual
Model: L-Shaped Computer Desk with Shelves and Monitor Stand
1. Introduction
Thank you for choosing the LINSY HOME L-Shaped Computer Desk. This manual provides detailed instructions for assembly, operation, maintenance, and troubleshooting to ensure safe and efficient use of your new desk. Please read this manual thoroughly before beginning assembly and retain it for future reference.

Image: The LINSY HOME L-Shaped Computer Desk, featuring a spacious L-shaped desktop, integrated shelving, and a monitor stand, set up in a modern home office environment.
2. Safety Information
Important Safety Instructions:
- Always assemble the desk on a stable, level surface.
- Be cautious when lifting heavy parts to avoid injury.
- This desk is top-heavy and may tip over if not properly assembled or anchored to the wall. Always anchor the desk to the wall using appropriate hardware to prevent tipping.
- Keep all small parts and packaging materials away from children and pets to prevent choking hazards.
- Do not stand or sit on the desk.
- Ensure all screws and fasteners are securely tightened before use. Periodically check and re-tighten as necessary.
3. Product Specifications
| Brand: | LINSY HOME |
| Model: | L-Shaped Computer Desk with Shelves and Monitor Stand |
| Shape: | L-Shape |
| Product Dimensions (D x W x H): | 54.3" x 54.3" x 29.5" |
| Item Weight: | 55.1 Pounds |
| Color: | Brown |
| Material Type: | Metal, Wood |
| Special Features: | L-Shape, Easy to Assemble, Integrated Shelves, Monitor Stand |
| Number of Shelves: | 2 (plus monitor stand) |
| Required Assembly: | Yes |
| Recommended People for Assembly: | 1 |
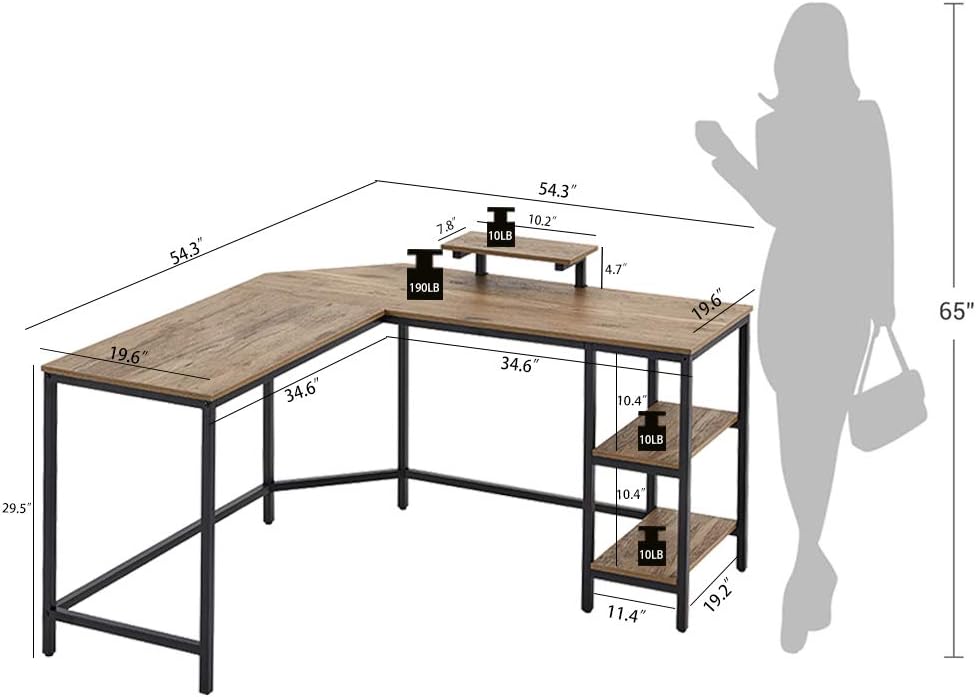
Image: Detailed dimensions of the LINSY HOME L-Shaped Computer Desk, including overall length, width, height, and shelf measurements.
4. Setup and Assembly
Before you begin, ensure all parts are present and undamaged. Refer to the included parts list in your packaging. Assembly is recommended for one person.
4.1. Assembly Video Guide
Video: A step-by-step guide demonstrating the assembly process for the LINSY HOME L-Shaped Computer Desk.
4.2. Key Assembly Steps
- Unpack and Identify Parts: Lay out all components and hardware on a clean, soft surface to prevent scratches. Verify all parts against the packing list.
- Assemble the Shelf Unit: Attach the metal frame pieces for the integrated shelf unit using the provided screws. Ensure all connections are secure.
- Attach Shelf Boards: Secure the wooden shelf boards to the shelf unit frame.
- Assemble Desk Frames: Connect the main metal frame components for the L-shaped desk. Pay attention to the orientation for the desired left or right configuration.

Image: The L-shaped desk frame illustrating its reversible design, allowing the longer side to be configured on either the left or right.
- Attach Desktop Panels: Carefully place and secure the wooden desktop panels to the assembled metal frame using the designated screws.
- Install Monitor Stand: Attach the monitor stand to the desktop in the desired position.
- Install Removable Shelf: The desk includes a removable shelf designed to accommodate a computer tower or other items. This shelf can be installed or removed as needed.

Image: A close-up view demonstrating the removable shelf feature, suitable for housing a computer tower or providing additional storage space.
- Final Tightening: Once all components are in place, gently tighten all screws and bolts. Do not overtighten.
5. Operating Instructions
Your LINSY HOME L-Shaped Computer Desk is designed for versatile use in a home or office environment. It provides ample space for computers, monitors, and other work essentials.
- Placement: Position the desk on a flat, stable surface. Avoid placing it in direct sunlight or near heat sources to prevent material damage.
- Weight Capacity: Do not exceed the recommended weight capacity for the desktop and shelves. Distribute weight evenly.
- Monitor Stand: Utilize the elevated monitor stand to optimize viewing height and free up desktop space.
- Storage Shelves: The integrated shelves are suitable for books, office supplies, and decorative items. The removable shelf can be used for a computer tower or additional storage.

Image: A close-up of the desk surface, showcasing its texture and how it can accommodate a laptop, books, and other office items.
6. Maintenance and Care
Proper care will extend the life and appearance of your desk.
- Cleaning: Wipe the desk surfaces with a dry cloth. For stubborn marks, use a slightly damp cloth with a mild cleaner, then dry immediately. Avoid harsh chemicals or abrasive cleaners.
- Spills: Clean up spills immediately to prevent staining or damage to the wood finish.
- Fasteners: Periodically check all screws and bolts to ensure they remain tight. Re-tighten as needed to maintain stability.
- Avoid Heat and Moisture: Do not place hot items directly on the desk surface. Use coasters for drinks.
7. Troubleshooting
If you encounter any issues with your desk, refer to the following common problems and solutions:
| Problem | Possible Cause | Solution |
|---|---|---|
| Desk is wobbly or unstable. | Loose screws or uneven floor. | Check and tighten all screws. Ensure the desk is on a level surface. Adjust leveling feet if present. |
| Parts do not align during assembly. | Incorrect orientation of parts or overtightened screws. | Review the assembly instructions and diagrams carefully. Loosen screws slightly, adjust alignment, then re-tighten. Do not force parts. |
| Missing hardware or damaged parts. | Packaging error or shipping damage. | Contact LINSY HOME customer support with your purchase details for assistance. |
8. Warranty and Support
This LINSY HOME product comes with a limited warranty. For specific warranty terms and conditions, please refer to the documentation included with your purchase or contact LINSY HOME customer support.
For further assistance, replacement parts, or to report any issues, please contact LINSY HOME customer support through the retailer where you purchased the product or visit the official LINSY HOME website.