1. Introduction
This user manual provides comprehensive instructions for the operation and maintenance of your SATLINK ST-5150 DVB-S2/C/T2 Combo Satellite TV Finder Meter. Please read this manual thoroughly before using the device to ensure proper functionality and to prevent damage.
The ST-5150 is a portable combo meter compatible with DVB-S2/S, DVB-T/T2, and DVB-C standards, supporting MPEG2/4 AVC and H.265/HEVC. Its compact size, lightweight design, intuitive user interface, long battery life, and rich feature set make it an essential tool for installing and verifying digital TV services, including satellite, antenna, and cable signals for residential or multi-dwelling units.
2. Safety Information
Please observe the following safety precautions to prevent injury or damage to the device:
- Do not expose the device to rain, moisture, or extreme temperatures.
- Avoid dropping or subjecting the device to strong impacts.
- Use only the provided power adapter for charging.
- Do not attempt to disassemble or repair the device yourself. Refer to qualified personnel for service.
- Keep the device away from strong magnetic fields.
3. Product Overview
The SATLINK ST-5150 is designed for efficient and accurate signal measurement. Below are key components and features:
3.1 Front Panel and Display

Figure 3.1: Front view of the SATLINK ST-5150. This image shows the device's front panel, featuring the LCD screen, navigation buttons, numeric keypad, and function keys. The screen displays various icons for DVB-S2, DVB-T2, DVB-C, Loop Search, Angle Calculation, Others, Multimedia, and System Settings. Indicator lights for Power, 22K, H/V, Lock, and Charge are visible below the screen. A compass is integrated on the right side of the control panel.

Figure 3.2: SATLINK ST-5150 with red protective silicone case. This image highlights the device enclosed in its red silicone protective case, offering enhanced durability and grip. The screen and button layout remain clearly visible and accessible.
3.2 Rear Panel and Connections

Figure 3.3: Rear view of the SATLINK ST-5150. This image displays the back of the device, showing the product label with input specifications for DC12V/1A, frequency ranges (950-2150MHz for S/S2, 48-862MHz for T/T2/C), input impedance (75Ω), and Li-ion battery details (7.4V/2600mAh). A battery compartment and speaker grille are also visible.
3.3 Key Features
- 4.3-inch High Definition TFT LCD Screen
- Fully DVB-S2/S/T/T2/C compliant
- MPEG-2, MPEG-4 H.264/MPEG4 AVC, H.265/HEVC hardware decoding
- Digital meter for signal strength and quality
- Supports Auto Scan and Manual Scan
- Sound and Light Alarm for Locking Signal
- Automatic calculation of AZ, EL angle
- Supports DiSEqC 1.0/1.1/1.2, Unicable, 0/22kHz Tone
- Integrated Speaker
- Supports both AV out and AV in
- Supports both HDMI out
- LNB short protection
- 7.4V/2600mAh Li-ion Battery Included
- Software upgrade via USB port
- Easy to carry design
4. Setup
4.1 Charging the Battery
Before first use, fully charge the device's internal Li-ion battery. Connect the provided AC adapter to the DC 12V input port on the device and plug it into a power outlet. The charge indicator light will illuminate during charging.
4.2 Initial Power On
Press and hold the Power button to turn on the device. The main menu will appear on the LCD screen.
4.3 Language and System Settings
Navigate to the System Settings menu to configure language, time, and other general settings. Use the navigation buttons (Up/Down/Left/Right) and the OK button to make selections.

Figure 4.1: System Information Screen. This image shows the device's system information screen, displaying details such as H/W Version (ABC-GB0-A-0), S/W Version (ST5150-3.0), and Build Date (06/06/2022 11:00:29). This screen is typically accessed via the System Settings menu.
5. Operating Instructions
5.1 Satellite Signal Finding (DVB-S2)
- Connect the satellite dish LNB cable to the LNB IN port (F-type connector) on the top of the ST-5150.
- From the main menu, select DVB-S2.
- Choose the desired satellite from the list or add a new one.
- Adjust LNB settings (LNB Type, 22KHz, DiSEqC, etc.) as required.
- Adjust the dish antenna while observing the signal strength and quality bars on the screen. The device will provide an audible alarm when a signal is locked.
- Once the signal is optimized, you can perform a channel scan.
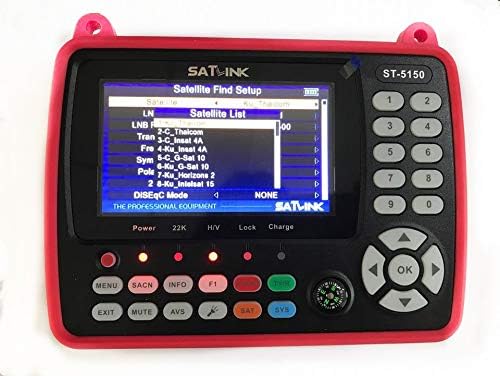
Figure 5.1: Satellite Find Setup Screen. This image shows the interface for setting up satellite parameters, including Satellite List, LNB Freq, Transponder, Symbol Rate, and Polarization. This is crucial for accurate satellite signal acquisition.
5.2 Terrestrial/Cable Signal Finding (DVB-T/T2/C)
- Connect the antenna or cable TV signal to the ANT IN port (female type connector) on the top of the ST-5150.
- From the main menu, select DVB-T2 or DVB-C depending on your signal type.
- Select the appropriate region/frequency band.
- Adjust the antenna or check cable connections while monitoring signal strength and quality.
- Perform a channel scan once the signal is stable.
5.3 Angle Calculation
The ST-5150 can calculate the azimuth (AZ) and elevation (EL) angles for satellite dish alignment. This feature uses your current longitude and latitude, which can be manually entered or obtained via GPS (if available and supported by the device's internal compass/GPS functionality).
- From the main menu, select Angle Calc.
- Enter your current longitude and latitude.
- Select the desired satellite. The device will display the calculated AZ and EL angles.

Figure 5.2: Angle Calculation Screen. This image displays the angle calculation interface, showing fields for Longitude, My Longitude, My Latitude, and the calculated angles (157.8, 35.6, 15.4) for satellite alignment. This feature assists in precise dish positioning.
5.4 Multimedia Playback
The device supports multimedia playback from a USB drive. Insert a USB drive into the USB port. Navigate to the Multimedia menu to browse and play supported file formats (wma, mp3, mp4, avi, jpg, bmp, img).
6. Maintenance
6.1 Cleaning
Wipe the device with a soft, dry cloth. Do not use liquid cleaners or abrasive materials.
6.2 Software Update
The device's software can be updated via the USB port. Visit the official SATLINK website for the latest firmware and instructions. Typically, you will download the firmware file to a USB drive, insert it into the device, and initiate the update from the System Settings menu.
6.3 Battery Care
To prolong battery life, avoid fully discharging the battery frequently. If storing the device for an extended period, charge it to approximately 50% and recharge every few months.
7. Troubleshooting
| Problem | Possible Cause | Solution |
|---|---|---|
| Device does not power on. | Low battery; Power button not pressed correctly. | Charge the battery; Press and hold the Power button for a few seconds. |
| No signal detected. | Incorrect cable connection; Wrong satellite/transponder settings; Antenna/dish misalignment. | Check all cable connections; Verify satellite/transponder parameters; Adjust antenna/dish alignment. |
| Screen frozen or unresponsive. | Software glitch. | Perform a soft reset by holding the Power button until the device turns off, then restart. If persistent, consider a firmware update. |
| USB drive not recognized. | Unsupported file system; Corrupted USB drive. | Ensure USB drive is formatted to NTFS, FAT32, or FAT16; Try a different USB drive. |
8. Technical Specifications
| Feature | Specification |
|---|---|
| Transmission Standards | DVB-S2/S, DVB-T/T2, DVB-C, H.264/MPEG4 AVC, H.265/HEVC |
| Satellite Input Connector | F-Type |
| Satellite Input Frequency | 950 to 2150 MHz |
| Satellite Signal Input Level | -65 to -25 dBm |
| LNB Power | 13V/18V, Imax 400mA |
| DVB-T/T2/C Input Connector | Female Type |
| DVB-T/T2/C Input Frequency | 48 to 862 MHz |
| LCD Screen Type | TFT Transmissive |
| LCD Resolution | 480x RGB x272 |
| Active Area (LxH) | 95 mm x 54 mm |
| AV Output Interface | 3.5 mm Jack (CVBS Video, Stereo L/R Audio) |
| Video Decompression | MPEG-2 MP @ HL, MPEG-1, MPEG-4 ASP @ L5, H.264 MP&HP @ L4, H.265 / HEVC, HW JPEG decoding |
| Audio Decompression | MPEG-1 Layer I/II, MPEG-2 Layer I/II |
| Data Service Port | USB2.0 Interface |
| File System Support | NTFS, FAT32, FAT16 |
| Supported File Formats | wma, mp3, mp4, avi, jpg, bmp, img |
| Battery | 7.4V/2600mAh Li-ion |
| Power Adapter Output | DC12V/1.2A |
| Power Consumption | Max. 10W |
| Dimensions (LxWxH) | 170 x 120 x 40 mm |
| Net Weight | 1 kg |
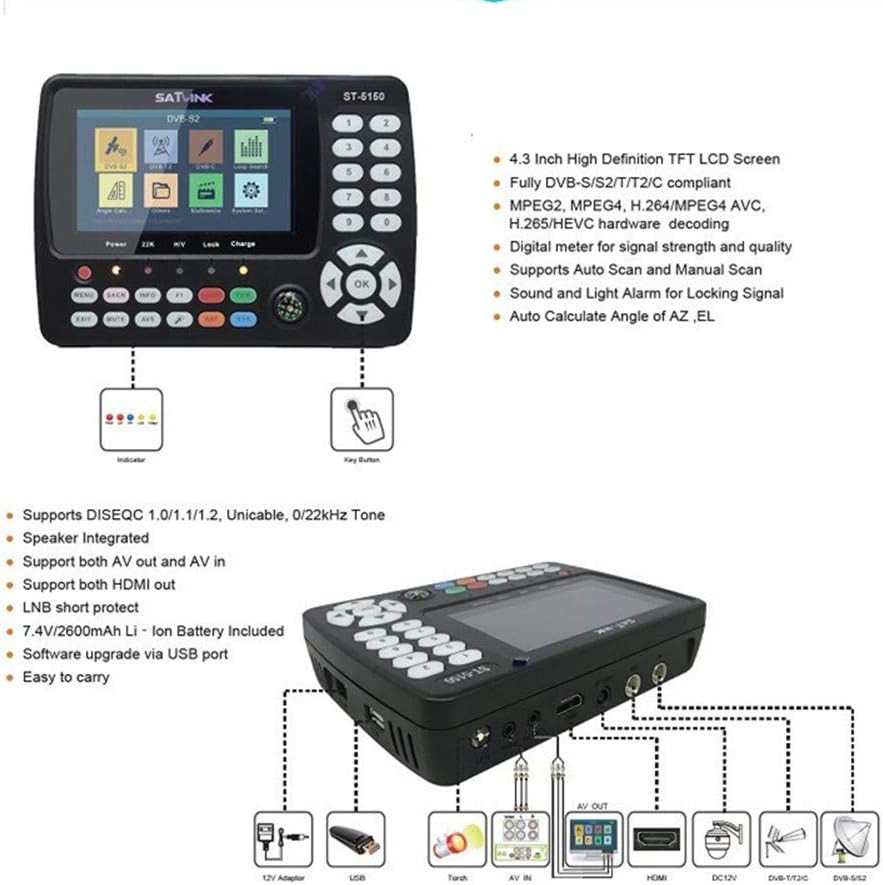
Figure 8.1: Detailed Specifications Diagram. This image provides a visual breakdown of the ST-5150's features and connectivity, including the 4.3-inch HD TFT LCD, DVB-S2/T/T2/C compliance, MPEG-2/4 H.264/H.265 decoding, digital signal meter, auto/manual scan, alarm for locking signal, angle calculation, DiSEqC support, integrated speaker, AV in/out, HDMI out, LNB short protection, 7.4V/2600mAh battery, and USB software upgrade. It also illustrates the various ports and accessories.

Figure 8.2: Product Packaging. This image shows the retail packaging box for the SATLINK ST-5150, highlighting key features like "Full HD 1080", DVB-S/S2/C/T/T2 compatibility, MPEG-2/MPEG-4, and H.265/HEVC support.
9. Warranty and Support
For warranty information and technical support, please refer to the documentation included with your purchase or visit the official SATLINK website. Keep your proof of purchase for warranty claims.
Contact Information: Please refer to the seller's information on the platform where the product was purchased for direct support, or visit the official SATLINK website for general inquiries and firmware updates.


