GPZON B26
GPZON Electronic Upper Arm Blood Pressure Monitor User Manual
Model: B26
Brand: GPZON
1. Introduction
Thank you for choosing the GPZON Electronic Upper Arm Blood Pressure Monitor. This device is designed for accurate and reliable measurement of blood pressure and pulse rate at home. It features advanced algorithms for high precision, arrhythmia detection, and intelligent cuff position detection to ensure accurate results. With its large LCD screen and one-button operation, it is user-friendly for all ages.
This manual provides essential information on how to set up, operate, and maintain your blood pressure monitor. Please read it thoroughly before first use to ensure correct operation and to achieve the most accurate readings.

Image: GPZON Electronic Upper Arm Blood Pressure Monitor with cuff and USB cables.
The main unit of the blood pressure monitor is white with a large black LCD display. It has 'SET', 'START/STOP', and 'MEM' buttons. The adjustable grey cuff and two white USB cables are also visible.
2. Package Contents
Upon opening the box, please verify that all components are present and undamaged:
- 1 x GPZON Blood Pressure Monitor Unit
- 1 x Adjustable Arm Cuff (22cm-42cm)
- 1 x USB Cable
- 1 x Instruction Manual

Image: All components included in the GPZON Blood Pressure Monitor kit.
This image displays the complete kit: the blood pressure monitor unit, the adjustable arm cuff, a USB cable, and the instruction manual, all neatly arranged next to the product packaging.
3. Setup
3.1 Powering the Device
The blood pressure monitor can be powered by either 4 AAA batteries (not included) or via the provided USB cable.
- Battery Installation: Open the battery compartment cover on the back of the device. Insert 4 AAA batteries, ensuring correct polarity (+/-). Close the cover securely.
- USB Power: Connect the small end of the USB cable to the USB port on the side of the monitor and the larger end to a compatible USB power adapter (e.g., phone charger) or a computer USB port.

Image: Illustration of battery installation and USB cable connection.
The image shows two methods of powering the device: (1) opening the battery compartment to insert AAA batteries, and (2) connecting the USB cable to the side port of the monitor.
3.2 Attaching the Arm Cuff
The adjustable arm cuff is designed to fit arm circumferences from 22cm to 42cm. Ensure the cuff is properly connected to the monitor unit.

Image: The adjustable arm cuff with a range of 22cm-42cm.
This image highlights the comfortable, improved cuff designed to fit most adults, with a specified arm circumference range of 22 cm to 42 cm.
4. Operating Instructions
4.1 Preparing for Measurement
For accurate readings, follow these guidelines:
- Rest for at least 5 minutes before taking a measurement.
- Measure at the same time each day.
- Do not eat, exercise, smoke, or drink alcohol within 30 minutes prior to measurement.
- Do not cross your legs during measurement.
- Do not talk or move during measurement.
- Avoid taking measurements during stressful periods.

Image: Guidelines for obtaining the most accurate blood pressure readings.
This image provides a list of important tips for accurate blood pressure measurement, such as resting, measuring at the same time daily, and avoiding certain activities before measurement.
4.2 Taking a Measurement
- Connect USB & Tube: Ensure the USB cable is connected for power and the air tube from the cuff is securely plugged into the left side of the monitor.
- Apply the Cuff: Wrap the cuff firmly around your bare left upper arm, approximately 2-3 cm above the elbow. Ensure the artery mark (Φ) on the cuff aligns with your inner arm artery and the tube is not bent. You should be able to insert two fingers between the cuff and your arm.
- Position Your Arm: Sit upright with your back straight. Place your arm on a flat surface with your palm facing up. The cuff should be at the same level as your heart. Relax and do not move or talk during the measurement.
- Start Measurement: Press the START/STOP button. The monitor will automatically inflate the cuff and begin the measurement. The results will be displayed within approximately 30 seconds.
- Save Results: The results will be automatically saved in the memory. You can press the MEM button to review past readings.
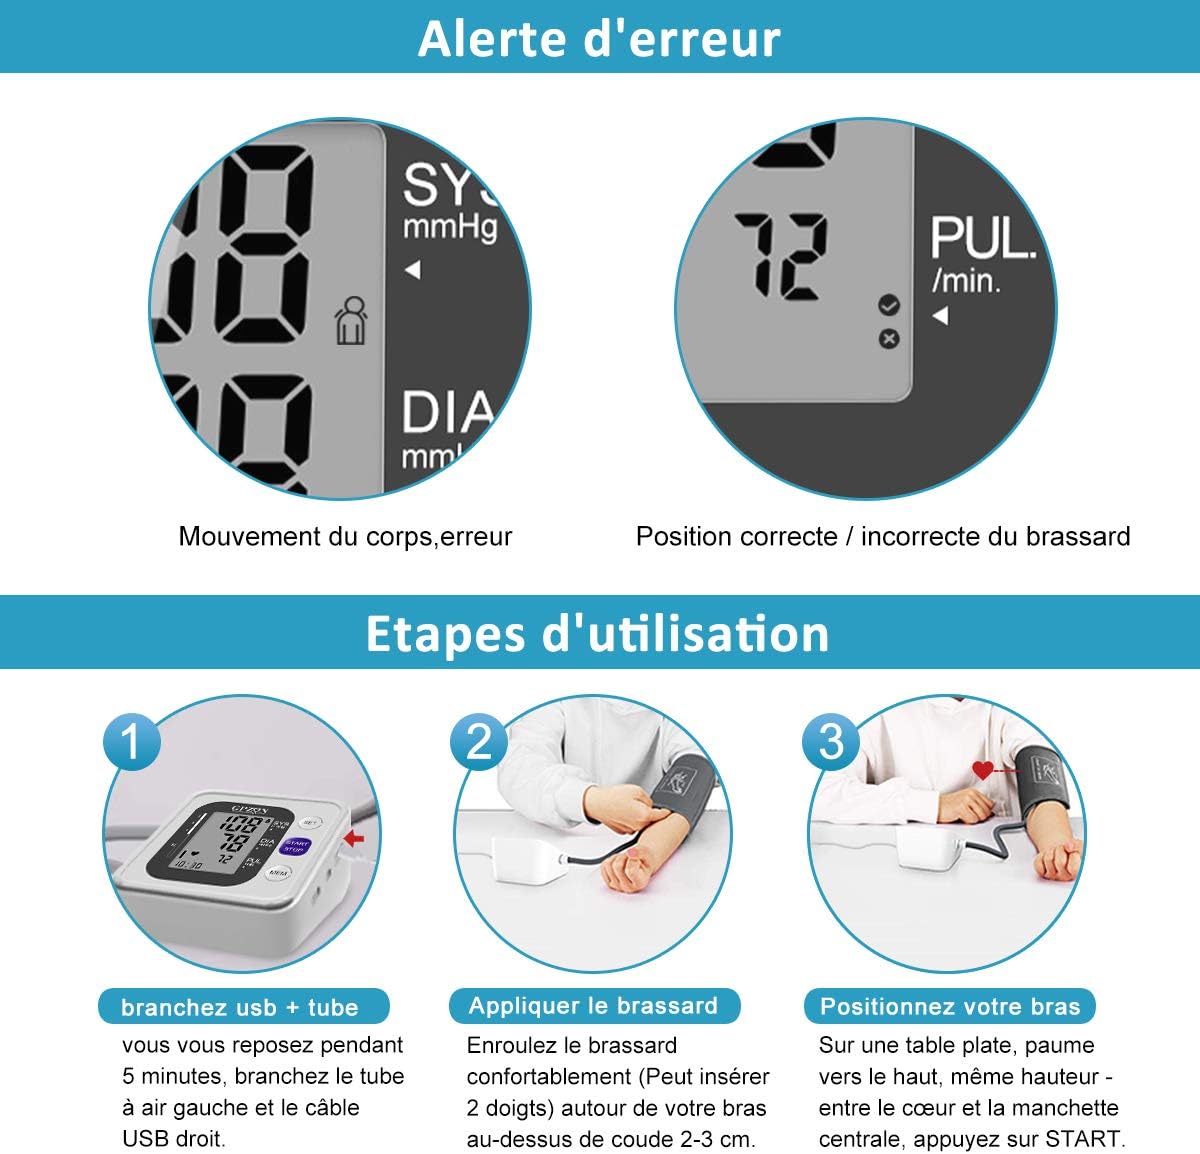
Image: Visual guide for the four steps of using the blood pressure monitor.
This image illustrates the usage steps: (1) connecting the USB and tube, (2) applying the cuff correctly, (3) positioning the arm at heart level, and (4) pressing START for measurement.
4.3 Understanding Your Readings
The display shows three main values:
- SYS (Systolic Pressure): The top number, indicating the pressure in your arteries when your heart beats.
- DIA (Diastolic Pressure): The bottom number, indicating the pressure in your arteries between beats.
- PUL (Pulse Rate): Your heart rate in beats per minute.

Image: Chart indicating blood pressure levels (Normal, Slight Hypertension, Moderate Hypertension, Severe Hypertension).
This chart visually represents different blood pressure categories based on systolic and diastolic readings, helping users understand their measurement results.
4.4 Memory Function and User Profiles
The monitor supports two users and stores up to 120 sets of results for each user, allowing daily health tracking by month, day, and time.
- Switching Users: Use the SET button to switch between User A and User B profiles.
- Viewing Memory: Press the MEM button to cycle through stored readings for the selected user.
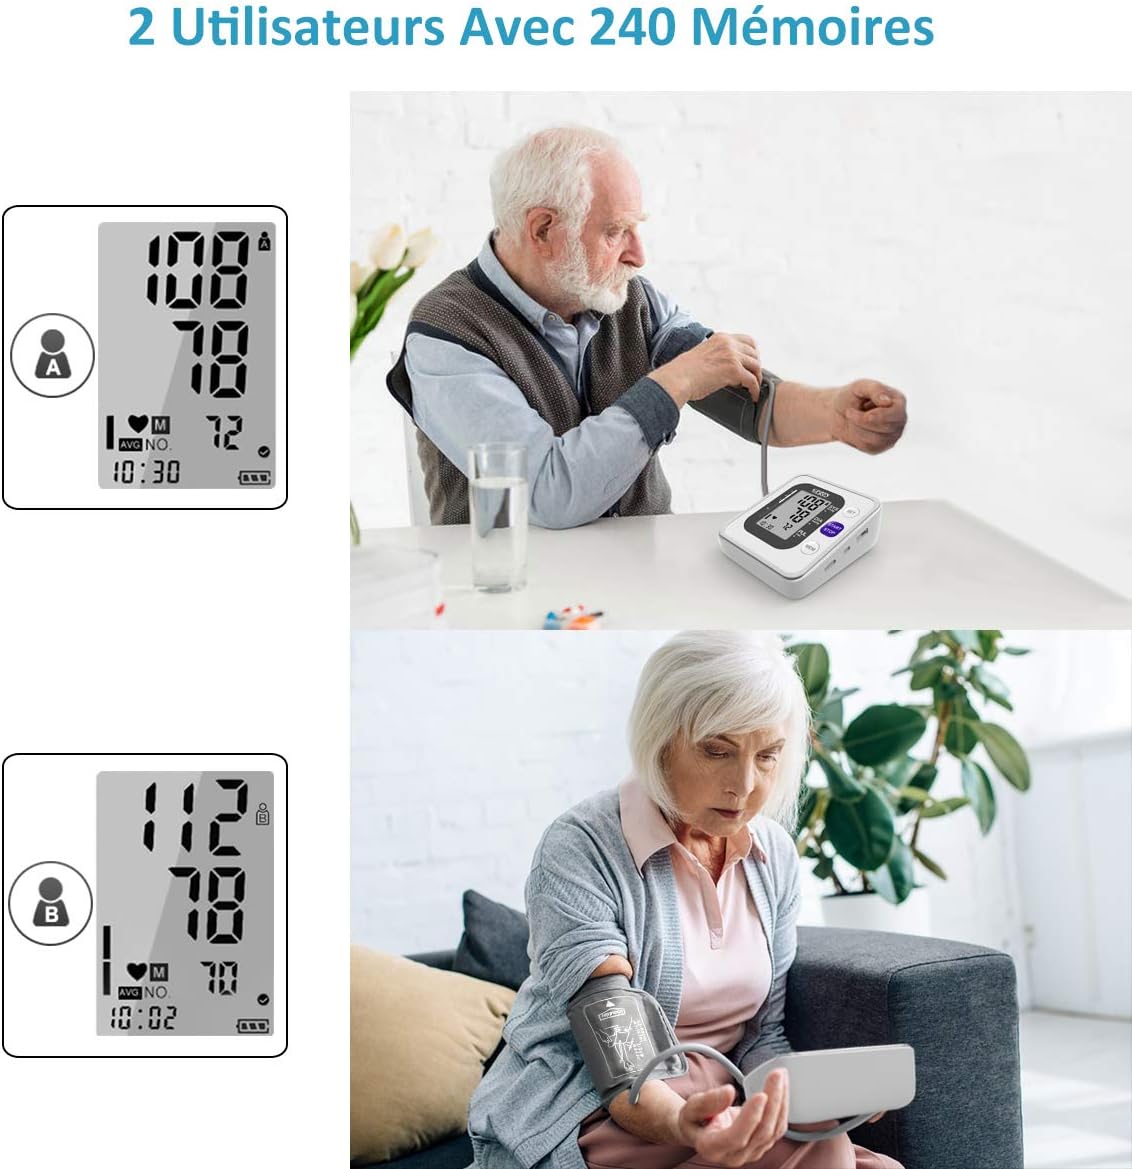
Image: Display showing two user profiles (A and B) and memory function.
This image illustrates the monitor's capability to store readings for two distinct users, each with their own set of 120 memory slots, allowing for individual tracking.
4.5 Arrhythmia Detection
The device can detect irregular heartbeats (arrhythmia) during measurement. If an irregular heartbeat is detected, a specific icon will appear on the display. Consult a medical professional if this icon frequently appears.
4.6 Scientific Reading Method (Average)
To obtain a more precise reading, press the MEM button to display the average of the last three readings.

Image: Display showing icons for arrhythmia detection and average reading.
This image highlights the monitor's features, including automatic detection of heart rhythm (arrhythmia) and the scientific reading method to display the average of the last three measurements for higher accuracy.
5. Maintenance
To ensure the longevity and accuracy of your blood pressure monitor, follow these maintenance guidelines:
- Cleaning: Wipe the device and cuff with a soft, dry cloth. Do not use abrasive cleaners or immerse the device in water.
- Storage: Store the device in a cool, dry place, away from direct sunlight, extreme temperatures, and humidity.
- Battery Replacement: Replace batteries when the low battery indicator appears on the display. Remove batteries if the device will not be used for an extended period.
6. Troubleshooting
The intelligent bio-chip automatically detects cuff position errors and movement errors, providing icon-based tips for correction. Refer to the display for error alerts.

Image: Icon indicating correct or incorrect cuff position.
This icon helps users identify if the cuff is positioned correctly or incorrectly, aiding in accurate measurement.
| Problem | Possible Cause | Solution |
|---|---|---|
| Inaccurate readings | Incorrect cuff placement, movement during measurement, not resting before measurement. | Ensure cuff is correctly applied and at heart level. Remain still and silent during measurement. Rest for 5 minutes before measuring. |
| Device does not power on | Low or dead batteries, incorrect battery polarity, USB cable not connected properly. | Replace batteries. Check battery polarity. Ensure USB cable is securely connected. |
| Cuff does not inflate | Air tube not connected, air leak in cuff or tube. | Ensure air tube is securely connected to the monitor. Check cuff and tube for any damage or leaks. |
7. Specifications
| Feature | Specification |
|---|---|
| Model Name | B26 |
| Brand | GPZON |
| Display Type | LCD |
| Power Source | Electric Cable (USB) |
| Cuff Length | Adjustable 22cm-42cm |
| Memory Capacity | 2 Users, 120 sets of results each (Total 240) |
| Special Features | Arrhythmia Detection, Auto Cuff Position Detection, Large LCD Screen, One-Button Operation, Quick 30-second measurement |
| Product Dimensions | 12L x 15W x 8H cm |
| Package Dimensions | 15.7 x 11.9 x 8.7 cm |
| Weight | 440 grams |
| Country of Origin | China |
8. Warranty and Support
Your GPZON Blood Pressure Monitor is designed for reliability and precision. If you encounter any issues with your blood pressure monitor, our professional team is ready to assist you 24/7.
Please contact customer support through the retailer's platform or the contact information provided with your purchase for assistance with troubleshooting, warranty claims, or any other inquiries.