1. Introduction
This manual provides detailed instructions for the KINGEAR Wireless Controller, designed for use with Nintendo Switch and PC. This controller offers an enhanced gaming experience with its ergonomic design and advanced features.
Note: This controller does not include NFC or infrared radiator functions.
2. Key Features
- Special Wake Up Mode: Press the 'HOME' button to wake up the Nintendo Switch console from sleep mode.
- Adjustable Turbo & Auto Turbo: Supports 3 levels of turbo speed (5, 12, 20 shoots/s) and an Auto Turbo function for continuous action without holding the button.
- Dual Motors & 6-Axis Motion Controls: Built-in dual motors provide realistic gaming feedback, and the 6-axis gyroscope enhances accuracy for precise control.
- Wireless and Wired Connection: Supports both wireless (Bluetooth) and wired connections to Nintendo Switch and Nintendo Switch Lite.
- Audio Function: Under wired mode, connect a headset to the audio jack for voice chat.
- Ergonomic Design: Designed for comfortable grip, suitable for various hand sizes.
3. Controller Overview

Figure 1: Front view of the KINGEAR Wireless Controller.

Figure 2: Detailed button layout and labels for the KINGEAR Wireless Controller.
The controller features standard gaming buttons including action keys (A, B, X, Y), directional keys (D-pad), left and right rockers (L3, R3), shoulder buttons (L, R, LT, RT), a HOME button, TURBO key, and status indicator LEDs.
4. Setup Instructions
4.1. Wireless Pairing with Nintendo Switch
- Ensure your Nintendo Switch console is powered on.
- From the HOME Menu, select Controllers > Change Grip/Order.
- On the KINGEAR controller, press the dedicated ONE KEY button (often the HOME button) to initiate pairing. The indicator lights will flash rapidly.
- Once paired, the indicator lights will become solid, and the controller will be ready for use.
Important: Avoid touching the joysticks during the one-key direct connection process to ensure proper calibration.
4.2. Wired Connection
Connect the controller to your Nintendo Switch dock or PC using a USB-C cable. The controller will automatically be recognized and can be used for gameplay.
4.3. Charging the Controller

Figure 3: Battery capacity, charging time, and estimated playtime.
The controller is equipped with a 500mAh battery. Connect the controller to a power source using the provided USB-C cable. A full charge typically takes approximately 2.5 hours and provides 8-10 hours of playtime.
5. Operating Instructions
5.1. Turbo Function

Figure 4: Illustration of the three adjustable turbo speeds.
To activate Turbo mode for a button:
- Press and hold the TURBO button.
- While holding TURBO, press the action button you wish to assign Turbo functionality to (e.g., A, B, X, Y, L, R, LT, RT).
To adjust Turbo speed:
- With Turbo active, press and hold the TURBO button.
- Move the Right Analog Stick Up or Down to cycle through the three speeds: Low (5 shoots/s), Normal (12 shoots/s), High (20 shoots/s).
To activate Auto Turbo:
- Activate Turbo for a button as described above.
- Press the TURBO button again while holding the action button. The button will now continuously activate without being held down.
To clear Turbo/Auto Turbo:
- Press and hold the TURBO button.
- Press the action button twice.
5.2. Vibration Adjustment
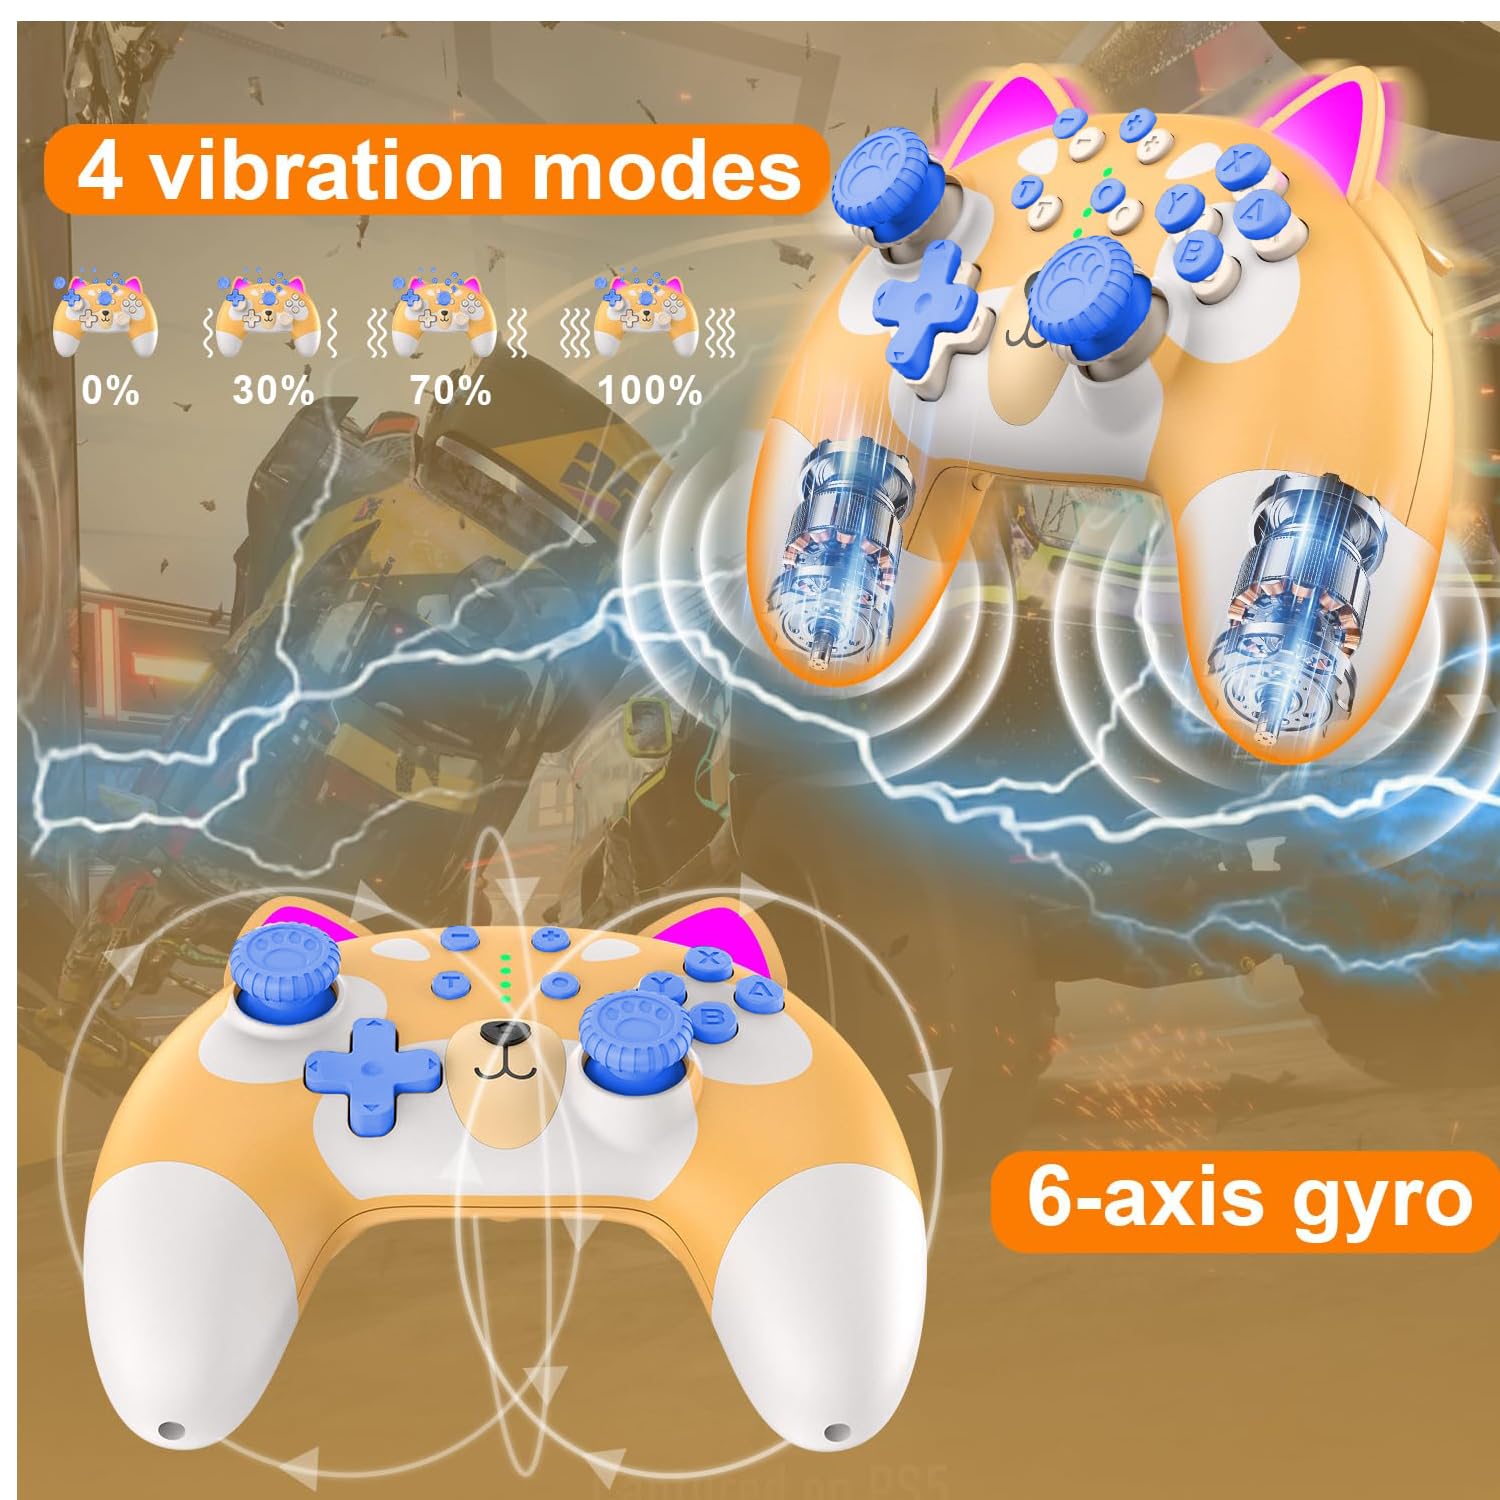
Figure 5: Visual representation of the four vibration intensity levels.
The controller supports four vibration modes: 0% (off), 30%, 70%, and 100% intensity. To adjust, press and hold the TURBO button and then press the D-pad Up or Down to cycle through the vibration levels.
5.3. Programmable Macro Buttons (M1/M2)

Figure 6: Location of M1 and M2 programmable macro buttons.
The M1 and M2 buttons on the back of the controller can be programmed to execute a sequence of button presses. Refer to the specific programming instructions provided with your controller packaging for detailed steps on how to set up macros.
5.4. Official Product Video
Video 1: An overview of the KINGEAR Cartoon Kitten Switch Controller in blue, demonstrating its features and design.
6. Maintenance
- Keep the controller clean by wiping it with a soft, dry cloth. Avoid using harsh chemicals or abrasive materials.
- Store the controller in a cool, dry place away from direct sunlight and extreme temperatures.
- Avoid dropping the controller or subjecting it to strong impacts.
- Do not attempt to disassemble the controller, as this may void any potential warranty and cause damage.
7. Troubleshooting
7.1. Controller Not Connecting
- Ensure the controller is sufficiently charged.
- Verify that the Nintendo Switch is in pairing mode (Controllers > Change Grip/Order).
- Try restarting both the Nintendo Switch console and the controller.
- If using a wired connection, ensure the USB-C cable is securely connected to both the controller and the console/dock.
7.2. Input Lag or Unresponsive Buttons
- Ensure there are no obstructions or excessive distance between the controller and the console during wireless play.
- Check for interference from other wireless devices.
- If using a wired connection, try a different USB-C cable or port.
- Perform a controller reset (refer to manufacturer's specific instructions if available, typically involves a small reset button).
7.3. Joystick Drift
If you experience unintended movement from the joysticks, try recalibrating them through the Nintendo Switch system settings (System Settings > Controllers and Sensors > Calibrate Control Sticks). If the issue persists, contact customer support.
8. Specifications
| Feature | Detail |
|---|---|
| Model Number | OP-CAT-UK |
| Connectivity | Wireless (Bluetooth), Wired (USB-C) |
| Battery Capacity | 500mAh |
| Charging Time | Approx. 2.5 hours |
| Playtime | Approx. 8-10 hours |
| Motion Control | 6-axis Gyroscope |
| Vibration | Dual Motors, 4 adjustable levels |
| Turbo Function | 3 adjustable speeds, Auto Turbo |
| Weight | 16 ounces (approx. 453g) |
| Package Dimensions | 6.3 x 5.3 x 2.3 inches |
| Date First Available | August 4, 2020 |
9. Warranty and Support
This product is a third-party controller. For any warranty claims, technical support, or further assistance, please refer to the contact information provided with your purchase or visit the official KINGEAR support channels.
Please retain your proof of purchase for warranty purposes.