1. Introduction
The LEXIN ET-COM Motorcycle Bluetooth Headset is designed to enhance your riding experience by providing seamless communication and entertainment. This system allows for two-way intercom communication between riders, Bluetooth connectivity for phone calls and music, FM radio, and voice assistant integration. Its robust design ensures reliable performance in various weather conditions.

Figure 1: LEXIN ET-COM Motorcycle Bluetooth Headset.
Key Features:
- 2-Way Intercom: Supports communication between 2 riders up to 1200 meters (0.8 miles).
- Bluetooth V5.0: Ensures stable and efficient wireless connectivity.
- DSP & CVC Advanced Noise Cancellation: Reduces background noise for clear audio, even at speeds up to 120km/h.
- Long Battery Life: 800mAh battery provides up to 15 hours of music streaming, 8 hours of talk time, and 300 hours of standby time.
- FM Radio & Voice Assistant: Access FM radio and voice commands (Siri, S Voice) for hands-free operation.
- IP67 Waterproof: Designed to work effectively in rainy conditions.
- 6 Colors DIY Shells: Interchangeable face plates to customize the unit's appearance.
2. What's in the Box
The LEXIN ET-COM package includes the following components:
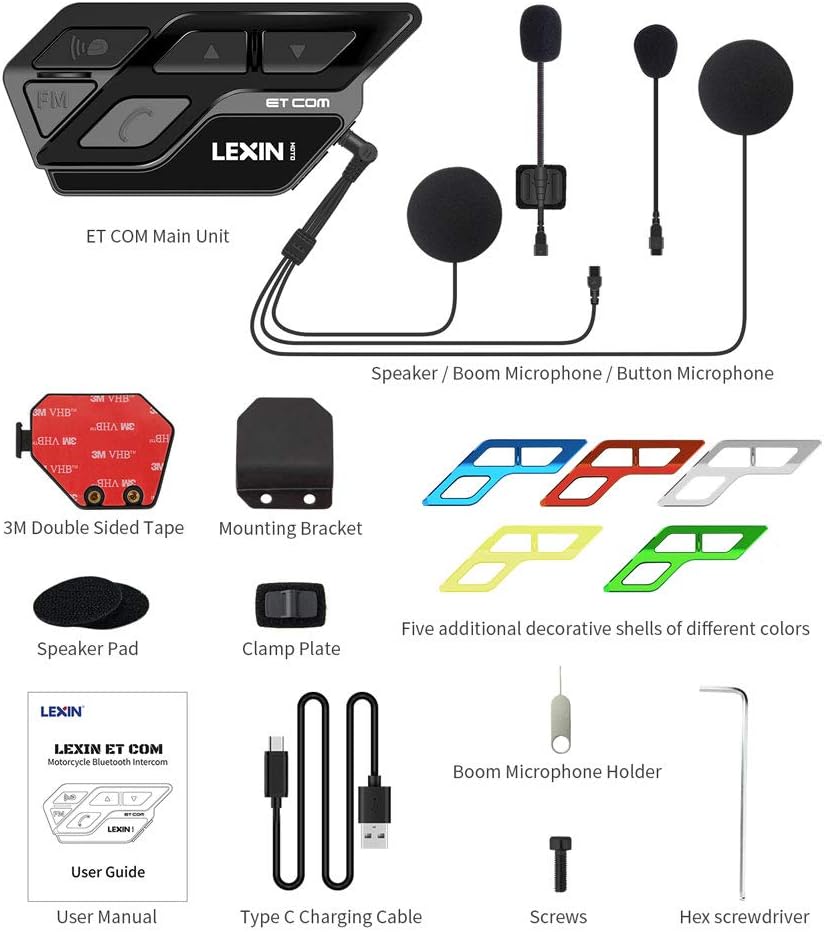
Figure 2: Package Contents.
- Main Unit (x2)
- Hi-fi speaker with boom and button mics (x2)
- Pins (x2)
- Allen Wrench (x2)
- Screws (x4)
- Boom Microphone Holder (x2)
- Speaker Pad (x4)
- Metal Mounting Bracket (x2)
- 3M Double Sided Adhesive (x2)
- User Manual
- Type-C USB Charging Cable
- Interchangeable Face Plates (x2)
For a visual unboxing experience, please refer to the official unboxing video:
Video 1: LEXIN Motorcycle Bluetooth for Helmet ETCOM Unboxing. This video demonstrates the contents of the package and initial handling of the components.
3. Setup and Installation
Proper installation is crucial for optimal performance and comfort. Follow these steps carefully:
3.1. Helmet Preparation
It is recommended to remove the inner padding of your helmet before installation to facilitate easier access and wire routing. The padding can be re-applied later to hide wires.
3.2. Mounting Bracket Installation
The ET-COM unit can be mounted using either the metal clamp bracket or the 3M double-sided adhesive tape.
- Using the Metal Clamp Bracket: Insert the metal plate between the inner padding and the outer shell of your helmet. Secure it with the provided screws and Allen wrench. Ensure it is tightened firmly to prevent movement.
- Using 3M Double-Sided Adhesive: If the clamp bracket is not suitable for your helmet, you can directly stick the adhesive mount to a flat surface on your helmet. Remove the red protective layer from the 3M tape before applying.

Figure 3: Easy Installation Guide.
3.3. Speaker and Microphone Installation
The headset includes two speakers and two microphone options (boom mic and button mic). The speakers have different wire lengths; the shorter wire is for the left side, and the longer wire is for the right side.
- Attach the Velcro pads to the back of each speaker.
- Place the speakers inside the helmet's ear pockets, ensuring they are positioned directly over your ears for optimal audio. Press firmly to secure the Velcro.
- Choose your preferred microphone:
- Boom Microphone: Ideal for open-face or modular helmets. Connect the boom mic to the main unit's microphone port. Secure it inside the helmet, ensuring it is positioned in front of your mouth. You can use the optional boom microphone holder for added stability.
- Button Microphone: Suitable for full-face helmets. Connect the button mic to the main unit's microphone port. Attach it to a suitable flat surface inside the helmet using its adhesive backing.
- Route all wires neatly under the helmet's inner padding to keep them hidden and comfortable.
3.4. Attaching the Main Unit
Once the speakers and microphone are installed, attach the main ET-COM unit to the mounting bracket.
- Align the main unit with the quick-release plate on the mounting bracket.
- Press the spring button on the mounting bracket and slide the main unit into place until it clicks securely.
- Connect the 3.5mm jack from the speakers/microphone assembly into the corresponding port on the main unit. Push firmly to ensure a waterproof seal.
For a detailed visual guide on the installation process, please watch the official installation video:
Video 2: LEXIN Motorcycle Bluetooth ETCOM Installation. This video provides step-by-step instructions for installing the headset components into a helmet.
4. Operating Instructions
The LEXIN ET-COM is designed for intuitive operation with large, glove-friendly buttons.

Figure 4: LX-ET COM Key Features.
4.1. Power On/Off and Pairing
- Power On: Press and hold the power button until the indicator light turns on.
- Power Off: Press and hold the power button until the indicator light turns off.
- Bluetooth Pairing: In power-off state, press and hold the power button until the indicator light flashes red and blue alternately. This indicates pairing mode. Search for "LEXIN ET-COM" on your device's Bluetooth settings and connect.
- Universal Pairing: The ET-COM supports universal pairing with most Bluetooth headsets on the market. Follow the pairing instructions for both devices.

Figure 5: Universal Pairing Capability.
4.2. Intercom Communication
The ET-COM allows for two-way intercom communication between two paired units up to 1200 meters (0.8 miles).
- Initiate Intercom: After pairing two ET-COM units, a short press of the intercom button on either unit will initiate the intercom connection.
- End Intercom: Short press the intercom button again to end the conversation.

Figure 6: 1200m Intercom Distance.
4.3. Phone Calls and Voice Assistant
- Answer/End Call: Short press the phone button to answer an incoming call or end an ongoing call.
- Reject Call: Long press the phone button to reject an incoming call.
- Redial Last Number: Double-press the phone button to redial the last dialed number.
- Voice Assistant: Long press the voice assistant button to activate Siri or other voice assistants on your connected smartphone.
4.4. Music and FM Radio
- Play/Pause Music: Short press the play/pause button to control music playback from your connected device.
- Next/Previous Track: Use the up/down buttons to skip tracks.
- FM Radio On/Off: Short press the FM button to turn the FM radio on or off.
- Tune FM Stations: Use the up/down buttons to change FM stations when the radio is active.
See the product in action with these official videos:
Video 3: LEXIN ETCOM Motorcycle Bluetooth Headset. A brief overview of the headset's features and usage.
Video 4: LEXIN Motorcycle Bluetooth Headset ETCOM Introduction. Introduces the main functionalities of the ET-COM headset.
5. Maintenance
5.1. Charging the Battery
The ET-COM unit is equipped with an 800mAh Lithium Ion battery. Connect the provided Type-C USB charging cable to the unit's charging port and to a suitable USB power source. A full charge takes approximately 1.5 hours.

Figure 7: Battery Life Overview.
5.2. Cleaning and Care
- Wipe the main unit with a soft, damp cloth. Do not use harsh chemicals or abrasive cleaners.
- Ensure the USB charging port cover is securely closed when not charging to maintain its IP67 waterproof rating.
- Store the unit in a cool, dry place when not in use.

Figure 8: IP67 Waterproof Rating.
6. Troubleshooting
If you encounter issues with your LEXIN ET-COM, try the following common troubleshooting steps:
- No Power: Ensure the unit is fully charged. Check the charging cable and power source.
- Cannot Pair: Make sure the unit is in pairing mode (flashing red and blue). Ensure Bluetooth is enabled on your device and it's within range. Try restarting both devices.
- Intercom Disconnects: Check if both units are within the 1200m range. Obstacles or strong interference can affect connection stability.
- Poor Audio Quality: Ensure speakers are correctly positioned over your ears. Check microphone placement. Verify that noise cancellation is active.
- Buttons Unresponsive: Try resetting the unit (refer to the full user manual for specific reset procedures if available).
For more detailed troubleshooting or specific technical support, please refer to the comprehensive user manual provided with your product or visit the official LEXIN support website.
7. Specifications
| Feature | Detail |
|---|---|
| Brand | LEXIN |
| Model Name | ETCOMDP |
| Item Model Number | LEXIN ET COM |
| Connectivity Technology | Wireless (Bluetooth) |
| Bluetooth Version | 5.0 |
| Frequency Response | 2480 MHz |
| Battery Life | 8 Hours (Talk Time) |
| Water Resistance Level | IP67 Waterproof |
| Noise Control | Active Noise Cancellation |
| Special Features | Built-In Voice Assistant, Hi-Fi Speakers, FM Radio, Fast Charging |
| Item Weight | 1.41 ounces (40 Grams) |
| Product Dimensions | 3.74 x 1.73 x 0.9 inches |
8. DIY Shells (Customization)
The LEXIN ET-COM comes with 6 interchangeable colored shells, allowing you to customize your unit to match your helmet or personal style. The available colors are Black, Red, Blue, Green, Yellow, and Silver.

Figure 9: Interchangeable Face Plates.
To change the shell:
- Locate the small hole on the underside of the main unit.
- Use the provided pin (or a similar small, pointed tool) to gently push the existing shell outwards from this hole until it detaches.
- Select your desired colored shell. Align it with the main unit and press firmly until it clicks securely into place.
Watch this video for a demonstration on how to change the shells:
Video 5: LEXIN motorcycle Intercom ETCOM Instruction. This video includes a segment demonstrating the shell replacement process.
9. Warranty and Support
LEXIN products are designed for quality and durability. For specific warranty information, product registration, or technical support, please refer to the warranty card included in your product packaging or visit the official LEXIN website.
You can also find additional resources and FAQs on the LEXIN brand store page on Amazon: LEXIN Store.


