1. Product Overview
The Eyoyo 7-inch portable monitor is a versatile display solution designed for various applications, including CCTV surveillance, car entertainment, gaming, and as a secondary display for computers. It features a 1024x600 resolution, wide viewing angles, and multiple input options for broad compatibility.

Figure 1.1: Eyoyo 7-inch portable monitor with its remote control.
Key Features:
- High Resolution & Wide Viewing Angle: 1024x600 resolution with 160° horizontal and vertical viewing angles for clear and detailed images from various perspectives.
- Car-Mounted Capability: Includes a cigarette lighter charging cable, making it suitable for use as an in-car monitor.
- Rich Interface Options: Supports HDMI, AV, and VGA inputs, compatible with devices like PS3, PS4, Xbox 360, Switch, iPhone, Mac Mini, DVD players, VCDs, and video cameras.
- Screen Flip Function: Horizontal and vertical image mirroring functions are available, useful for CCTV camera setups and inspection tasks.
- Multi-language OSD Menu: Supports multiple languages for the On-Screen Display menu, catering to diverse user needs.
- Built-in Speakers: Equipped with stereo speakers for audio output.
- Touch Sensor Buttons: Features touch-sensitive control buttons for a sleek design and easy operation.
2. Package Contents
Please check the package contents upon opening to ensure all items are present and undamaged.

Figure 2.1: Included accessories and components.
- 1 x Eyoyo 7-inch Monitor
- 1 x Monitor Stand
- 1 x Cigarette Lighter Charging Cable
- 1 x Suction Mount
- 1 x Adhesive Tape
- 1 x Power Adapter
- 1 x Remote Control
- 1 x AV Cable
- 1 x HDMI Cable
- 1 x Mini VGA Cable
- 1 x User Manual
3. Setup
3.1. Assembling the Stand
Attach the monitor to the provided stand or suction mount. Ensure it is securely fastened before use.

Figure 3.1: Example of monitor setup in a vehicle using the suction mount.
3.2. Connecting Power
- For indoor use, connect the included power adapter to the monitor's DC 12V input port and then to a wall outlet.
- For car use, connect the included cigarette lighter charging cable to the monitor's DC 12V input port and then to your vehicle's cigarette lighter socket.
3.3. Connecting Input Sources
The monitor supports HDMI, VGA, and AV inputs. Choose the appropriate cable for your device and connect it to the corresponding port on the monitor.

Figure 3.2: Multiple interface connections for various devices.
- HDMI: Connect to devices like game consoles (PS3, PS4, Xbox, Switch), cameras, or Raspberry Pi.
- VGA: Connect to PCs or security systems.
- AV: Connect to TV boxes or DVD players.
4. Operation
4.1. Basic Controls
The monitor can be controlled using the touch sensor buttons on the front panel or the included remote control.

Figure 4.1: Touch sensor buttons and speaker locations.
- Power Button: Turns the monitor on/off.
- Menu Button: Accesses the On-Screen Display (OSD) menu.
- Arrow Buttons (< / >): Navigate through menu options or adjust values.
- AV Button: Selects the AV input source.
- IR Sensor: Receives signals from the remote control.
4.2. OSD Menu Navigation
Press the "MENU" button to open the OSD menu. Use the arrow buttons to navigate through options and the "MENU" button again to confirm selections or enter sub-menus. Press the "Power" button to exit the menu.
4.3. Input Selection
Press the "AV" button repeatedly to cycle through available input sources (HDMI, VGA, AV).
4.4. Image Adjustment
Within the OSD menu, you can adjust various image settings:
- Brightness: Adjusts the overall luminance of the screen.
- Contrast: Controls the difference between light and dark areas.
- Color/Saturation: Adjusts the intensity of colors.
- Sharpness: Enhances the detail of the image.
4.5. Screen Flip Function
The monitor supports horizontal and vertical image mirroring. This feature is particularly useful for specific installations, such as CCTV cameras where the monitor might be mounted upside down or in a mirrored orientation.
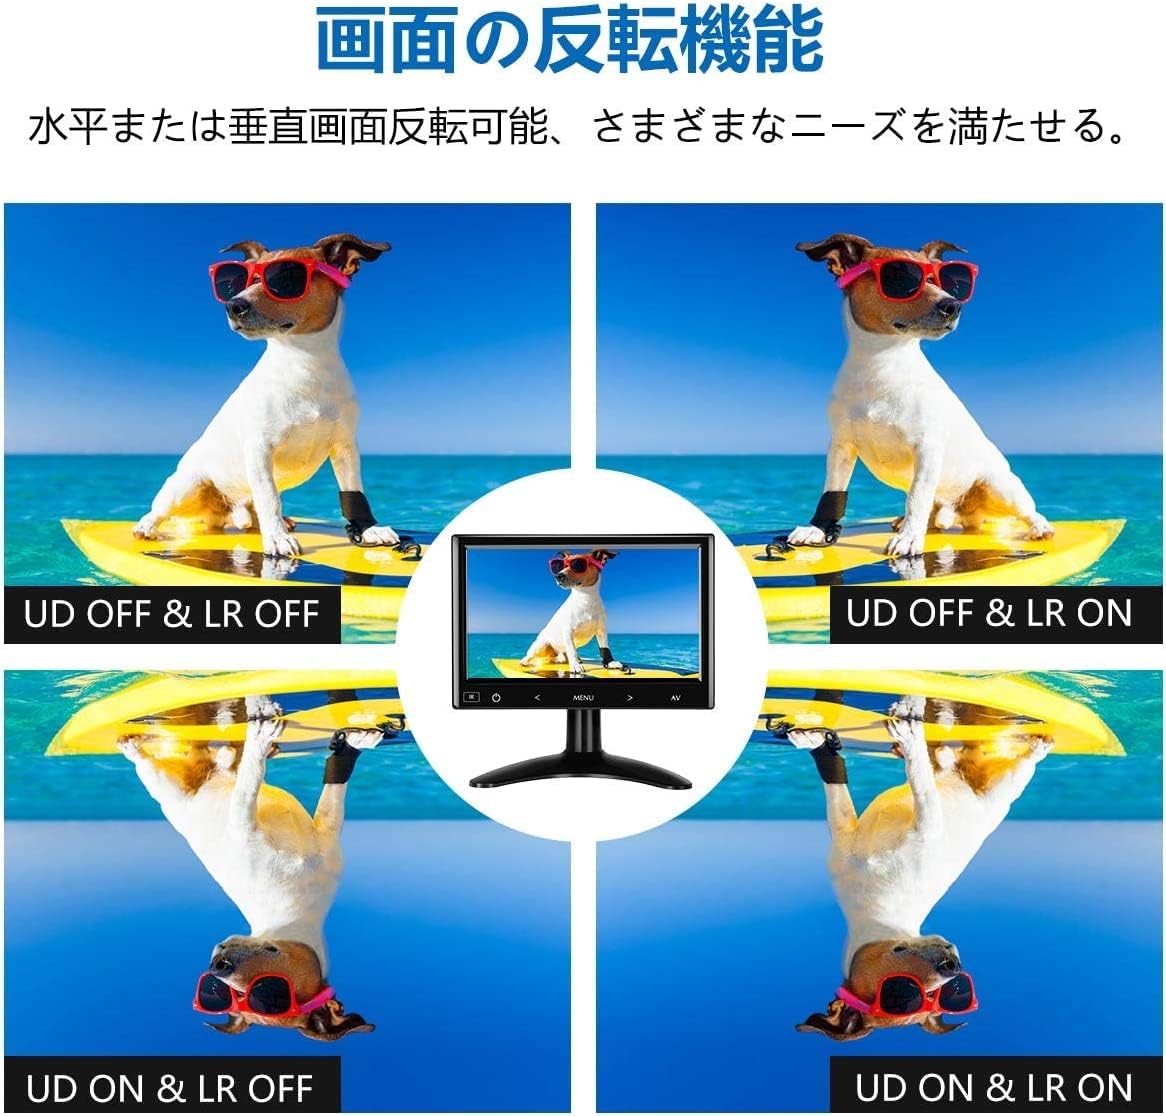
Figure 4.2: Demonstrating the horizontal and vertical screen flip capabilities.
4.6. Audio Settings
The monitor has built-in stereo speakers. Adjust the volume through the OSD menu or directly using the remote control.
5. Maintenance
5.1. Cleaning the Monitor
- Always disconnect the power cable before cleaning.
- Use a soft, lint-free cloth slightly dampened with water or a mild, non-abrasive screen cleaner.
- Do not spray liquid directly onto the screen or into any openings.
- Avoid using harsh chemicals, solvents, or abrasive materials.
5.2. Storage
When not in use for extended periods, store the monitor in a cool, dry place away from direct sunlight and extreme temperatures. It is recommended to keep the original packaging for safe storage and transport.
6. Troubleshooting
| Problem | Possible Cause | Solution |
|---|---|---|
| No image on screen |
|
|
| No sound |
|
|
| Image is distorted or unclear |
|
|
| Remote control not working |
|
|
7. Specifications
| Feature | Detail |
|---|---|
| Brand | Eyoyo |
| Model | B08DXMX1BY |
| Screen Size | 7 inches |
| Resolution | 1024x600 |
| Aspect Ratio | 16:9 |
| Viewing Angle | 160° (Horizontal/Vertical) |
| Input Interfaces | HDMI, VGA, AV |
| Built-in Speakers | Yes (Stereo) |
| Control Method | Touch Sensor Buttons, Remote Control |
| Product Dimensions | 9 x 14.5 x 21 cm |
| Product Weight | Approx. 0.89 kg (monitor only) |
8. Warranty and Support
Eyoyo provides a 1-year warranty for this product, covering returns and refunds for manufacturing defects. If you encounter any issues during use, please do not hesitate to contact our customer support team.
For assistance, please refer to the contact information provided on the product packaging or the official Eyoyo website.