1. Introduction
This manual provides instructions for the installation, operation, and maintenance of your JVR Automatic Chicken Coop Door Opener. This device is designed to automate the opening and closing of your chicken coop door using a light sensor, enhancing the safety and convenience for your poultry.
Please read this manual thoroughly before installation and operation to ensure proper function and longevity of the product.
2. Safety Information
- Anti-Pinch Safety Feature: The door is equipped with a built-in pressure sensor. If an obstruction, such as a bird, is detected during closing, the door will automatically reverse and reopen. If repeatedly triggered, the system will stop and remain open to prevent injury.
- Ensure all electrical connections are secure and protected from moisture.
- Do not attempt to modify the device. Unauthorized modifications may void the warranty and pose safety risks.
- Keep children and pets away from the moving door mechanism during operation.
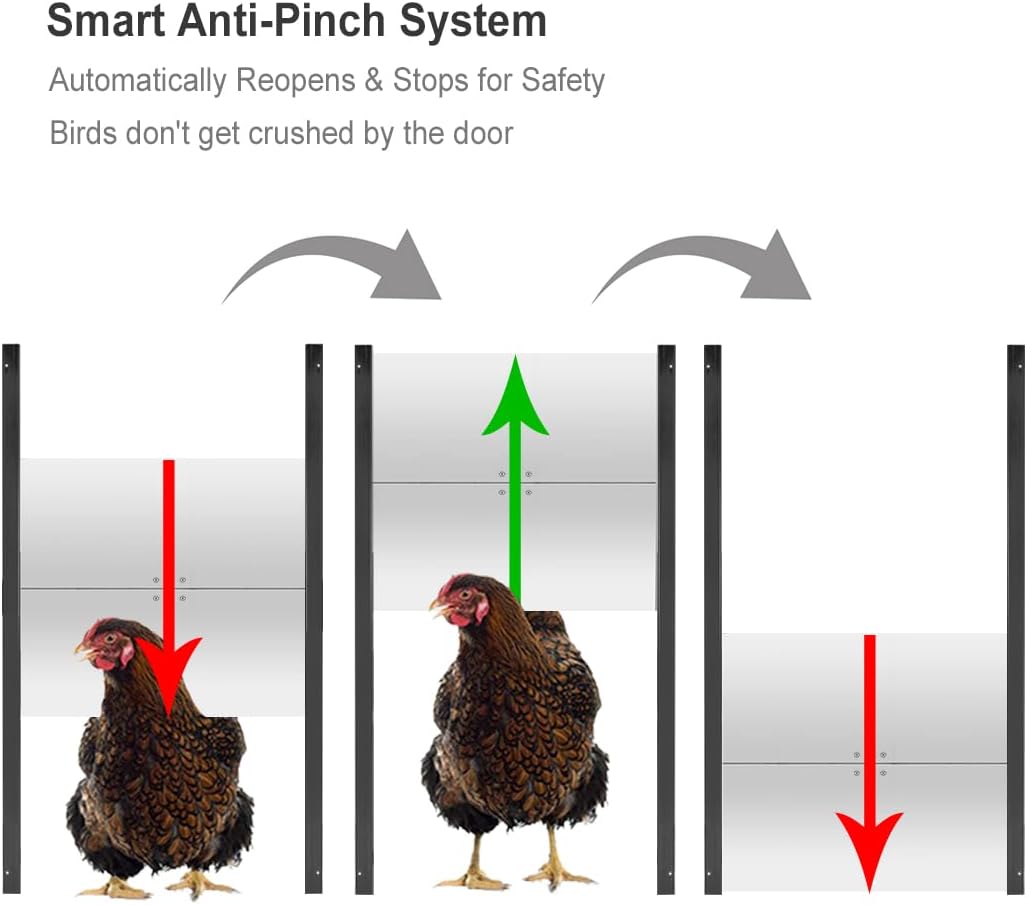
Image: Anti-Pinch System Diagram. This image shows a three-panel diagram. The first panel depicts a chicken partially under a closing door (red arrow down), indicating an obstruction. The second panel shows the door reversing and opening (green arrow up) to avoid the chicken. The third panel shows the door closing fully (red arrow down) once the path is clear.
3. Package Contents
Verify that all components are present and undamaged before proceeding with installation.
- Control Box (with integrated electronics)
- Linear Actuator
- Aluminum Door Panel (11.8" W x 12.6" H)
- Light Sensor (39 3/8 inches long cable)
- Power Adapter
- Mounting Hardware (screws, brackets)

Image: System Overview. This image displays the complete system, including the control box, linear actuator, aluminum door, light sensor, and power adapter, all connected and ready for installation on a coop.
4. Setup and Installation
The JVR Automatic Chicken Coop Door Opener is designed for straightforward installation without complex wiring.
4.1 Preparation
- Choose a suitable location on your chicken coop for the door and control box. Ensure the door opening is clear of obstructions.
- The door requires an opening of approximately 11.8 inches wide by 12.6 inches high.
- Ensure access to a power outlet for the power adapter.
4.2 Installation Steps
- Mount the Door: Securely attach the aluminum door panel to your coop around the opening using the provided mounting hardware. Ensure it slides smoothly.
- Install the Linear Actuator: Mount the linear actuator above the door opening, ensuring it aligns with the door for smooth vertical movement. The actuator should be firmly attached to a sturdy surface.
- Mount the Control Box: Install the control box in a protected, weatherproof location. It can be installed indoors or outdoors, but protection from direct heavy rain is recommended for longevity.
- Connect Components: Connect the linear actuator cable and the light sensor cable to the designated ports on the control box.
- Connect Power: Plug the power adapter into the control box, then into a standard electrical outlet.

Image: Easy Installation Diagram. This image illustrates the simple connections between the control box, linear actuator, light sensor, and power adapter, highlighting the 'plug and play' nature of the setup.
5. Operating Instructions
The JVR Automatic Chicken Coop Door Opener offers both automatic light-sensing operation and manual control.
5.1 Automatic Mode (Light Sensor)
- The external light sensor detects ambient light levels.
- The door will automatically open at dawn and close at dusk. There is a 30-second delay before the door starts moving to allow poultry to enter or exit.
- Position the light sensor in an area that accurately reflects the natural light conditions your coop experiences. Avoid placing it in direct artificial light or constant shadow.

Image: Day and Night Operation. This image shows two panels: one with a chicken coop door open during daylight hours, and another with the same door closed during nighttime, illustrating the automatic light sensor function.

Image: External Light Sensor. A detailed view of the light sensor component, which has a long cable for flexible placement to detect ambient light.
5.2 Manual Override
- The control box features a switch for manual operation.
- To manually open or close the door, set the switch to 'Open' or 'Close'.
- Return the switch to 'AUTO' for automatic light-sensing operation.

Image: Control Box with Manual Switch. This image shows the side of the control box with a rotary switch labeled 'Open', 'Close', and 'AUTO', allowing for manual operation or automatic light-sensing mode.
6. Maintenance
- Cleaning: Periodically clean the door tracks and the door panel to ensure smooth operation. Remove any debris, dirt, or ice that may impede movement.
- Light Sensor: Keep the light sensor clean and free from obstructions to ensure accurate light detection.
- Actuator: Inspect the linear actuator for any signs of wear or damage. Ensure its mounting is secure.
- Weather Protection: While the control box is weatherproof, it is recommended to keep it in a dry place and protect it from extreme weather conditions for optimal performance and longevity.
- Power Supply: Ensure the power adapter and cable are free from damage.
7. Troubleshooting
- Door Not Opening/Closing:
- Check power connection to the control box.
- Ensure the light sensor is clean and exposed to appropriate light levels for automatic operation.
- Verify the manual override switch is in the 'AUTO' position for automatic function.
- Check for obstructions in the door path.
- Door Reverses Unexpectedly:
- This indicates the anti-pinch safety feature is active. Check for any obstructions (e.g., poultry, debris) in the door's path.
- Ensure the door tracks are clean and allow for smooth movement.
- Inconsistent Automatic Operation:
- The light sensor may be affected by artificial light sources (e.g., yard lights) or deep shadows. Adjust the sensor's position for more accurate light detection.
- Clean the light sensor lens.
8. Specifications
| Model | B08DS86XTM |
| Brand | JVR |
| Door Dimensions | 11.8" (W) x 12.6" (H) |
| Overall Product Dimensions | 12"L x 2"W x 42"H |
| Item Weight | 5 Pounds |
| Material | Aluminum, Stainless Steel |
| Operation Style | Automatic (Light Sensor) / Manual Override |
| Special Feature | Weather Resistant, Anti-Pinch Safety |
| Target Audience | Duck, Chicken (Medium Breeds, Large Breeds) |
| Use Environment | Indoor, Outdoor |

Image: Door Dimensions. This image provides a clear visual of the aluminum door panel, highlighting its width of 11.8 inches and height of 12.6 inches.

Image: Linear Actuator. A detailed view of the robust linear actuator, which is responsible for the vertical movement of the coop door.
9. Warranty and Support
The JVR Automatic Chicken Coop Door Opener comes with a 1-year manufacturer's warranty from the date of purchase. This warranty covers defects in materials and workmanship under normal use.
For technical support, troubleshooting assistance, or warranty claims, please contact JVR customer service. Refer to your purchase documentation for contact details or visit the official JVR website.