Introduction
Thank you for choosing the Columbia 300 Lumen Rechargeable Multi-Color Headlamp. This manual provides essential information for the safe and efficient operation, maintenance, and troubleshooting of your headlamp. Please read it thoroughly before use and retain it for future reference.
This headlamp features super bright LEDs, an integrated motion sensor for hands-free operation, and 5 versatile lighting modes, powered by an ultra-lightweight rechargeable lithium polymer battery.
Product Overview
Familiarize yourself with the components of your Columbia headlamp.

Figure 1: Front view of the Columbia 300 Lumen Headlamp, showing the main LED lights and adjustable strap.

Figure 2: Top view of the headlamp, highlighting the power button and motion sensor activation button.
- Main LED Array: Provides primary illumination.
- Flood LED Array: Offers wider area illumination.
- Red Safety LED: For preserving night vision or signaling.
- Power Button: Controls power and cycles through modes.
- Motion Sensor Button: Activates/deactivates motion sensor function.
- Adjustable Headband: For comfortable and secure fit.
- Charging Port: Micro USB port for recharging the battery.
Setup
1. Initial Charging
Before first use, fully charge the headlamp battery. The headlamp comes with a pre-installed rechargeable lithium polymer battery.
- Locate the charging port cover on the side of the headlamp.
- Open the cover to expose the micro USB charging port.
- Connect the included micro USB cable to the headlamp's charging port and the other end to a USB power source (e.g., computer, wall adapter, portable power bank).
- A charging indicator light will illuminate (typically red) during charging and change color (typically green) when fully charged.
- Once fully charged, disconnect the cable and securely close the charging port cover to maintain water resistance.

Figure 3: Headlamp with charging port open and micro USB cable connected.
2. Adjusting the Headband
The elastic headband is adjustable to ensure a comfortable and secure fit on your head or over a helmet.
- Place the headlamp on your head.
- Use the adjustable buckle on the strap to tighten or loosen the headband until it fits snugly without being too tight.

Figure 4: Adjustable headband for a secure fit.
Operating Instructions
1. Power On/Off and Mode Selection
The headlamp features 5 versatile lighting modes.
- To Turn On: Press the Power Button (usually marked with a power symbol). The headlamp will turn on in the last used mode or a default mode.
- To Cycle Modes: While the headlamp is on, press the Power Button repeatedly to cycle through the available lighting modes:
- Spot High
- Spot Low
- Flood
- Spot + Flood Combo
- Flashing Red Safety
- To Turn Off: Press and hold the Power Button for approximately 2 seconds, or cycle through all modes until the light turns off.

Figure 5: Headlamp with flood illumination active.
2. Motion Sensor Function
The motion sensor allows you to turn the headlamp on or off with a wave of your hand, ideal for hands-free operation.
- To Activate Motion Sensor: With the headlamp on, press the Motion Sensor Button (usually marked with a hand wave symbol). A small indicator light (often green) will illuminate to confirm the motion sensor is active.
- To Use Motion Sensor: Wave your hand approximately 5-10 cm (2-4 inches) in front of the headlamp's sensor to turn the light on or off.
- To Deactivate Motion Sensor: Press the Motion Sensor Button again. The indicator light will turn off.
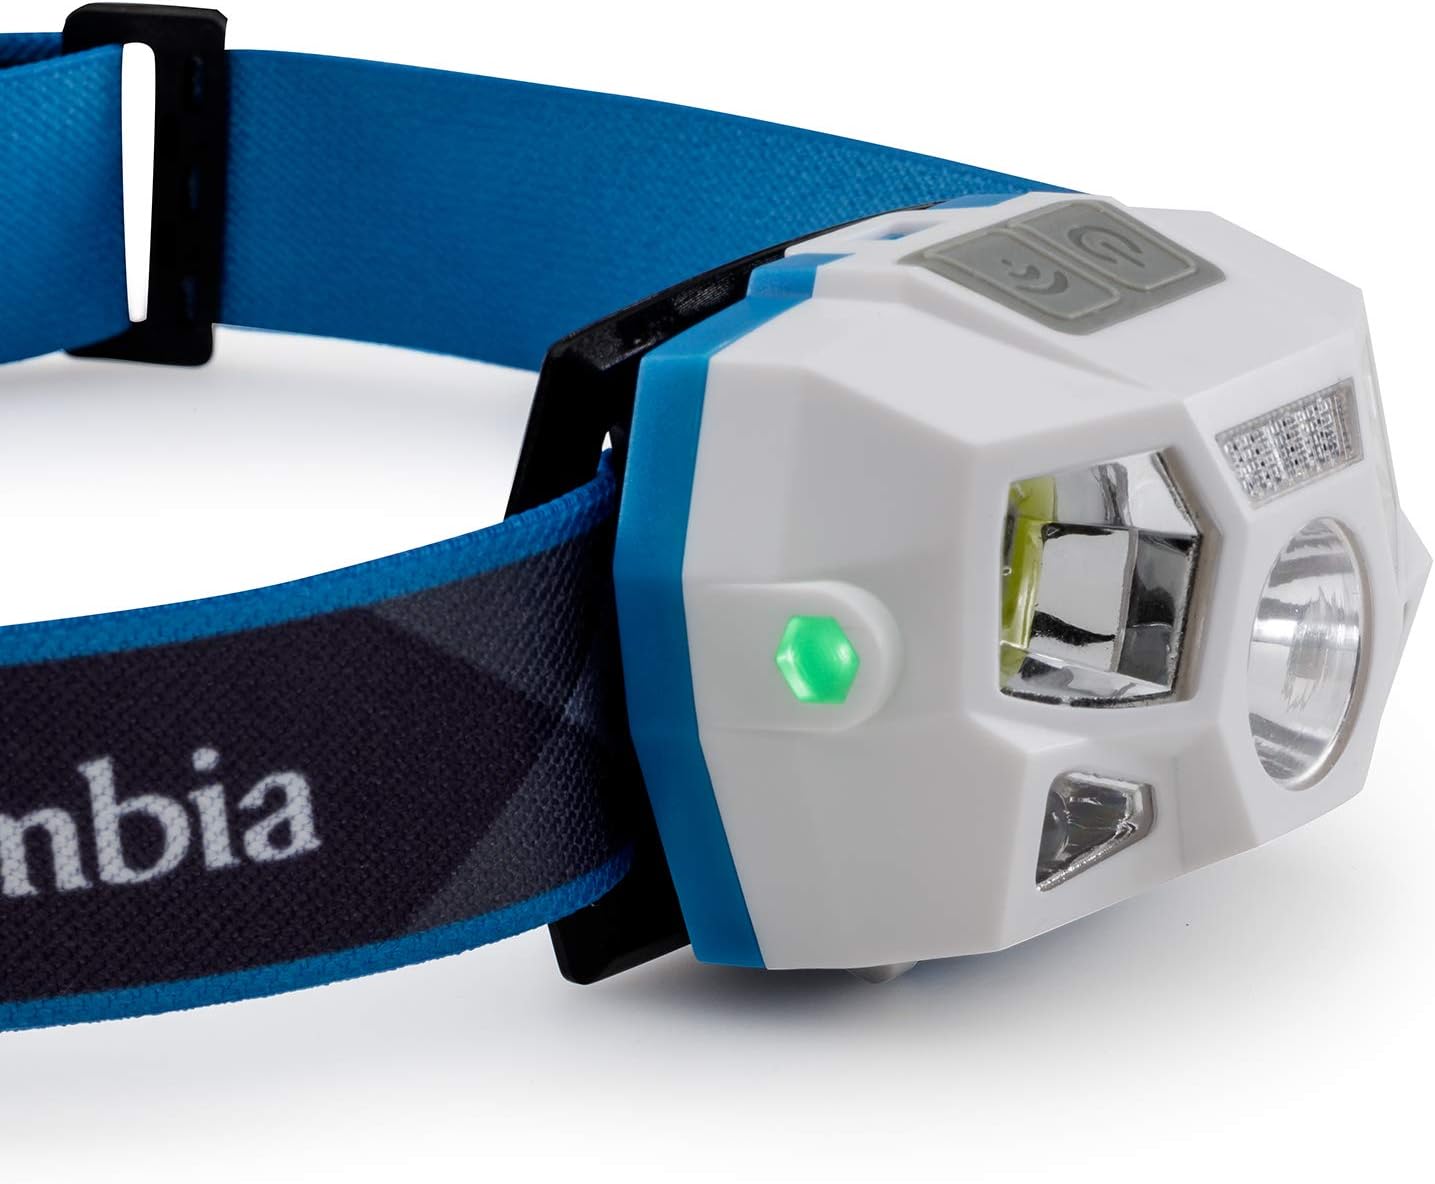
Figure 6: Green indicator light showing motion sensor is active.
Maintenance
1. Cleaning
- Wipe the headlamp body with a soft, damp cloth. Do not use abrasive cleaners or solvents.
- Ensure the charging port cover is securely closed before cleaning to prevent water ingress.
- The headband can be hand-washed with mild soap and water, then air-dried.
2. Battery Care
- To prolong battery life, avoid fully discharging the battery frequently.
- Recharge the battery regularly, even if not in use, at least once every 3-6 months.
- Store the headlamp in a cool, dry place away from direct sunlight and extreme temperatures.
3. Storage
When storing the headlamp for extended periods, ensure it is fully charged and stored in a protective case or bag to prevent damage.
Troubleshooting
| Problem | Possible Cause | Solution |
|---|---|---|
| Headlamp does not turn on. | Battery is discharged. | Charge the headlamp fully using the provided micro USB cable. |
| Light output is dim. | Low battery charge. | Recharge the battery. |
| Motion sensor not responding. | Motion sensor not activated or obstruction. | Ensure the motion sensor is activated (green indicator light on). Clear any obstructions in front of the sensor. Try waving your hand closer to the sensor. |
| Headlamp not charging. | Faulty cable or power source. | Try a different micro USB cable or a different USB power source. Ensure the cable is securely connected. |
Specifications
- Model Number: 50019
- Light Output: 300 Lumens
- Beam Distance: Up to 81 meters
- Battery Type: Rechargeable Lithium Polymer (1 included)
- Charging: Micro USB
- Run Time: Up to 2 hours (on high setting)
- Lighting Modes: Spot High, Spot Low, Flood, Spot + Flood Combo, Flashing Red Safety
- Special Features: Motion Sensor, 1m Impact Resistance, IPX4 Weather Resistance
- Material: Plastic
- Weight: 110 Grams
- Dimensions: 35 x 15 x 10 cm (approximate)
Safety Information
- Do not look directly into the LED light when it is on, as it may cause temporary vision impairment.
- Keep out of reach of children.
- Do not attempt to disassemble or modify the headlamp. This will void the warranty and may cause damage or injury.
- Use only the provided or a certified micro USB cable for charging.
- Avoid exposing the headlamp to extreme temperatures or direct sunlight for prolonged periods.
- Dispose of the battery according to local regulations. Do not dispose of in fire.
Warranty and Support
For warranty information or technical support, please refer to the official Columbia website or contact their customer service. Keep your purchase receipt as proof of purchase.
Online Support: Visit Columbia Customer Service