1. Introduction
This manual provides instructions for the safe and effective use of your DuraTech 1/4-inch Drive Preset Torque Wrench Set. Please read this manual thoroughly before operation and retain it for future reference.
2. Package Contents
The DuraTech 1/4-inch Drive Torque Wrench Set includes the following items:
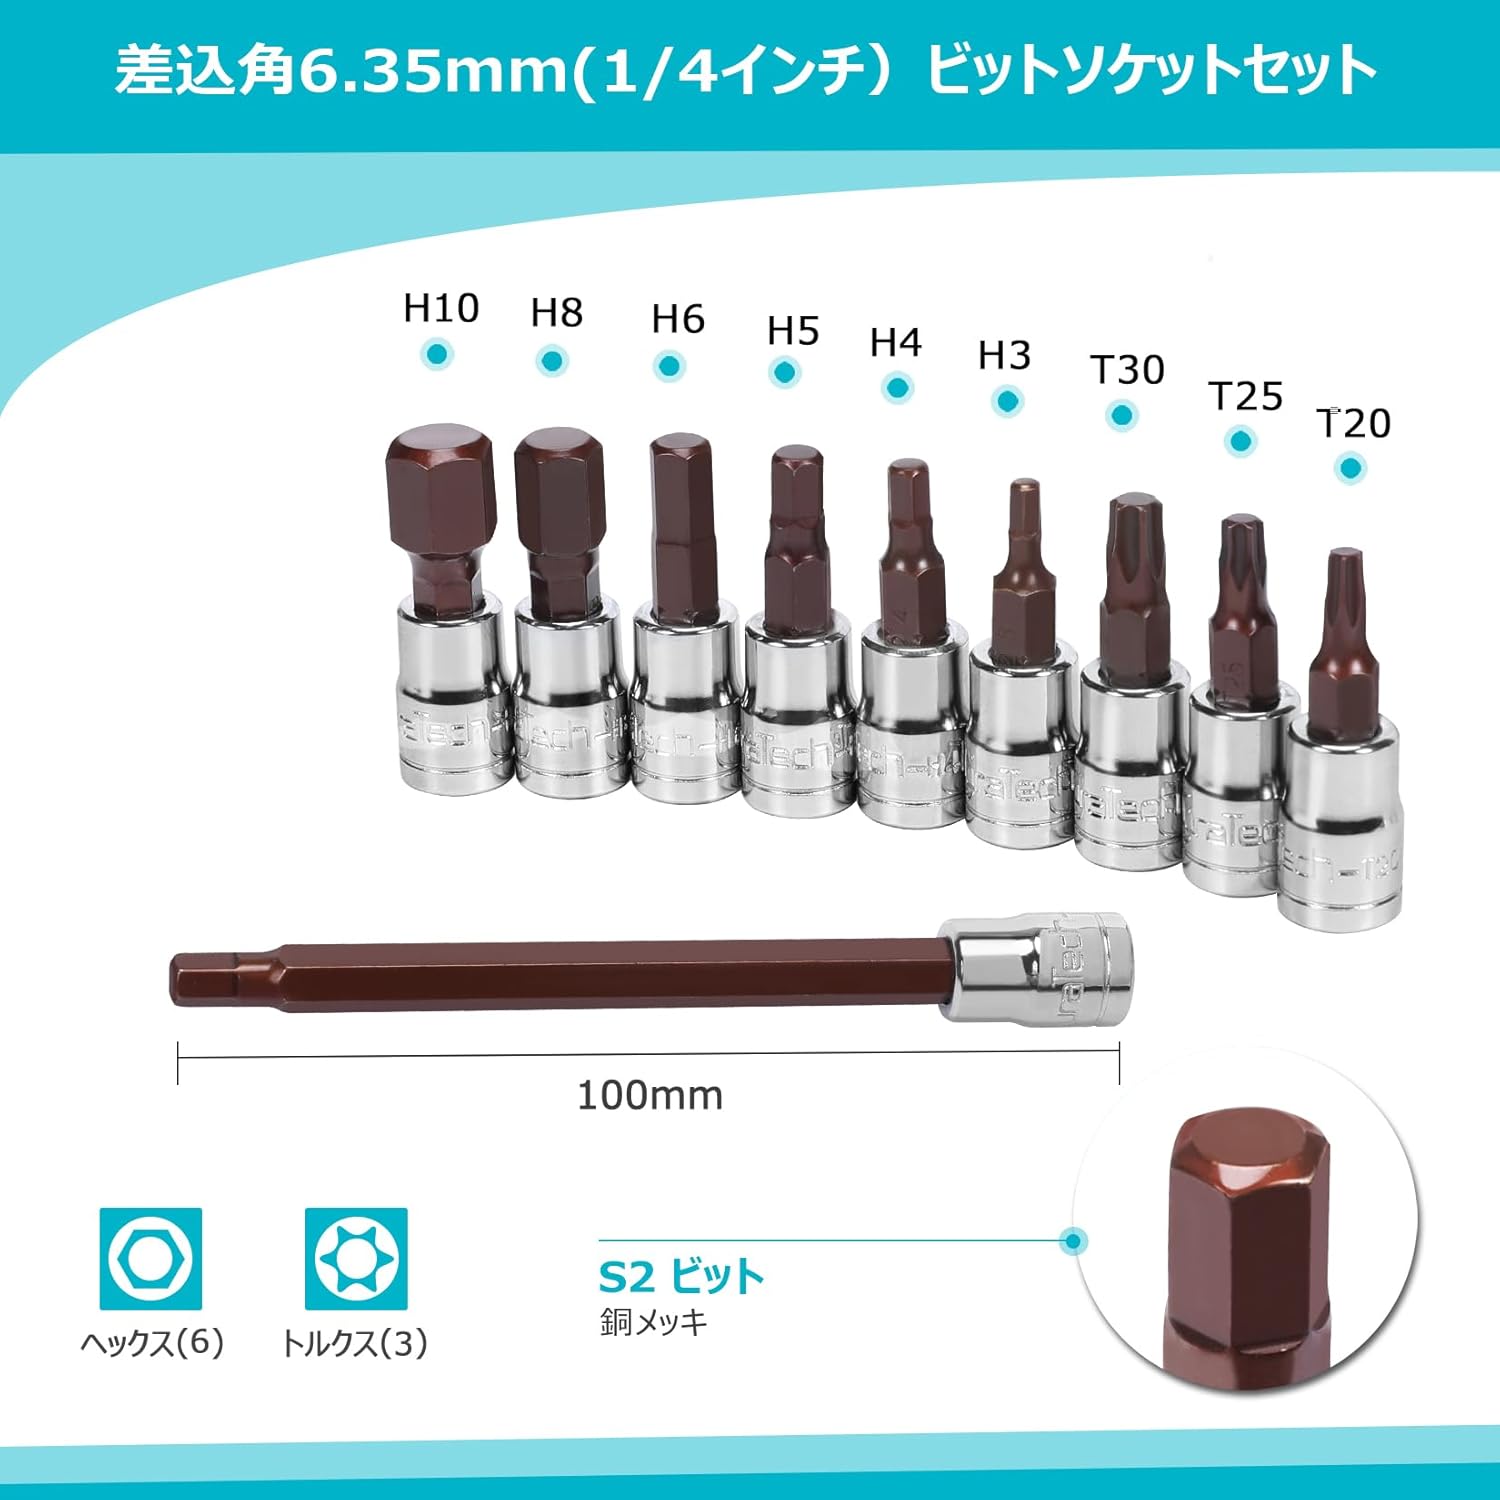
- 1x 1/4-inch Drive Torque Wrench
- 6x Hex Bit Sockets
- 3x Torx Bit Sockets
- 1x Long Hex Bit Socket
- 1x Storage Case
3. Specifications
| Brand | DURATECH |
| Model Number | DTMTTWS11.JP |
| Drive Size | 1/4 inch (6.35mm) |
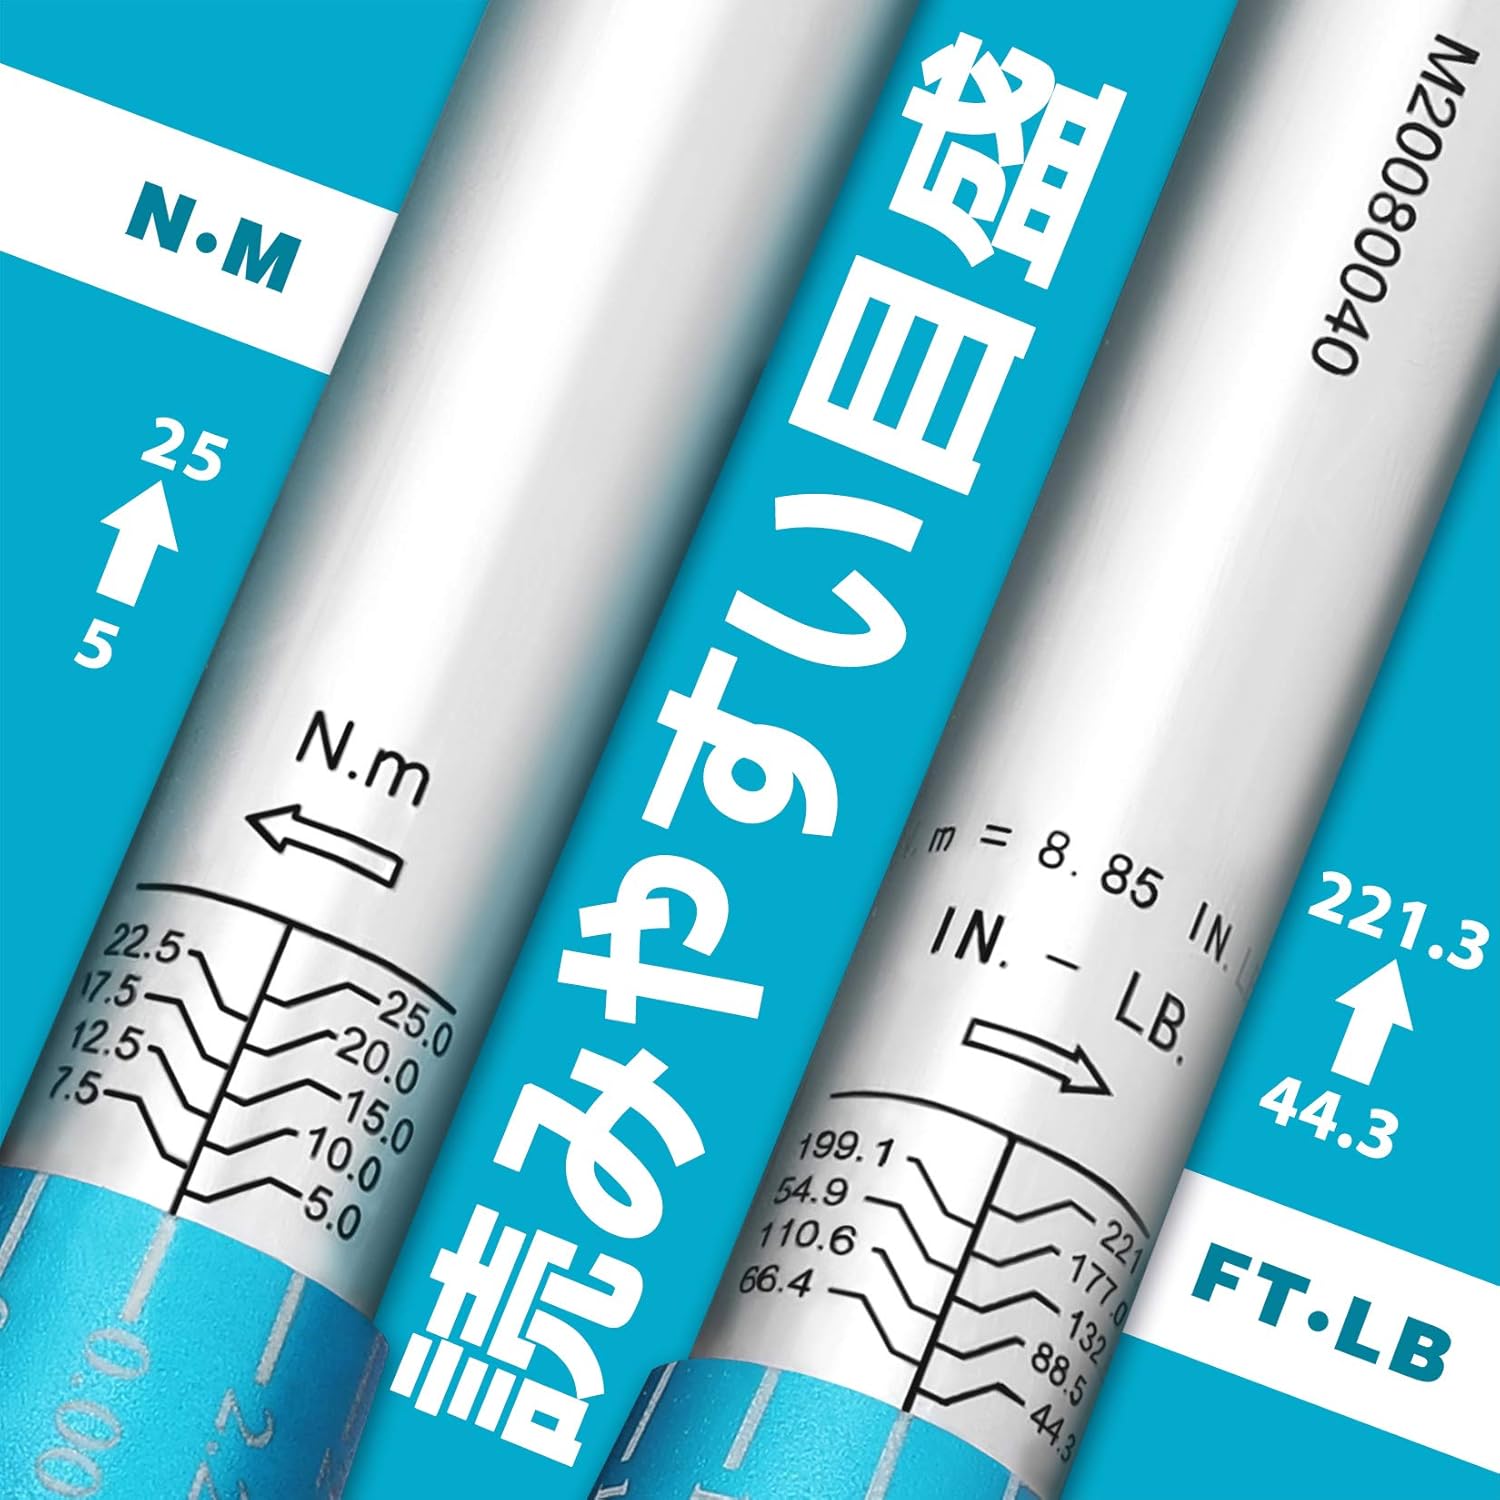
| Torque Range | 5 - 25 N·m (44.3 - 221.3 LB·FT) |
| Accuracy | ±4% |
| Torque Wrench Length | 24.1 cm (at minimum torque setting) |
| Torque Wrench Weight | 0.34 kg |
| Material | Chrome Vanadium Steel (Wrench), Copper-plated S2 Steel (Bits) |
| Case Dimensions | 34 x 10.5 x 5.5 cm |
4. Setup
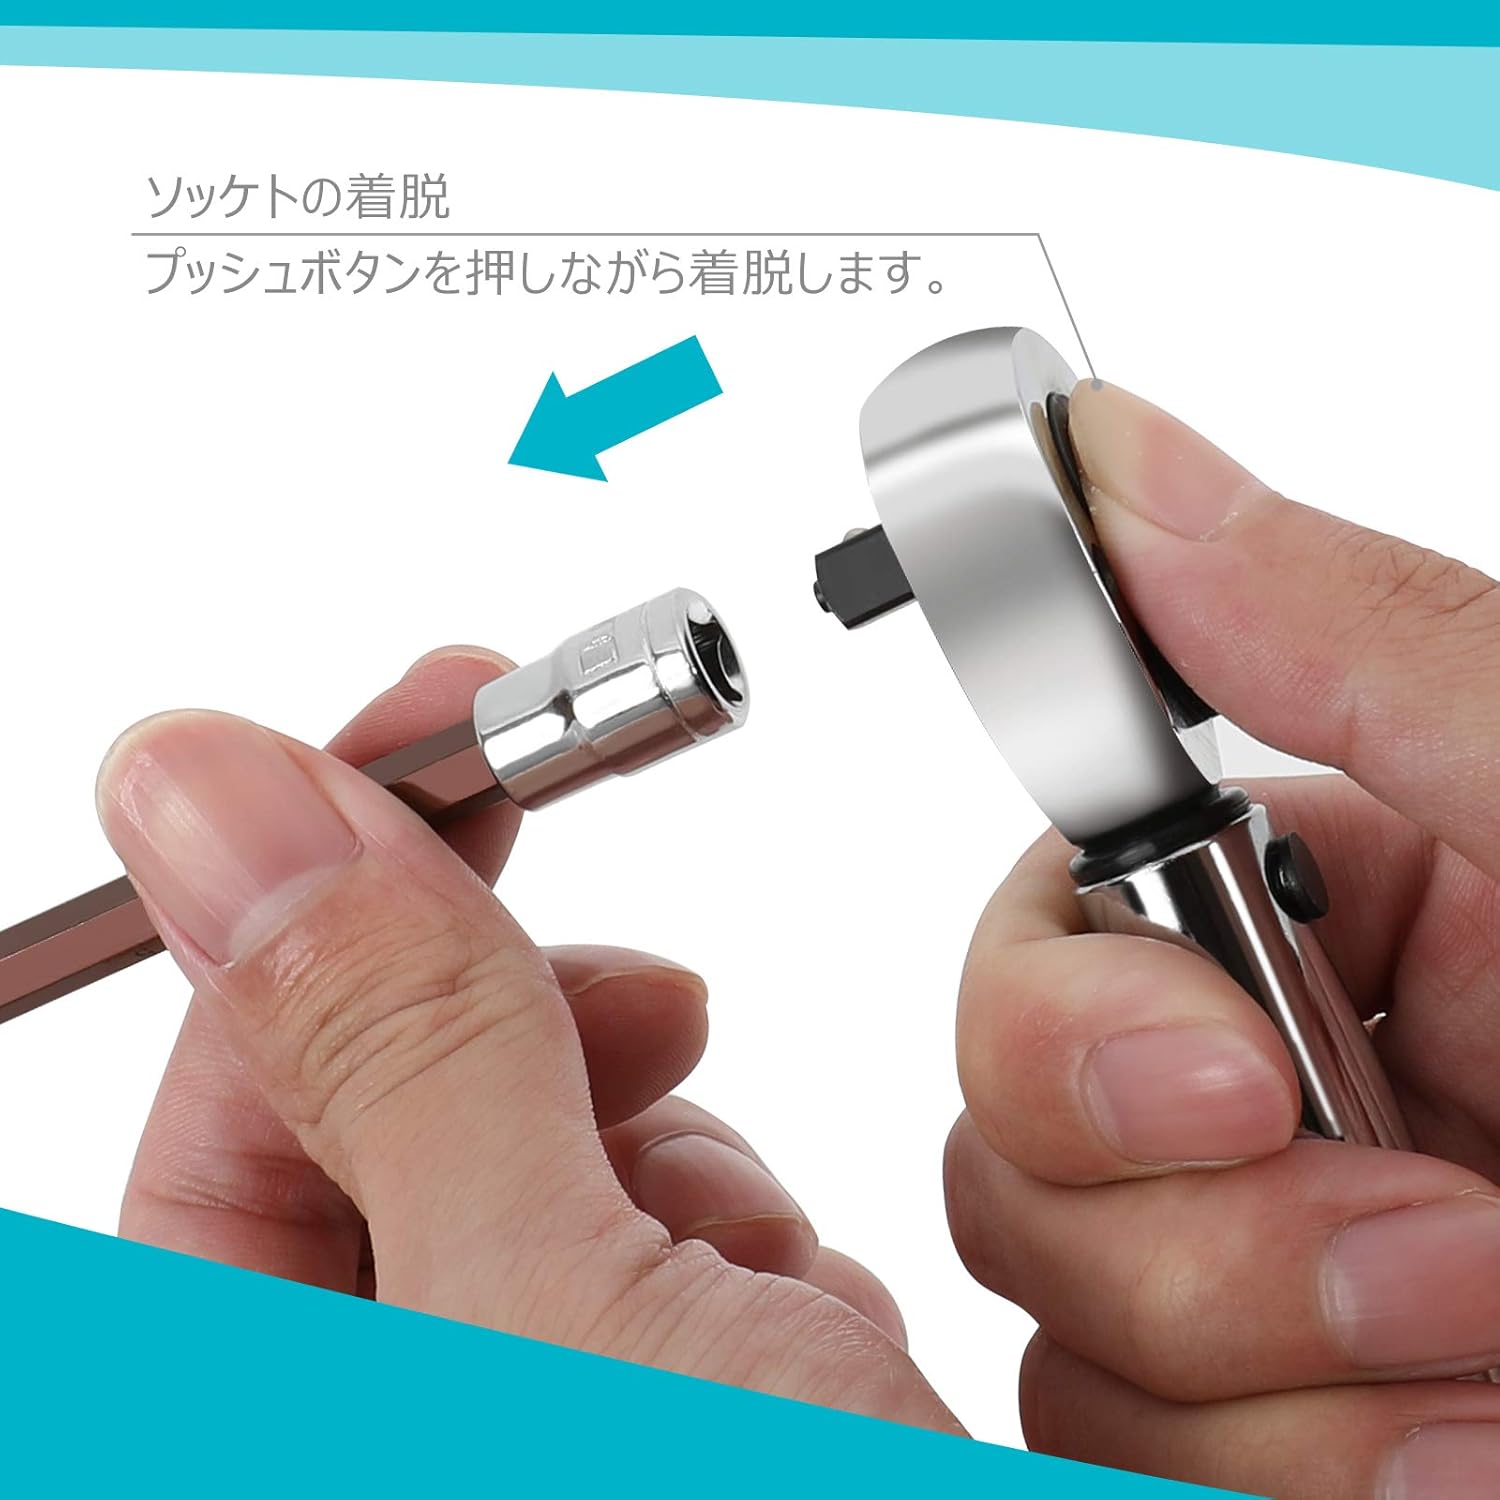
4.1 Attaching a Socket
- Press the push button located on the head of the torque wrench.
- While holding the button down, insert the desired socket onto the drive square.
- Once the socket is fully inserted, release the button. The socket is now securely attached.
4.2 Setting the Torque Value
- Unlock the adjustment mechanism by pulling down the locking ring located at the base of the handle.
- Rotate the handle grip to adjust the torque value. The main scale is laser-engraved, and the sub-scale is white on a turquoise background for clear reading. Align the desired torque value using both scales.
- Once the desired torque is set, push the locking ring back up to secure the setting. Ensure the ring is fully engaged to prevent accidental changes during use.

5. Operating Instructions
5.1 Using the Torque Wrench
Once the socket is attached and the torque value is set:
- Place the socket onto the fastener (bolt or nut) you intend to tighten.
- Apply steady, increasing force to the handle in the tightening direction (clockwise for most standard fasteners).
- Continue applying force until you hear and feel a distinct "click" from the wrench. This click indicates that the preset torque value has been reached.
- Immediately stop applying force once the click is detected. Further tightening will result in overtightening and potential damage.

5.2 Reversible Ratchet Head
The torque wrench features a 72-gear ratchet head with a reversible lever. This allows for quick switching between clockwise and counter-clockwise rotation for convenience, though the torque function is primarily for tightening.

6. Maintenance
- After each use, clean the torque wrench and bits with a dry, soft cloth. Do not use solvents or harsh chemicals.
- Store the torque wrench in its protective case to prevent damage and keep it free from dust and moisture.
- When storing for extended periods, set the torque wrench to its lowest torque setting (5 N·m) to relieve tension on the internal spring, which helps maintain accuracy.
- Avoid dropping the tool or subjecting it to impacts, as this can affect its calibration and accuracy.
- Regular calibration by a qualified professional is recommended to ensure continued accuracy, especially with frequent use.
7. Safety Precautions
WARNING: Failure to follow these safety precautions may result in injury or damage to the tool or workpiece.
- The torque measurement range is 5-25 N·m (44.3-221.3 LB·FT). Do not use the wrench if the desired torque exceeds this range. Applying torque above 25 N·m may damage the tool.
- Avoid overtightening. Continuing to apply force after the "click" sound indicates the preset torque has been reached will result in overtightening and can damage the fastener, workpiece, or the tool itself.
- This torque wrench is designed for tightening bolts and nuts only. Do not use it for loosening fasteners, as this can damage the internal mechanism and significantly reduce its accuracy.
- Do not use extension pipes or other leverage-enhancing devices with the torque wrench. This can lead to over-torquing and damage to the tool or fastener.
- Ensure the socket is properly seated on the fastener and that you are applying force straight, not at an angle, to prevent cross-threading or stripping.
- Always wear appropriate personal protective equipment, such as safety glasses, when using hand tools.

8. Troubleshooting
If you encounter issues with your DuraTech Torque Wrench, consider the following:
- Wrench not clicking: Ensure the torque setting is within the 5-25 N·m range. Verify the locking ring is fully engaged after setting the torque. Apply steady, increasing force; a rapid jerk might prevent the click mechanism from engaging properly.
- Inaccurate torque: Ensure the wrench is properly calibrated. Avoid dropping the tool. Always store at the lowest torque setting. If accuracy issues persist, professional calibration is recommended.
- Socket not attaching securely: Ensure the push button on the wrench head is fully depressed when inserting the socket and fully released afterward. Check for any debris in the drive square or socket.
9. Warranty and Support
For warranty information or technical support, please refer to the official DuraTech website or contact your retailer. Keep your purchase receipt as proof of purchase.