EZTAT2 Defender X Silver
EZ Wireless Tattoo Machine 4.0mm (Defender X Silver)
Instruction Manual
Introduction
Thank you for choosing the EZ Wireless Tattoo Machine 4.0mm (Defender X Silver). This manual provides detailed instructions for the safe and efficient operation, maintenance, and troubleshooting of your new tattoo machine. Please read this manual thoroughly before first use to ensure optimal performance and longevity of the device.
Key Features
- One-handed Operation: EZ's first wireless pen designed for easy one-handed control, featuring a D click system for consistent needle position and accuracy.
- Memory Function: Automatically adjusts to the last saved voltage setting upon restart, remembering your preferred working habits.
- Push Mode: Activate strong start mode by pressing the '+' and '-' buttons simultaneously. Initial voltage output is 12V for 1 second, then returns to normal.
- Stroke Length: Available in 3.5mm (Silver) and 4.0mm (Black) strokes for personalized performance.
- Built-in EZ Customized Swiss Motor: Ensures high speed, higher power, low noise, and stable operation.
- Fully Compatible: Works with most standard tattoo cartridge needles (liner, shader, flat magnum, curved magnum).
Product Overview

Figure 1: EZ Wireless Tattoo Machine Defender X Silver. This image shows the overall design of the silver machine.

Figure 2: Detailed view of the OLED screen display, increase/reduce buttons, and start/stop switch.
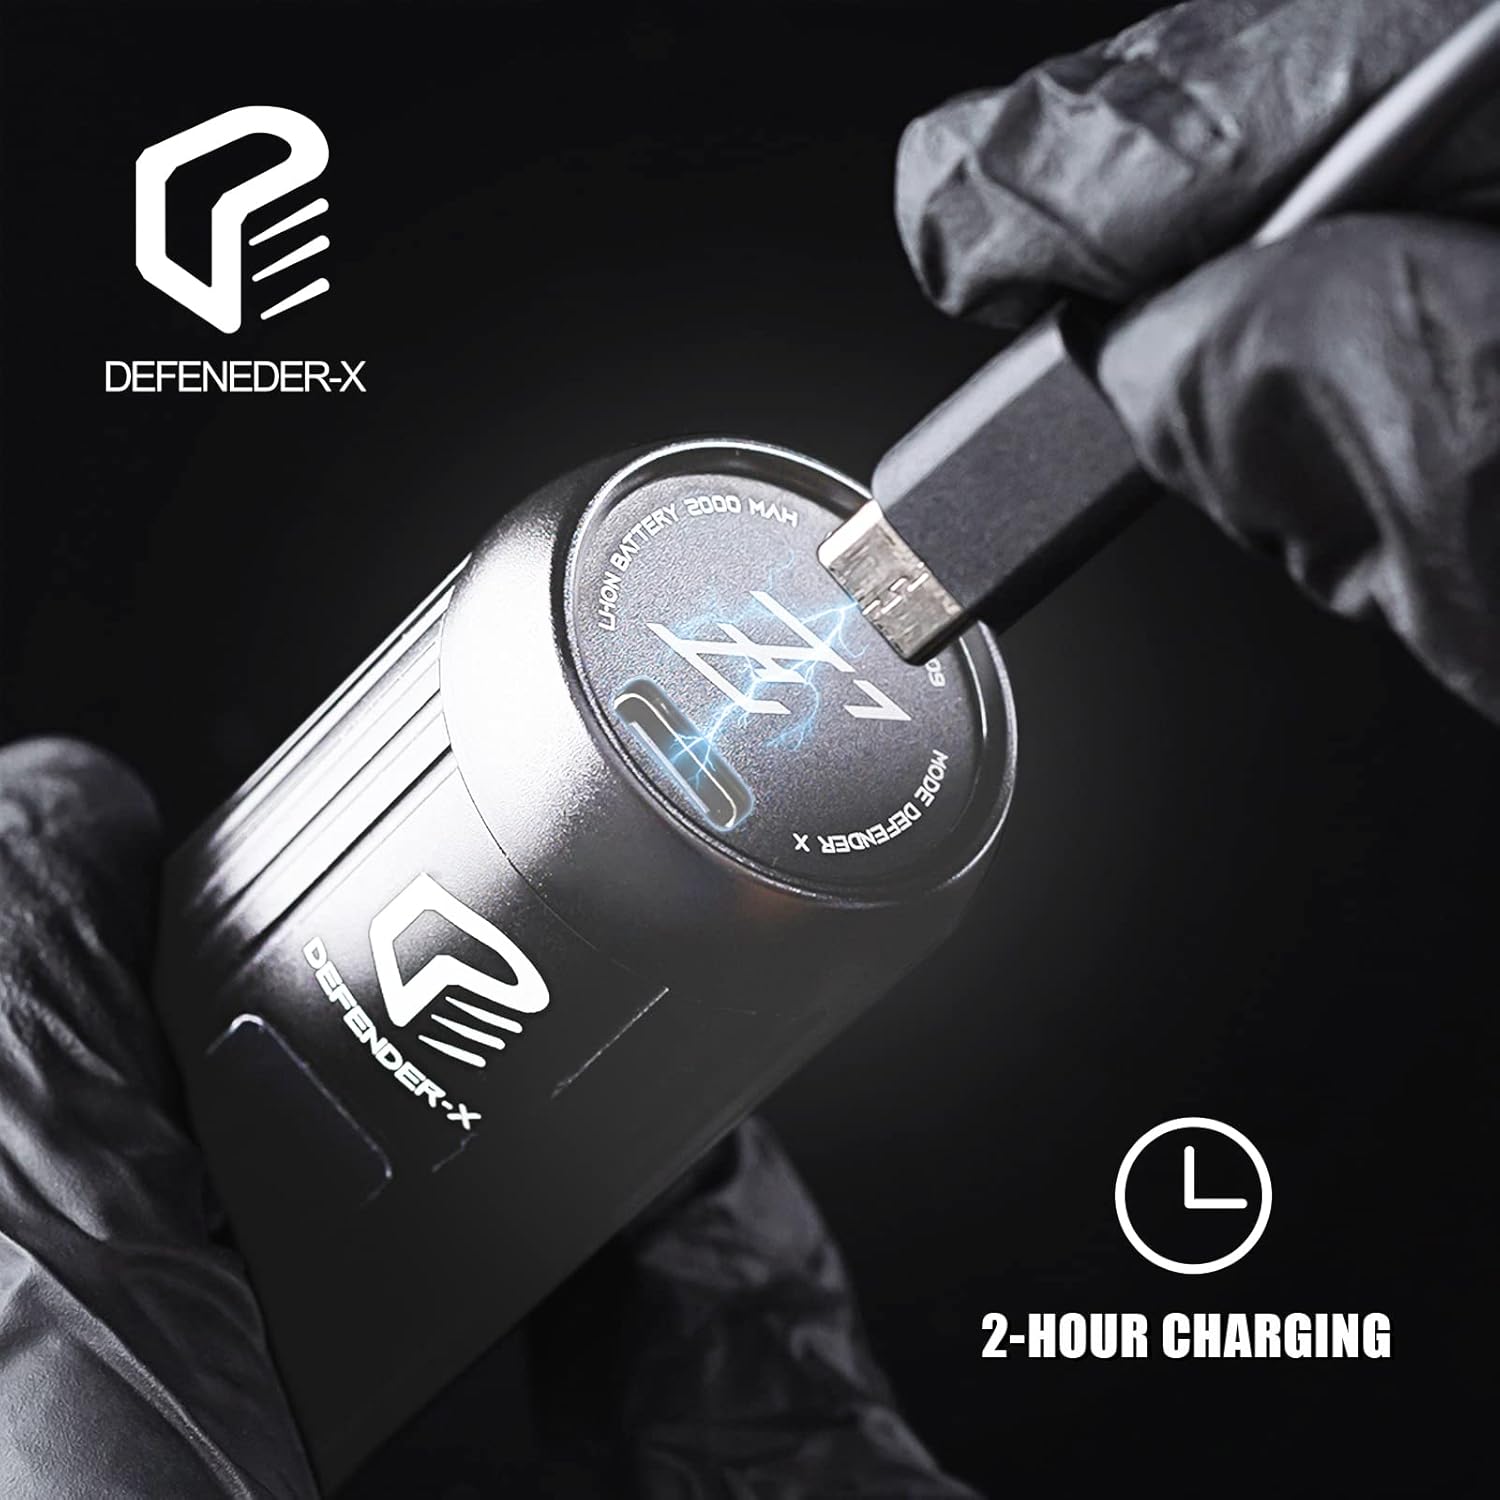
Figure 3: Close-up of the charging port, indicating a 2-hour charging time for the 2000mAh battery.
Setup
1. Charging the Device
Before initial use, fully charge your EZ Wireless Tattoo Machine.
- Connect the provided USB-C charging cable to the charging port located at the bottom of the machine.
- Connect the other end of the cable to a compatible USB power adapter (not included) or a USB port on a computer.
- The OLED display will show a charging indicator. A full charge typically takes approximately 2 hours.
- Once fully charged, the battery indicator will show full. Disconnect the charging cable.
Figure 4: Connecting the USB-C cable to the machine for charging.
2. Attaching a Cartridge Needle
The Defender X is compatible with most standard tattoo cartridge needles.
- Ensure the machine is powered off.
- Carefully insert the desired cartridge needle into the machine's front opening. Push firmly until it clicks into place.
- To adjust needle protrusion, twist the grip of the machine. The D click system ensures consistent needle position and accuracy.

Figure 5: Demonstrates how to attach a cartridge needle to the machine.
Operating Instructions
1. Power ON/OFF and Start/Stop
- To power on the machine, press and hold the power button (circular button below the display) for a few seconds until the OLED display illuminates.
- To start the machine, press the power button briefly. The machine will begin operating at the last set voltage.
- To stop the machine, press the power button briefly again.
- To power off the machine, press and hold the power button for a few seconds until the display turns off.
2. Adjusting Voltage
- Use the '+' and '-' buttons located above the power button to increase or decrease the voltage. The current voltage will be displayed on the OLED screen.
- The machine features a memory function, recalling the last used voltage setting upon restart.
3. Push Mode (Strong Start)
The Push Mode provides a strong initial start, useful for certain needle configurations or starting on tougher skin.
- To activate Push Mode, press the '+' and '-' buttons simultaneously. The screen LOGO will become solid, indicating the strong start mode is active.
- In Push Mode, the initial voltage output is 12V for 1 second, then it returns to the normal set voltage.
- To deactivate Push Mode, press the '+' and '-' buttons simultaneously again. The screen LOGO will flash, indicating the mode is off.
Video 1: Demonstrates the features and operation of the Defender X wireless tattoo pen machine, including controls, charging, and needle adjustment.
Maintenance
Proper maintenance ensures the longevity and optimal performance of your tattoo machine.
- Cleaning: After each use, wipe down the exterior of the machine with a clean, damp cloth and a mild, non-abrasive disinfectant. Do not submerge the machine in liquid.
- Sterilization: This machine is not designed for autoclave sterilization. Use appropriate barrier protection during tattooing to maintain hygiene.
- Storage: Store the machine in a dry, cool place away from direct sunlight and extreme temperatures.
- Battery Care: To preserve battery life, avoid fully discharging the battery frequently. Charge the machine regularly, even if not in use for extended periods.
Troubleshooting
If you encounter issues with your EZ Wireless Tattoo Machine, please refer to the following common solutions:
- Machine not turning on: Ensure the battery is charged. Connect the charger and check if the display shows charging.
- Machine not running: After turning on, briefly press the power button to start operation. Check if a cartridge needle is properly inserted.
- Inconsistent needle protrusion: Ensure the grip is securely twisted and adjusted. The D click system should maintain consistency.
- Unusual noise or vibration: Check if the cartridge needle is correctly seated. If the issue persists, contact customer support.
For further assistance, please contact EZTAT2 customer support.
Specifications
| Feature | Detail |
|---|---|
| Motor | EZ Customized Swiss Motor |
| Stroke Length | 3.5mm (Silver) and 4.0mm (Black) options |
| Needle Protrusion | 0-4.5mm |
| Operating Voltage | 5-12V DC |
| Switch Frequency | 60-160 Hz |
| Material | Aircraft Aluminum |
| RPM | 12000rpm ±10% |
| Battery Capacity | 2000mAh |
| Recharging Time | Approx. 2 hours |
| Powerpack Working Time | Approx. 5 hours |
| Package Dimensions | 6.26 x 3.03 x 1.85 inches |
| Weight | 7.37 ounces |

Figure 6: Visual representation of the machine's dimensions and key specifications.
Warranty and Support
EZTAT2 products are manufactured to high-quality standards. For warranty information, technical support, or any inquiries regarding your EZ Wireless Tattoo Machine, please contact EZTAT2 customer service directly.
Visit the official EZTAT2 Store for more information and contact details: EZTAT2 Store on Amazon.
Related Documents - Defender X Silver
 |
Wireless Tattoo Power Supply Product Manual Comprehensive product manual for the Wireless Tattoo Power Supply, detailing its features like adjustable 1-12V voltage, LED display, 2000mAh battery, and USB-C charging. Includes specifications, usage instructions, and package contents for tattoo artists. |
 |
ROKYO CR07 Wireless Tattoo Pen Machine User Manual User manual and technical specifications for the ROKYO CR07 wireless tattoo pen machine, featuring adjustable stroke, 2000mAh battery, and IPS HD display. |
 |
Portable Tattoo Transfer Machine User Manual User manual for the Portable Tattoo Transfer Machine. Includes setup, operation, troubleshooting, and safety instructions for this 2000mAh wireless thermal stencil printer. |
 |
Peak Forge 3.5mm Battery Pack: User Manual & Specifications Detailed user manual and specifications for the Peak Forge 3.5mm Battery Pack, providing consistent wireless power for tattoo machines. Includes setup, features, technical data, and warranty information. |
 |
FitRx Muscle Massager Gun Manual - User Guide and Specifications Comprehensive manual for the FitRx Muscle Massager Gun by Tzumi. Learn about product features, user instructions, safety guidelines, maintenance, and specifications for effective muscle relief. |
 |
Apex Forge M8 Cordless Rotary Tool User Manual Comprehensive user manual for the Apex Forge M8 Cordless Rotary Tool, detailing safety instructions, operating procedures, technical specifications, and accessory usage for this versatile power tool. |
Ask a question about this manual
Ask about setup, troubleshooting, compatibility, parts, safety, or missing instructions. Manuals+ will review the question and use this page’s manual context to help answer it.