1. Introduction
Thank you for choosing a Hisense washing machine. This manual provides essential information for the installation, operation, and maintenance of your WF3S9043BW3 model. Please read it thoroughly before using the appliance to ensure safe and correct usage.
This appliance is designed for household use only. Always follow local regulations for waste disposal and recycling.
2. Setup and Installation
2.1 Unpacking
Carefully remove all packaging materials. It is crucial to remove all transport bolts from the rear of the machine before operation. Failure to do so can cause severe damage to the appliance.

Image: The washing machine with its door open, illustrating the drum where transport bolts are typically located at the rear.
2.2 Placement
Place the washing machine on a firm, level surface. Adjust the leveling feet to ensure the machine is stable and does not wobble. Ensure adequate ventilation around the appliance.
2.3 Water Connection
Connect the water inlet hose to a cold water tap with a 3/4-inch thread. Ensure all connections are tight to prevent leaks. Position the drain hose correctly into a standpipe or sink, ensuring it is not kinked or blocked.
2.4 Electrical Connection
Plug the power cord into a grounded electrical outlet. Ensure the voltage and frequency match the specifications on the rating plate of the appliance. Do not use extension cords or multiple socket adapters.

Image: Overall view of the Hisense WF3S9043BW3 washing machine, showing its design and connections.
2.5 First Use
Before washing laundry for the first time, run a drum cleaning cycle without any laundry or detergent to remove any manufacturing residues.
3. Operating Instructions
3.1 Control Panel Overview
The control panel features a program selector dial, function buttons, and a digital display. Use the dial to select your desired wash program, and the buttons to adjust settings such as temperature, spin speed, and delay start.

Image: Detailed view of the washing machine's control panel, highlighting the program selection dial and digital display.
3.2 Loading Laundry
Open the door and load laundry into the drum. Do not overload the machine; refer to the program guide for maximum load capacities. Close the door firmly.
3.3 Adding Detergent
Pull out the detergent dispenser drawer. Add the appropriate amount of detergent and fabric softener to the designated compartments. Refer to your detergent packaging for dosage recommendations.

Image: The detergent dispenser drawer pulled out, showing the compartments for detergent and fabric softener.
3.4 Selecting a Program
Turn the program selector dial to choose the desired wash program. Common programs include Eco, Cotton, Synthetics, Wool, and Quick Wash. The display will show the estimated cycle time.
3.5 Starting a Cycle
Press the Start/Pause button to begin the wash cycle. The machine will automatically proceed through the selected program.
3.6 Special Features
- Steam: Utilizes steam to help eliminate bacteria and reduce creases in fabrics.
- ConnectLife app: Allows you to control and monitor your washing machine remotely via your smartphone.
- Quick Wash: A rapid cycle designed to clean lightly soiled clothes in as little as 15 minutes.
- PureJet: Powerful jets of water ensure detergent is fully dissolved and effectively penetrates fabrics for thorough cleaning.
- Pause and Add: Enables you to pause an ongoing cycle and add forgotten items of laundry.
4. Care and Maintenance
4.1 Cleaning the Detergent Dispenser
Regularly remove and clean the detergent dispenser drawer to prevent residue buildup. Rinse it under running water and use a brush if necessary.
4.2 Cleaning the Drum
Run a drum cleaning program periodically to maintain hygiene and prevent odors. This cycle typically uses hot water and high spin speeds.
4.3 Cleaning the Filter
The drain pump filter should be cleaned regularly to ensure proper drainage and prevent blockages. Refer to the appliance's specific instructions for accessing and cleaning the filter.
4.4 Exterior Cleaning
Wipe the exterior of the machine with a soft, damp cloth. Do not use abrasive cleaners or solvents.
5. Troubleshooting
If you encounter issues with your washing machine, consult the following common problems and solutions before contacting service.
- Machine does not start: Check if the power cord is properly plugged in, the door is fully closed, and the Start/Pause button has been pressed.
- No water intake: Ensure the water tap is open and the water inlet hose is not kinked or blocked.
- Water not draining: Check the drain hose for kinks or blockages, and clean the drain pump filter.
- Excessive vibration/noise: Verify that all transport bolts have been removed and the machine is level. Ensure the laundry load is balanced.
For issues not resolved by these steps, please contact Hisense customer support.
6. Technical Specifications
| Feature | Value |
|---|---|
| Brand | Hisense |
| Model | WF3S9043BW3 |
| Capacity | 9 Kilograms |
| Maximum Rotational Speed | 1400 RPM |
| Noise Level (Spin) | 72 dB |
| Dimensions (D x W x H) | 55 x 59.5 x 84.5 cm |
| Installation Type | Freestanding |
| Colour | White |
| Special Features | Child Lock, Hygiene Steam, High Efficiency, Smart Connectivity, Reload Function |
| Included Components | Power Cord |
| Item Weight | 63 kg |
| Energy Rating | A |
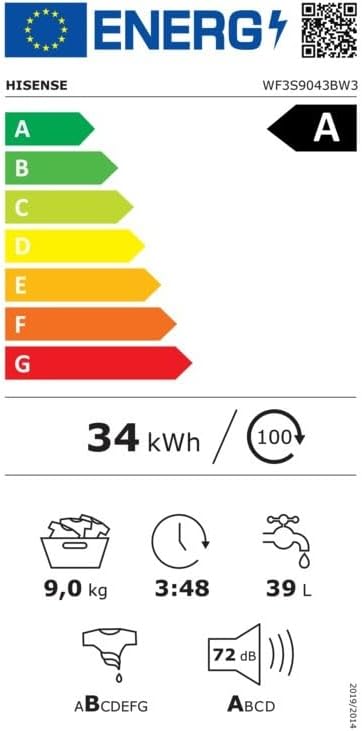
Image: The energy efficiency label for the Hisense WF3S9043BW3 washing machine, indicating its A rating and consumption details.
7. Warranty and Support
Your Hisense washing machine comes with a manufacturer's warranty. Please refer to the warranty card included with your purchase for specific terms and conditions. Keep your proof of purchase for warranty claims.
For technical assistance, spare parts, or service requests, please contact Hisense customer support. You can find more information and support resources by visiting the official Hisense Store.
This user manual is intended to provide general guidance. For detailed instructions and safety information, always refer to the full manual provided with your appliance.


