1. Introduction
This manual provides essential information for the installation, operation, and maintenance of the PARTS 79866M Main Drive Belt. This drive belt is a replacement component designed for specific Zebra thermal barcode printer models. Proper installation ensures optimal printer performance and longevity.

Image 1.1: A single PARTS 79866M Main Drive Belt, showing its full length and ribbed surface.
2. Compatibility
The 79866M Main Drive Belt is compatible with the following Zebra thermal barcode printer models:
- Zebra ZT410 (203dpi)
- Zebra ZT411 (203dpi)
- Zebra ZT420 (203dpi)
- Zebra ZT421 (203dpi)
Important Note: This belt is specifically for 203dpi printer models. It is NOT compatible with Zebra ZT410 or ZT420 300dpi thermal printers.
3. Installation Instructions
Before beginning installation, ensure the printer is powered off and unplugged from the electrical outlet to prevent injury or damage. Refer to your printer's official service manual for detailed disassembly instructions.
- Access the Drive Mechanism: Carefully open the printer's casing to expose the main drive mechanism where the belt is located. This may involve removing several screws and panels.
- Locate and Remove Old Belt: Identify the existing drive belt. If it is broken or worn, carefully remove it from the pulleys and motor.
- Prepare for New Belt Installation: The main drive motor may need to be slightly repositioned to facilitate belt replacement. Locate the screws securing the motor.
- Install New Belt: Gently place the new 79866M drive belt onto the pulleys and around the motor shaft. Ensure it is seated correctly in all grooves. If necessary, slightly move the motor to create enough slack for the belt to fit without excessive force.
- Adjust Belt Tension: Once the belt is in place, adjust the motor position to achieve proper belt tension. The belt should be taut but not overly tight, allowing for smooth rotation without slipping. Tighten the motor screws securely.
- Reassemble Printer: Carefully reassemble the printer casing, ensuring all connections are secure and no wires are pinched.
- Test Functionality: Plug in and power on the printer. Perform a test print to verify that the new drive belt is functioning correctly and the printer operates smoothly.
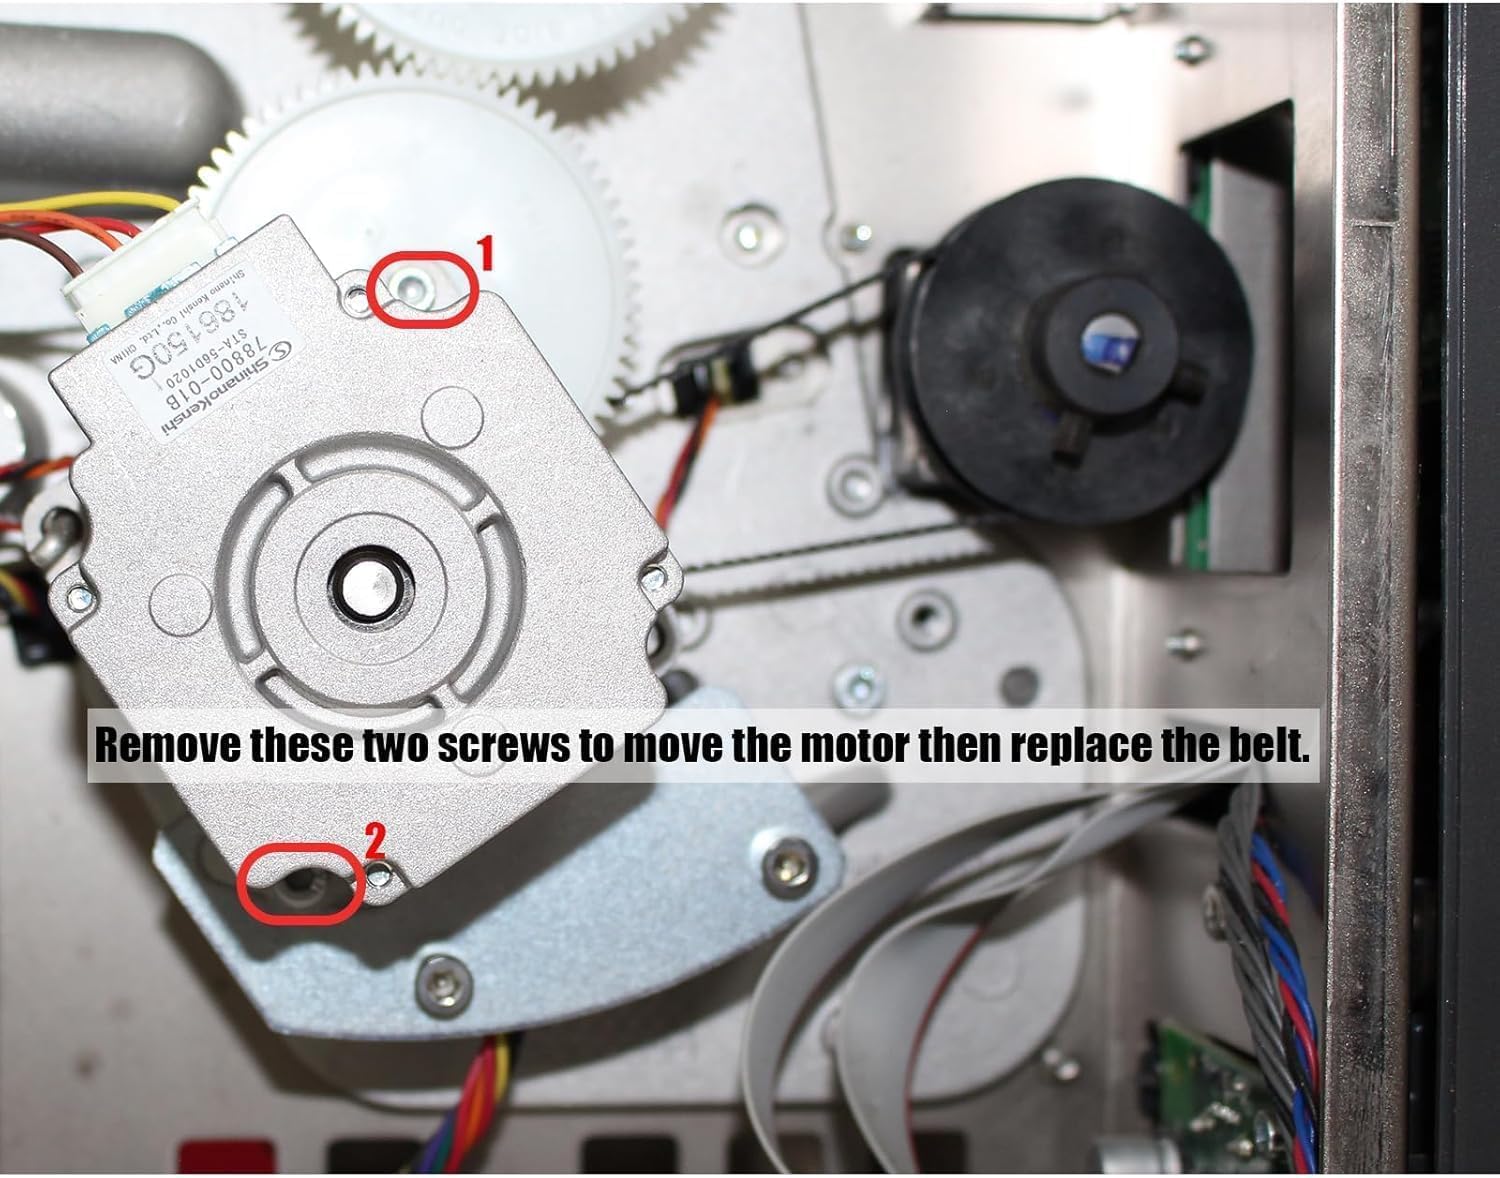
Image 3.1: View of the printer's drive motor. The two highlighted screws (labeled 1 and 2) must be loosened or removed to allow the motor to move, creating slack for belt replacement.

Image 3.2: The new drive belt correctly installed around the motor and pulleys, indicating proper tension and alignment.
4. Operation
The main drive belt is an internal component responsible for transferring motion within the printer mechanism. Once correctly installed, its operation is integral to the printer's normal function. No direct user interaction with the belt is required during printer operation.
5. Maintenance
To ensure the longevity and optimal performance of your 79866M Main Drive Belt and printer:
- Regular Inspection: Periodically inspect the belt for signs of wear, cracking, fraying, or stretching. The frequency of inspection depends on printer usage.
- Keep Clean: Ensure the area around the drive mechanism is free from dust, debris, and label adhesive, which can accumulate on the belt and pulleys, leading to premature wear or slippage.
- Avoid Over-tensioning: During installation, ensure the belt is not excessively tight, as this can put undue stress on the motor and belt, reducing its lifespan.
- Proper Storage: If storing spare belts, keep them in a cool, dry place away from direct sunlight and extreme temperatures.
6. Troubleshooting
If you experience issues after replacing the drive belt, consider the following:
| Symptom | Possible Cause | Solution |
|---|---|---|
| Printer not feeding labels | Belt not installed correctly or too loose. | Re-check belt installation and tension. Ensure it's seated properly. |
| Grinding or unusual noises | Belt rubbing against components, or debris in mechanism. | Inspect for obstructions. Ensure belt is aligned and not too tight. |
| Intermittent printing issues | Belt slipping due to low tension or wear. | Adjust belt tension. If belt is worn, replace it. |
| Printer error codes related to motor/feed | Belt issue or motor malfunction. | Verify belt installation. Consult printer's service manual for specific error codes. |
7. Specifications
- Part Number: 79866M / 20006
- Compatibility: Zebra ZT410, ZT411, ZT420, ZT421 Thermal Barcode Printers (203dpi models only)
- Quantity: Typically sold in multi-packs (e.g., 5 pieces)
- Material: Durable rubber composite

Image 7.1: Close-up view of the drive belt, clearly showing the part number '20006' printed on its surface.
8. Warranty Information
This product comes with a 3-month limited warranty from the date of purchase. The warranty covers manufacturing defects. It does not cover damage resulting from improper installation, misuse, or normal wear and tear. Please retain your proof of purchase for warranty claims.
9. Customer Support
For any questions regarding the installation, compatibility, or performance of your PARTS 79866M Main Drive Belt, please contact the seller or manufacturer directly. Provide your purchase details and a clear description of the issue for prompt assistance.