
Introduction
This manual provides detailed instructions for the installation, operation, and maintenance of your dibay TR-100 Digital Thermostat Kit. This kit is designed as a high-performance upgrade and service replacement for compatible Traeger pellet grills, offering precise temperature and smoke control for an enhanced grilling experience.
Product Overview
The dibay TR-100 Digital Thermostat Kit features a digital control panel with a clear LED display and intuitive controls. It allows users to set precise cooking temperatures and manage smoke levels for various cooking styles.

Image: Front view of the dibay TR-100 control panel, illustrating the display screen, temperature knob, smoke setting button, and power switch with their respective functions.
Key Features
- Three-Digit Temperature Display: Shows the exact cooking temperature in Fahrenheit.
- Front Panel Cook Control: Easy-to-use knob for setting desired temperatures.
- Eight Cook Temperature Settings: Adjustable from 180°F to 375°F.
- High Cook Temperature Setting: Reaches up to 450°F for searing or high-heat cooking.
- Front Panel Smoke Control: Dedicated button for adjusting smoke intensity.
- Sixteen Smoke Settings (P0 - P5): Provides precise control over smoke production.
- Ignition Indicator: Lights up when the igniter is active.
- Smoke Setting Indicator: Displays the current P-setting for smoke.
- Cook Idle Fuel Rate Indicator: Shows the fuel rate during idle cooking.
- Low Temperature Indicator: Alerts when the grill temperature is too low.
- Overtemperature Protection: Automatically shuts down if temperature exceeds safe limits.
- Low Temperature Overshoot Protection: Prevents excessive temperature drops.
- Cool Down Cycle: Ensures safe shutdown by running the fan for a period after power off.
- 7-inch RTD Temperature Sensor: Provides accurate temperature readings.
Compatibility
The dibay TR-100 Digital Thermostat Kit is compatible with the entire line of Traeger pellet grills, with the exception of the PTG, Ranger, and Scout models. It serves as a direct replacement for the standard 3-speed or existing digital thermostats in compatible Traeger wood pellet grills, including those with Item# BAC236.
What's in the Box
Upon opening your dibay TR-100 Digital Thermostat Kit, you should find the following components:
- Digital Control Panel (TR-100)
- 7-inch RTD Temperature Sensor
- Mounting Hardware
- User Manual (this document)
Setup and Installation
Before beginning installation, ensure your grill is completely cool and unplugged from any power source. It is recommended to take photos of existing wiring before disconnecting any components.
Wiring Connections
Carefully connect the wires from the new control panel to the corresponding components within your grill. Refer to the diagram below for wire color identification:

Image: Side view of the dibay TR-100 control board with labeled wire connections. Red: motor line, Purple: ignition rod wire, Orange: fan cable, White: N line, Black: power L line.
- Red Wire: Connects to the motor line.
- Purple Wire: Connects to the ignition rod wire.
- Orange Wire: Connects to the fan cable.
- White Wire: Connects to the Neutral (N) line.
- Black Wire: Connects to the Live (L) power line.
Temperature Sensor Installation
Install the 7-inch RTD temperature sensor into its designated port within the grill's cooking chamber. Ensure it is securely fastened and positioned to accurately measure the internal temperature.
Mounting the Control Panel
Mount the new control panel onto your grill using the provided mounting hardware. Ensure it is flush and secure. Once all connections are made and the panel is mounted, you may plug in your grill.

Image: The dibay TR-100 control panel seamlessly integrated into the side of a pellet grill, demonstrating its installed appearance.
Operating Instructions
Powering On/Off
- To power on the grill, flip the Power switch to the 'ON' position. The digital display will illuminate.
- To power off, flip the Power switch to the 'OFF' position. The grill will initiate a cool-down cycle, during which the fan will continue to operate for approximately five minutes to safely burn off residual pellets and cool down the fire pot.
Setting Cooking Temperature
- Rotate the large central Temperature knob to select your desired cooking temperature. Available settings range from 180°F to 375°F in increments.
- For higher temperatures, turn the knob to the 'High' setting, which can reach up to 450°F.
- The digital display will show the current internal temperature of the grill.
Adjusting Smoke Settings (P-Settings)
The 'Smoke' button allows you to adjust the pellet feed rate, influencing the amount of smoke produced. This is often referred to as the P-setting (P0-P5).
- Press the Smoke button to cycle through the available P-settings.
- A lower P-setting (e.g., P0, P1) results in shorter pellet feed cycles and less smoke, while a higher P-setting (e.g., P4, P5) results in longer pellet feed cycles and more smoke.
- The default P-setting is P2. Adjust as needed based on ambient temperature and desired smoke intensity.
Maintenance
Proper maintenance ensures the longevity and optimal performance of your digital thermostat kit.
- Cleaning the Control Panel: Wipe the control panel clean with a damp cloth. Avoid using abrasive cleaners or excessive moisture, which can damage electronic components.
- Temperature Sensor: Periodically inspect the RTD temperature sensor for any buildup or damage. Gently clean it if necessary to ensure accurate temperature readings.
- Wiring: Ensure all wiring connections remain secure and free from corrosion.
Troubleshooting
If you encounter issues with your dibay TR-100 Digital Thermostat Kit, refer to the following common troubleshooting tips:
- No Power/Display: Ensure the grill is properly plugged into a working outlet and the power switch is in the 'ON' position. Check all wiring connections for looseness.
- Inaccurate Temperature Readings: Verify that the RTD temperature sensor is clean and correctly installed in the grill chamber. Ensure no wires are pinched or damaged.
- Temperature Fluctuations: Significant temperature swings can sometimes be adjusted by modifying the P-setting (Smoke setting). Experiment with different P-settings to find the optimal balance for your environment and desired temperature stability.
- Grill Not Igniting: Check the ignition rod wire connection. Ensure pellets are feeding correctly into the fire pot.
- Excessive Smoke/Lack of Smoke: Adjust the P-setting using the 'Smoke' button. A higher P-setting increases smoke, while a lower setting reduces it.
If problems persist after attempting these troubleshooting steps, please contact customer support.
Specifications
Detailed specifications for the dibay TR-100 Digital Thermostat Kit:
| Feature | Detail |
|---|---|
| Brand | dibay |
| Model Name | TR-100 |
| Display Type | Digital LED |
| Temperature Range (Cook) | 180°F to 375°F |
| Temperature Range (High) | Up to 450°F |
| Lower Temperature Range | 150°F |
| Upper Temperature Range | 450°F |
| Response Time | 3 seconds |
| Power Source | Battery Powered (Note: This likely refers to internal memory/clock, main power is AC) |
| Outer Material | Plastic |
| Special Features | Alarm, High Accuracy, Large Display |
| Indoor/Outdoor Usage | Outdoor |
| Item Length (Control Panel) | 5.51 inches (approx. 14 cm) |
| RTD Sensor Length | 7 inches (approx. 17.8 cm) |
| UPC | 783919703650 |
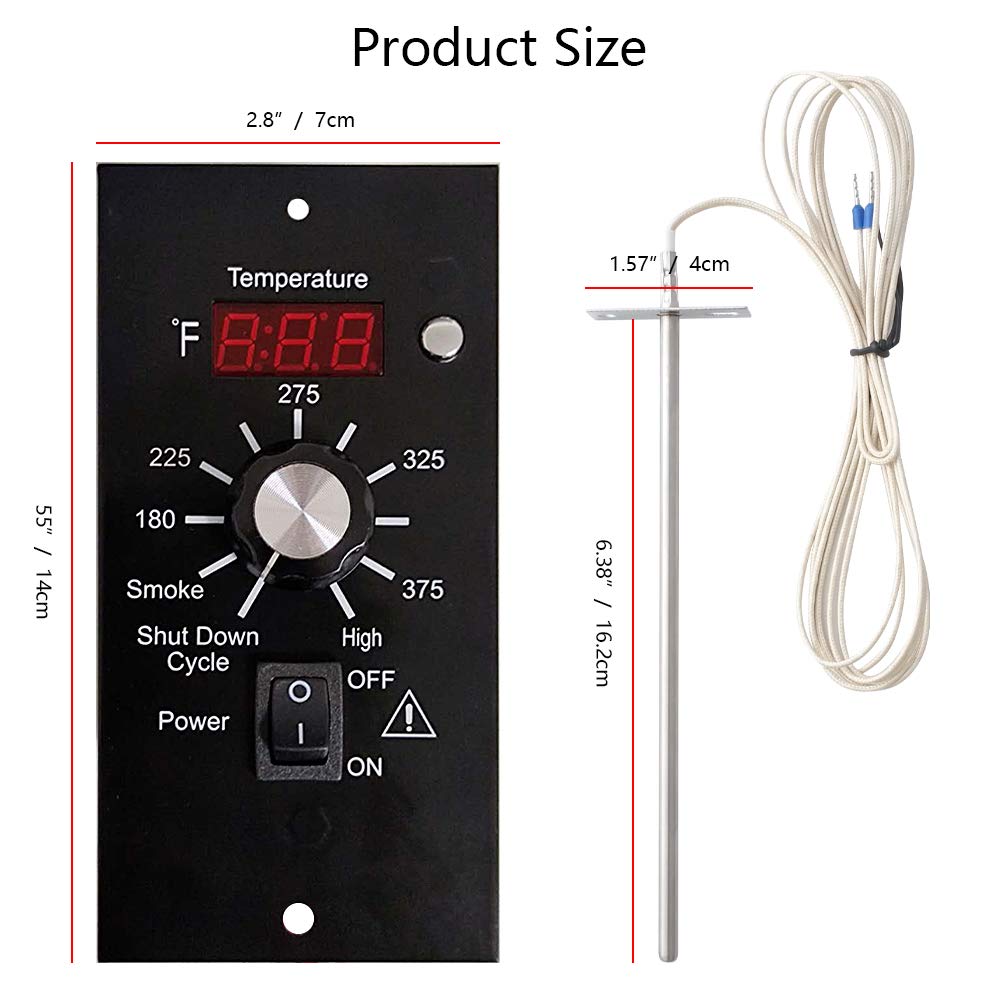
Image: Product size diagram showing the control panel dimensions (2.8"/7cm width, 5.5"/14cm height) and the RTD sensor dimensions (1.57"/4cm top, 6.38"/16.2cm probe length).
Warranty
The dibay TR-100 Digital Thermostat Kit comes with a One Year Manufacturer's Warranty from the date of purchase. This warranty covers defects in materials and workmanship under normal use. Please retain your proof of purchase for warranty claims.
Support
For further assistance, technical support, or warranty inquiries, please contact dibay customer service through the retailer where the product was purchased or refer to the contact information provided with your product packaging.