
1. Introduction
This manual provides essential information for the safe and effective operation of your SISHUINIANHUA 38X38 8-in-1 Combo Heat Press Machine. This versatile machine is designed for heat transfer applications on various items, including T-shirts, mugs, caps, and plates. Please read this manual thoroughly before initial use and retain it for future reference.
2. Safety Instructions
To prevent injury or damage to the machine, always follow these safety precautions:
- Electrical Safety: Ensure the machine is connected to a grounded power outlet with the correct voltage (220V for EU models). Do not operate with wet hands or in damp conditions. Disconnect power before cleaning or maintenance.
- Hot Surfaces: The heating elements and platens reach high temperatures during operation. Avoid direct contact with hot surfaces. Use heat-resistant gloves if necessary.
- Ventilation: Operate the machine in a well-ventilated area to dissipate heat and any fumes from transfer materials.
- Children and Pets: Keep children and pets away from the machine during operation and when it is cooling down.
- Stable Surface: Place the machine on a stable, heat-resistant, and level surface to prevent tipping.
- Emergency Stop: Familiarize yourself with the power switch location for quick shutdown in an emergency.
- Proper Use: Use the machine only for its intended purpose of heat transfer. Do not modify the machine or use non-approved attachments.
3. Product Overview
3.1 Main Components
The following diagram illustrates the main components of the heat press machine:
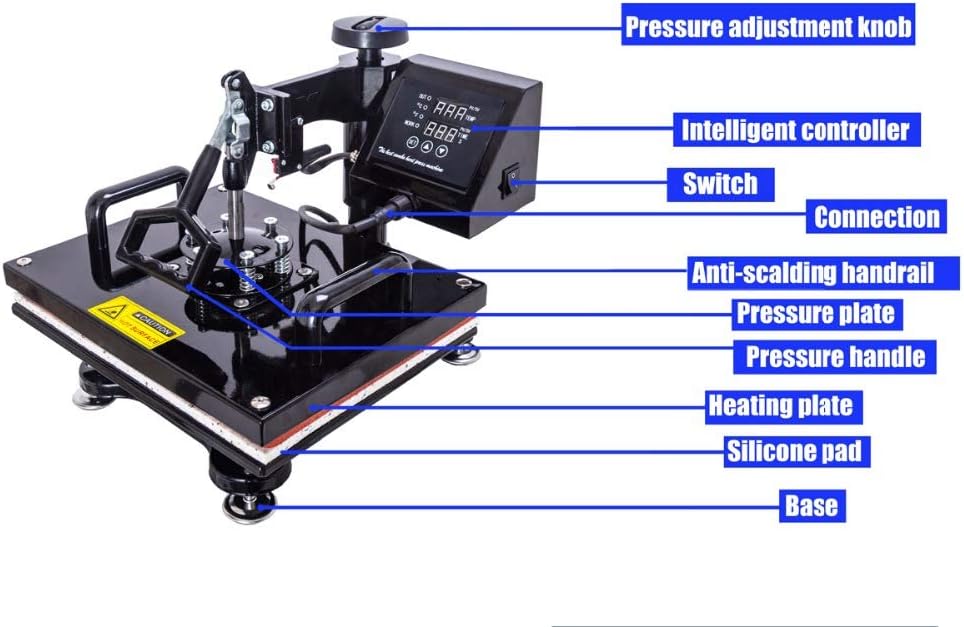
Figure 1: Main components of the heat press machine, including the pressure adjustment knob, intelligent controller, switch, connection port, anti-scalding handrail, pressure plate, pressure handle, heating plate, silicone pad, and base.
- Pressure Adjustment Knob: Used to adjust the downward pressure of the heating platen.
- Intelligent Controller: Digital display for setting and monitoring temperature and time.
- Switch: Main power on/off switch.
- Connection: Port for connecting various attachments.
- Anti-scalding Handrail: Provides a safe grip point for moving the heating element.
- Pressure Plate: The upper heating element that applies heat and pressure.
- Pressure Handle: Used to lower and raise the heating plate.
- Heating Plate: The main flat heating element (telfon-coated).
- Silicone Pad: Provides a soft, heat-resistant surface for items being pressed.
- Base: The stable foundation of the machine.
3.2 Included Attachments
The 8-in-1 combo heat press includes various attachments for different applications:

Figure 2: The heat press machine configured with different attachments, demonstrating its versatility for various items.
- Platen Press (Teflon-coated): 12" x 15" (38x38 cm) for T-shirts, fabrics, and flat items.
- Hat/Cap Press: 6" x 3" (curved) for caps and hats.
- Mug Press: Includes multiple sizes (e.g., 10oz, 11oz, 12oz, 17oz) for various mug diameters.
- Plate Press: Includes two sizes (e.g., 5" max diameter, 6" max diameter) for different plate sizes.

Figure 3: Detailed view of the various mug, plate, and cap attachments with their respective sizes. All parts are thermocouple parts for accurate temperature readings.
4. Setup
- Unpacking: Carefully remove all components from the packaging. Check for any damage during transit.
- Placement: Position the heat press on a sturdy, level, and heat-resistant workbench or table. Ensure adequate space around the machine for ventilation and safe operation.
- Attachment Installation:
- For the flat platen, ensure it is securely mounted.
- To change attachments (mug, cap, plate), carefully unbolt the current attachment and replace it with the desired one, ensuring all connections are firm and secure. Refer to the connection points shown in Figure 1.
- Power Connection: Plug the power cord into a grounded electrical outlet. Ensure the power switch is in the 'OFF' position before plugging in.
- Initial Inspection: Before first use, ensure all screws are tightened and moving parts operate smoothly.
5. Operating Instructions
5.1 Basic Operation
- Power On: Flip the main power switch to the 'ON' position. The intelligent controller display will illuminate.
- Set Temperature: Use the controller to set the desired temperature. Consult your transfer material's instructions for recommended settings.
- Set Time: Use the controller to set the desired pressing time in seconds.
- Pre-heating: Allow the machine to pre-heat until it reaches the set temperature. The controller will indicate when the target temperature is reached.
- Adjust Pressure: Use the pressure adjustment knob to set the appropriate pressure for your item. Test on a scrap item if unsure.
- Position Item: Place your item (e.g., T-shirt, mug) on the appropriate platen/attachment. Position your transfer design onto the item.
- Press: Lower the pressure handle to bring the heating element down onto the item. The timer will automatically start.
- Finish: Once the timer alarms, lift the pressure handle. Carefully remove the item and the transfer paper (hot or cold peel, as per transfer instructions).
- Power Off: When finished, turn the main power switch to 'OFF' and unplug the machine. Allow it to cool completely before storing.
5.2 Workflow Example
The following diagram illustrates a typical workflow for heat transfer applications:

Figure 4: A visual representation of the heat transfer process, starting from a digital image, printing with an inkjet printer and sublimation ink, and then using the heat press to transfer the design onto various items like T-shirts, caps, mugs, plates, phone cases, tiles, rock photos, mouse pads, throw pillows, and puzzles.
6. Maintenance
- Cleaning: Ensure the machine is unplugged and completely cool before cleaning. Wipe down exterior surfaces with a soft, damp cloth. For the Teflon-coated platen, use a non-abrasive cleaner if necessary.
- Silicone Pad Care: Regularly inspect the silicone pad for wear or damage. Replace if necessary to ensure even pressure distribution.
- Storage: Store the machine in a dry, dust-free environment when not in use.
- Regular Checks: Periodically check all electrical connections and moving parts for any signs of wear or looseness.
7. Troubleshooting
| Problem | Possible Cause | Solution |
|---|---|---|
| Machine does not power on | Power cord unplugged, power switch off, faulty outlet. | Check power cord connection, ensure switch is ON, test outlet with another device. |
| Uneven heat distribution | Damaged heating element, worn silicone pad, incorrect pressure. | Inspect heating element, replace silicone pad, adjust pressure knob. |
| Transfer not adhering properly | Incorrect temperature, insufficient time, low pressure, wrong transfer paper. | Verify temperature/time settings, increase pressure, ensure correct transfer paper for material. |
| Controller display not working | Loose connection, internal fault. | Power cycle the machine. If issue persists, contact support. |
If you encounter problems not listed here or if solutions do not resolve the issue, please contact customer support.
8. Specifications
- Wattage: 1050W
- Temperature Range: 0 - 482°F (0 - 250°C)
- Timer Control: 0 - 999 seconds
- Color: Black
- Platen Press (Teflon-coated): 12" x 15" (38x38 cm)
- Hat/Cap Press: 6" x 3" (curved)
- Mug Press: Multiple sizes (e.g., 10oz, 11oz, 12oz, 17oz)
- Plate Press: Two sizes (e.g., 5" max diameter, 6" max diameter)
- Adjustable Height: 13 1/2" to 17"
- Product Dimensions (w/ platen press): 15.25"L x 15"W x 17"H
- Material: Metal

Figure 5: Dimensions of the SISHUINIANHUA 38X38 8-in-1 Combo Heat Press Machine.
9. Warranty & Support
For warranty information, technical support, or to purchase replacement parts, please contact the seller or manufacturer directly. Keep your purchase receipt as proof of purchase.
Manufacturer: SISHUINIANHUA
For assistance, please refer to the contact information provided at the point of purchase or on the product packaging.