1. Introduction
This manual provides essential information for the safe and efficient operation, maintenance, and troubleshooting of your Hitachi Healthy Chef MRO-S8Y Steam Oven Range. Please read this manual thoroughly before using the appliance and retain it for future reference.
The Hitachi Healthy Chef MRO-S8Y is a 31-liter capacity steam oven range featuring superheated steam technology, a flat ceramic table plate, and a 250℃ single-tier wide oven. It includes a weight sensor for automatic cooking adjustments and offers various cooking modes such as microwave, oven, grill, and steam.

Image: Front view of the Hitachi Healthy Chef MRO-S8Y Steam Oven Range in red.
2. Safety Information
Always follow basic safety precautions when using electrical appliances to reduce the risk of fire, electric shock, burns, or injury.
- Do not operate the oven if the door is damaged, or if the seals or hinges are faulty.
- Ensure proper ventilation around the appliance as specified in the setup section.
- Do not heat sealed containers, as they may explode.
- Use oven mitts when handling hot dishes or components.
- Keep children away from the appliance during operation and when it is cooling down.
- Unplug the appliance from the power outlet before cleaning or maintenance.
3. Setup
3.1 Unpacking and Placement
Carefully remove all packaging materials. Place the oven on a stable, level surface. Ensure adequate clearance for ventilation.
- Maintain a minimum clearance of 4.5 cm on both sides and at least 10 cm above the unit.
- Do not place the oven near heat sources or in direct sunlight.

Image: Diagram illustrating the dimensions of the oven (Width 487mm, Depth 430mm, Height 365mm) and the required installation clearances (4.5cm on sides, 10cm above).
3.2 Initial Cleaning
Before first use, wipe the interior and exterior surfaces with a damp cloth. Wash the ceramic table plate, water tank, and drip tray with mild detergent and rinse thoroughly.
3.3 Water Tank Installation
The water tank is used for steam and superheated steam functions. Fill the water tank with fresh tap water and insert it into its designated slot at the bottom front of the oven.

Image: The water tank and drip tray, which are removable components for steam functions.
4. Operating Instructions
4.1 Control Panel Overview
The control panel features various buttons and a display for selecting cooking modes, setting time, and adjusting power levels. Refer to the labels on the appliance for specific button functions.
4.2 Microwave Functions
- Auto Reheat: The built-in weight sensor automatically detects the weight of food (including the container) and calculates the optimal heating time. This function is available for specific menus like milk, vegetables, and defrosting.
- Manual Power Levels: Select from 800W, 600W, 500W, 200W equivalent, or 100W equivalent. The 1000W setting is available for a maximum of 3 minutes for specific auto-cooking menus.
- Defrosting: Use the auto-defrost menu for frozen foods.
4.3 Oven Functions
The oven offers a 250℃ single-tier wide oven for baking. It is suitable for preparing bread, pastries, and other baked goods.
- Wide Oven Capacity: The included 41x30cm black tray allows for baking a large quantity of items, such as up to 48 cut-out cookies at once.
- Continuous Auto Reheating: After oven cooking, the appliance can perform continuous auto-reheating using the weight sensor, even if the internal temperature is high.

Image: A baking tray demonstrating the capacity to bake 48 cut-out cookies simultaneously in the 250℃ wide oven.
4.4 Grill Functions
The grill function provides single-sided grilling. It can toast up to two slices of bread at a time.
4.5 Steam and Superheated Steam Functions
Utilize superheated steam for healthy cooking, such as non-fry dishes and stir-fries without oil, by reducing excess fat.

Image: Examples of healthy dishes like fried chicken, stir-fried beef with peppers, and potato croquettes, prepared using superheated steam to reduce oil.
4.6 Special Features
- Weight Sensor Cooking: The oven automatically calculates the optimal heating amount based on the food's weight, eliminating the need for manual quantity settings.
- 2-Item Simultaneous Reheating: Conveniently reheat two items of the same quantity at the same time. For best results, each item should weigh between 100g and 300g.
- Cookpad Hall of Fame Recipes: Access 5 selected recipes from Cookpad's Hall of Fame that can be prepared automatically using the oven's functions.

Image: A diagram showing the internal weight sensor and steam/temperature sensor, which work together to automatically adjust cooking based on food weight.
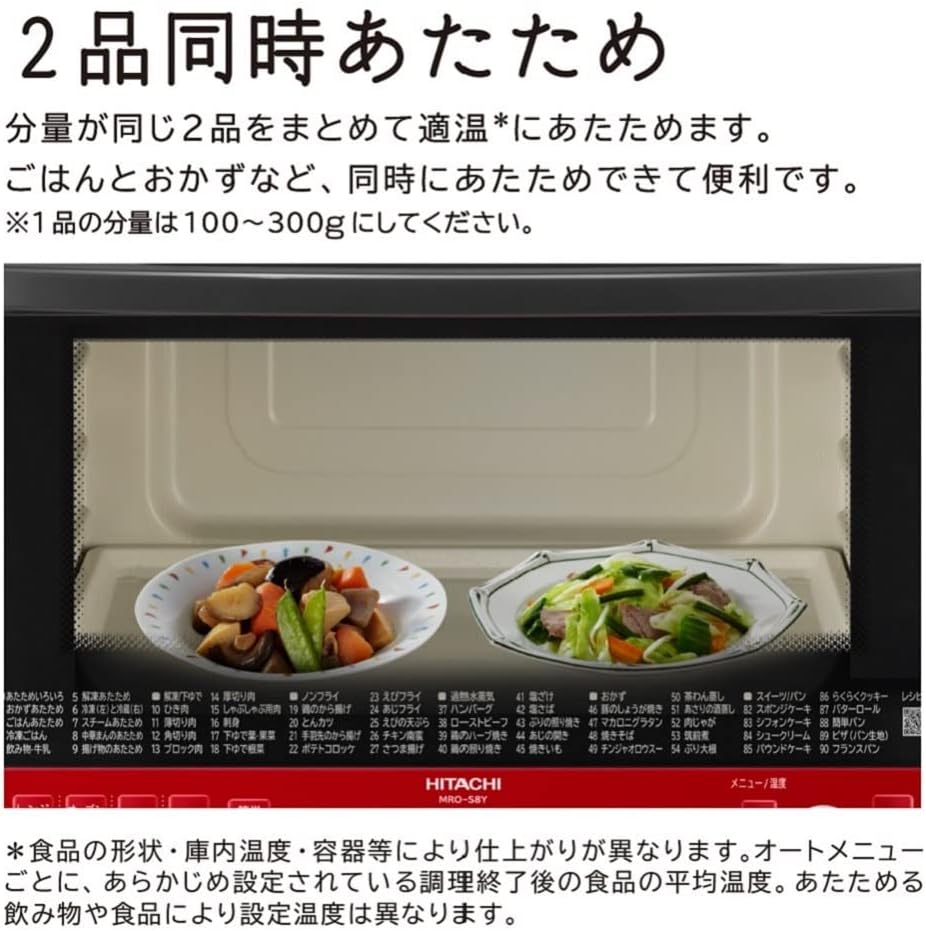
Image: Two different dishes placed side-by-side inside the oven, demonstrating the 2-item simultaneous reheating feature.

Image: A collage of various dishes, including stir-fries, curries, and vegetable sides, indicating the availability of Cookpad recipes for automatic cooking.
5. Maintenance
Regular cleaning ensures optimal performance and extends the lifespan of your oven range.
5.1 Cleaning the Interior
The oven interior features a silicone-based coating on the side and back surfaces, making dirt easy to spot and wipe away. The flat top surface, without exposed heaters, is also easy to clean.
- Wipe the interior surfaces with a soft, damp cloth after each use.
- For stubborn stains, use a mild detergent and then wipe with a clean, damp cloth.
- Do not use abrasive cleaners or scouring pads, as they may damage the coating.

Image: A hand wiping the interior side wall of the oven, highlighting the easy-to-clean silicone coating.

Image: A hand wiping the flat top surface inside the oven, demonstrating ease of cleaning due to no exposed heaters.
5.2 Cleaning the Ceramic Table Plate
The ceramic table plate is removable and washable, making it easy to clean even if it gets dirty.
- Remove the ceramic table plate from the oven.
- Wash it with mild dish soap and water.
- Rinse thoroughly and dry before placing it back in the oven.

Image: A hand removing the white ceramic table plate from the oven interior.

Image: A hand washing the ceramic table plate with a sponge under running water, indicating it is fully washable.
5.3 Water Tank and Drip Tray Cleaning
Regularly clean the water tank and drip tray to prevent mineral buildup and ensure proper steam generation.
- Remove the water tank and drip tray.
- Wash them with mild detergent and rinse thoroughly.
- Ensure they are completely dry before reinserting.
5.4 Steam Cleaning Function
The oven may include a steam cleaning function to help loosen food residue. Refer to the appliance's display or specific instructions for activating this feature.

Image: Steam being released from a nozzle inside the oven, illustrating the steam cleaning function.
6. Troubleshooting
If you encounter issues with your oven, refer to the following common troubleshooting steps. For problems not listed here, contact customer support.
- Oven not starting: Ensure the door is fully closed and latched. Check if the power cord is securely plugged into a working outlet.
- Food not heating evenly: Ensure food is placed centrally on the ceramic plate. Stir or rotate food halfway through cooking if possible.
- Steam not generating: Check if the water tank is filled with water and correctly inserted.
- Error codes: If an error code appears on the display, consult the full user manual for specific code meanings and solutions.
7. Specifications
| Feature | Specification |
|---|---|
| Brand | Hitachi |
| Model Number | MRO-S8Y R |
| Capacity | 31 Liters |
| Product Dimensions (D x W x H) | 43 x 48.7 x 36.5 cm |
| Package Dimensions | 58.4 x 51.8 x 44.6 cm |
| Product Weight | 15.5 kg |
| Package Weight | 18.84 kg |
| Color | Red |
| Material | Ceramic |
| Voltage | 100 Volts |
| Wattage | 1000 W |
| Special Features | Automatic Cooking, Defrost, Weight Sensor |
8. Warranty and Support
8.1 Manufacturer's Warranty
This product comes with a manufacturer's warranty of 12 months from the date of purchase. Please retain your proof of purchase for warranty claims.
8.2 Customer Support
For technical assistance, service, or warranty inquiries, please contact Hitachi customer support. Refer to the contact information provided in your product packaging or on the official Hitachi website.