1. Introduction
Thank you for choosing the STTWUNAKE 64GB Magnetic Mini Voice Activated Recorder. This compact and versatile device is designed for high-quality audio recording with features such as voice activation, long battery life, and a built-in magnet for convenient placement. This manual provides detailed instructions to help you set up, operate, and maintain your recorder effectively.
2. Package Contents
Please verify that all items listed below are included in your package:
- STTWUNAKE 64GB Voice Recorder
- Detachable Clip
- USB Charging/Data Cable
- User Manual

Image: The STTWUNAKE voice recorder, detachable clip, USB cable, and user manual are shown alongside the product packaging.
3. Product Overview
The STTWUNAKE N1-64G is a compact digital audio recorder designed for ease of use and portability. It features a robust 64GB internal storage, a long-lasting battery, and intelligent noise reduction for clear recordings.

Image: Front view of the STTWUNAKE 64GB voice recorder.

Image: Side view of the recorder with the detachable clip attached.
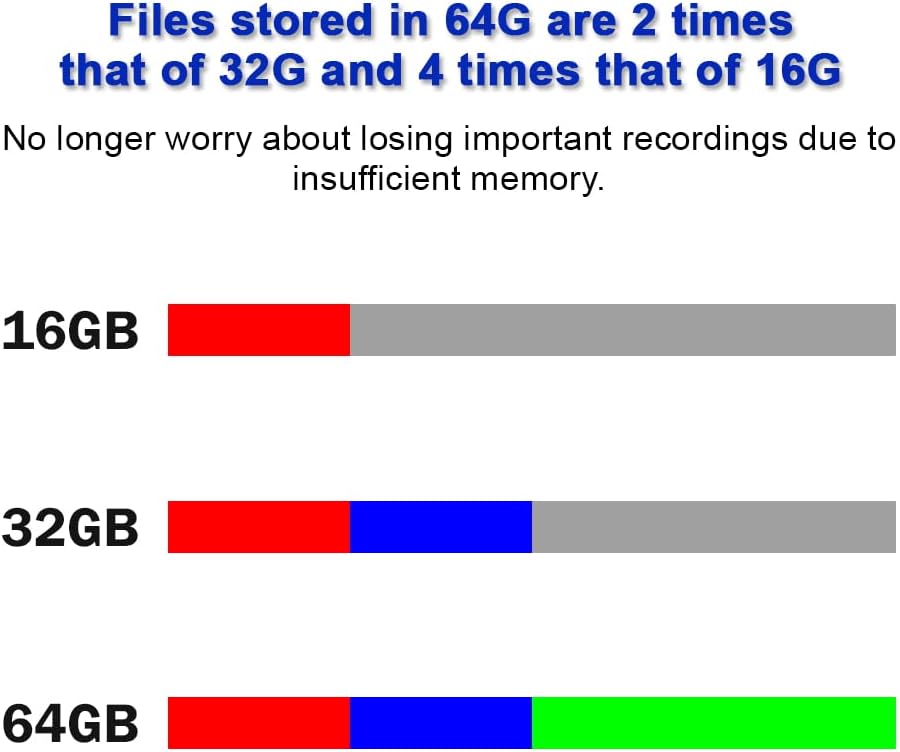
Image: Close-up of the power (ON/OFF) and voice activated recording (VOR ON/VOR OFF) switches located on the device.

Image: A hand holding the recorder, illustrating its compact and portable design.
4. Setup
4.1 Charging the Device
Before initial use, fully charge the recorder. Connect the provided USB cable to the recorder's charging port and plug the other end into a USB power adapter (not included) or a computer's USB port. The indicator light will show charging status and turn off when fully charged.

Image: The voice recorder connected to a USB cable for charging.
5. Operating Instructions
5.1 Power On/Off
To power on the device, slide the ON/OFF switch to the ON position. To power off, slide the ON/OFF switch to the OFF position. A small indicator light will briefly illuminate to confirm the action.
5.2 Standard Recording
- Ensure the device is powered on.
- Slide the VOR ON/VOR OFF switch to the VOR OFF position for continuous recording.
- The device will begin recording immediately.
- To stop recording, slide the ON/OFF switch to the OFF position. The recording will be saved automatically.
5.3 Voice Activated Recording (VOR)
The VOR function allows the recorder to start recording automatically when sound is detected above a certain threshold (approximately 35 decibels) and pause when the sound level drops below this threshold. This conserves storage space and battery life.
- Ensure the device is powered on.
- Slide the VOR ON/VOR OFF switch to the VOR ON position.
- The device will enter voice-activated recording mode. Recording will start when sound is detected and pause when silence occurs.
- To stop VOR, slide the ON/OFF switch to the OFF position. The recording will be saved automatically.
Note: If you need to capture all sounds, including very low-level audio, it is recommended to use standard continuous recording (VOR OFF) to avoid missing any details.

Image: Close-up of the power switch (ON/OFF) and the voice activated recording switch (VOR ON/VOR OFF).
5.4 Playing Back and Transferring Recordings
To access and manage your recordings, connect the recorder to a computer using the provided USB cable. The device will appear as a removable storage drive. You can then copy, move, or play back the WAV audio files using your computer's media player.

Image: Illustration of the voice recorder connected to a computer, with files being transferred.
6. Key Features
6.1 64GB Storage Capacity
The recorder comes with a generous 64GB internal storage, providing ample space for up to 1000 hours of audio recordings. This capacity is significantly larger than many standard recorders, reducing concerns about running out of space during extended use.

Image: The voice recorder with a prominent '64GB' label, indicating its storage capacity.

Image: A visual comparison showing 64GB storage capacity relative to 16GB and 32GB.
6.2 Long Battery Life
Equipped with a built-in high-capacity battery, the recorder can operate continuously for approximately 300 hours on a single full charge, making it suitable for extended recording sessions without frequent recharging.

Image: The voice recorder next to a battery icon displaying '300H', signifying its long battery life.
6.3 Built-in Magnet
The recorder features a strong built-in magnet, allowing it to be securely attached to any magnetic metal surface. This provides flexible placement options for discreet or convenient recording.

Image: Examples of the voice recorder magnetically attached to various metal surfaces, such as under a desk, on a bed frame, and on a refrigerator.
6.4 Removable Clip
A detachable clip is included, offering additional versatility for carrying and placement. The clip allows the recorder to be easily attached to clothing, bags, or other objects.

Image: The voice recorder with its detachable clip, demonstrated by attaching it to a backpack.
6.5 DSP Intelligent Noise Reduction
The device incorporates a built-in DSP (Digital Signal Processor) intelligent noise reduction chip. This technology helps to filter out background noise, resulting in clearer and more intelligible audio recordings.

Image: A visual representation of a DSP chip, symbolizing the intelligent noise reduction capability.
7. Maintenance
- Cleaning: Use a soft, dry cloth to clean the exterior of the device. Do not use liquid cleaners or solvents.
- Storage: Store the recorder in a cool, dry place away from direct sunlight and extreme temperatures.
- Battery Care: To prolong battery life, avoid fully discharging the battery frequently. Charge the device regularly, even if not in use for extended periods.
- Data Management: Regularly transfer important recordings to a computer and back them up to prevent data loss.
8. Troubleshooting
- Device not turning on: Ensure the battery is charged. Connect the device to a power source and allow it to charge for at least 30 minutes before attempting to power it on again.
- Cannot record: Check if the device has sufficient storage space. Connect to a computer and delete unnecessary files if the storage is full. Ensure the ON/OFF switch is in the ON position.
- Poor audio quality/Excessive background noise: While the device has DSP noise reduction, extreme environmental noise can still affect recording quality. Try to record in quieter environments. Ensure the microphone is not obstructed.
- Battery not holding charge: If the battery life significantly decreases over time, it may indicate battery degradation. Ensure you are using the correct charging cable and power source.
- Device not recognized by computer: Ensure the USB cable is securely connected to both the recorder and the computer. Try a different USB port or cable. Restart your computer.
9. Specifications
| Feature | Specification |
|---|---|
| Brand | STTWUNAKE |
| Model | N1-64G |
| Memory Storage Capacity | 64 GB |
| Digital Recording Time | Up to 1000 hours |
| Battery Life (Recording) | Approx. 300 hours |
| Battery Type | Lithium Polymer (included) |
| Microphone Format | Built-In |
| Media Format | WAV |
| Hardware Interface | USB |
| Compatible Devices | Personal Computer |
| Special Features | 64G high capacity, Built-in magnet, Voice activated recording, DSP noise reduction |

Image: Dimensions and weight of the STTWUNAKE voice recorder.
10. Warranty and Support
For warranty information or technical support, please refer to the contact details provided with your purchase or visit the official STTWUNAKE website. Keep your proof of purchase for any warranty claims.