Introduction
Thank you for choosing the GEEKOTO 75-inch Aluminum Alloy Tripod. This manual provides detailed instructions for the proper setup, operation, and maintenance of your tripod to ensure optimal performance and longevity. This tripod is designed for versatility, offering a stable platform for your camera, a rotatable center column for diverse shooting angles, and the ability to convert into a monopod.

Image: The GEEKOTO 75-inch Aluminum Alloy Tripod shown in its standard configuration alongside the quick release plate.
Product Components
Familiarize yourself with the various parts of your GEEKOTO tripod:

Image: A detailed diagram illustrating the numbered components of the GEEKOTO tripod.
- Quick Release Plate: For fast attachment and detachment of your camera.
- Bubble Level: Helps ensure the tripod is perfectly level for accurate shots.
- 360° Ball Head: Allows for flexible camera positioning and smooth panning.
- 360° Panoramic Scale: Aids in precise panoramic photography.
- Transverse Center Column Locks: Secure the center column in vertical or horizontal positions.
- Centre Column Lock: Secures the main center column height.
- Leg Angle Adjustment Lock: Allows adjustment of each leg's angle independently.
- Removable Leg: One leg can be detached to form a monopod.
- Twist Locks: Secure the extension of each leg section.
- Non-slip Rubber Foot: Provides stability on various surfaces.
- Retractable Weight Hook: For hanging additional weight to enhance stability.
Setup Instructions
1. Unfolding the Tripod
- Gently spread the tripod legs outwards until they are fully extended or set to your desired angle using the Leg Angle Adjustment Locks (7).
- Adjust the angle of each leg independently to adapt to uneven terrain.
2. Extending the Legs
- To extend a leg section, twist the Twist Lock (9) counter-clockwise to loosen it.
- Pull the leg section outwards to the desired length.
- Twist the Twist Lock (9) clockwise to secure the leg section firmly in place. Repeat for all sections and legs.
3. Attaching the Quick Release Plate to Your Camera

Image: The quick release plate with its 1/4-inch screw for camera attachment.
- Locate the Quick Release Plate (1).
- Align the 1/4-inch screw on the Quick Release Plate with the tripod mount hole on the bottom of your camera.
- Turn the screw clockwise to tighten the plate securely to your camera. Ensure it is snug to prevent camera movement.
4. Mounting Your Camera to the Tripod

Image: Visual guide showing how to slide the quick release plate, with camera attached, into the tripod head.
- Ensure the quick release clamp on the tripod head is open.
- Slide the Quick Release Plate (with your camera attached) into the clamp on the tripod head.
- Push down firmly until you hear a click, indicating it is locked. Then, tighten the locking knob on the quick release clamp to secure the camera.
Operating Instructions
1. Adjusting the Ball Head (360° Panorama)
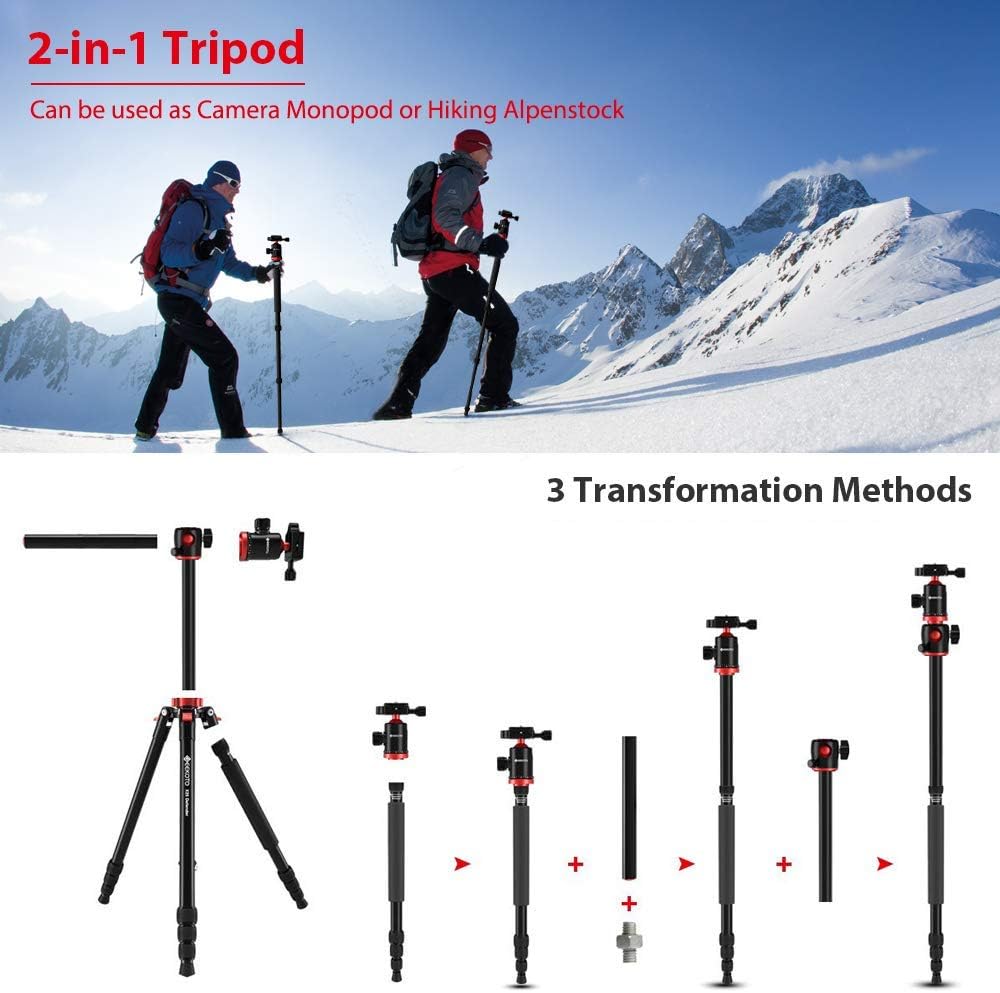
Image: The ball head with its 360-degree panoramic scale, indicating rotational movement.
- To adjust the angle of your camera, loosen the main locking knob on the 360° Ball Head (3).
- Position your camera to the desired angle.
- Tighten the main locking knob to secure the camera in place.
- For panoramic shots, use the 360° Panoramic Scale (4) at the base of the ball head. Loosen the separate panning lock knob (if present) to rotate the camera horizontally without changing the tilt.
2. Using the Transverse Center Column

Image: The transverse center column shown rotating horizontally by 360 degrees, enabling various shooting angles.
- The center column can be used vertically or rotated horizontally for macro, low-angle, or panoramic shooting.
- To adjust, loosen the Transverse Center Column Locks (5).
- Pull the center column up slightly, then rotate it to the desired vertical angle (0°, 22.5°, 45°, 67.5°, 90°) or horizontally (360° rotation).
- Important: Ensure the calibration line on the column is aligned before locking to ensure stability. Tighten the Transverse Center Column Locks (5) firmly.
3. Converting to a Monopod

Image: A sequence showing the tripod transforming into a monopod or hiking stick by detaching one leg and the center column.
- To convert the tripod into a monopod, first remove the Removable Leg (8) by twisting it counter-clockwise until it detaches.
- Next, remove the center column by loosening the Centre Column Lock (6) and pulling the column upwards.
- Attach the ball head (with or without the quick release plate) to the top of the detached leg.
- Alternatively, you can attach the ball head to the top of the detached center column for a taller monopod.
- The detached leg can also be used as a hiking stick.
4. Using the Bubble Level
- The Bubble Level (2) helps you quickly find the balance of the tripod. Adjust the leg lengths until the bubble is centered within the level, ensuring your camera is perfectly horizontal for accurate shooting.
5. Using the Retractable Weight Hook
- For increased stability, especially in windy conditions or with heavy camera setups, extend the Retractable Weight Hook (11) located at the bottom of the center column.
- Hang a sandbag, camera bag, or other heavy object from the hook to lower the tripod's center of gravity and improve stability.
Maintenance
- Cleaning: Wipe down the tripod with a soft, damp cloth after each use, especially if used in dusty, sandy, or wet environments. Avoid harsh chemicals.
- Lubrication: Periodically check the leg locks and ball head for smooth operation. If they become stiff, a small amount of silicone-based lubricant can be applied, but avoid over-lubrication.
- Storage: Store the tripod in a dry, cool place, away from direct sunlight and extreme temperatures. Ensure it is clean and dry before storage.
- Inspection: Regularly inspect all screws, locks, and joints for tightness and wear. Tighten any loose components.
Troubleshooting
Tripod is unstable:
- Ensure all leg sections are fully extended and their twist locks are securely tightened.
- Verify that the Leg Angle Adjustment Locks are engaged for each leg.
- Check if the Centre Column Lock and Transverse Center Column Locks are firmly tightened.
- Use the Retractable Weight Hook to add stability, especially with heavier cameras or in windy conditions.
Camera is not secure on the ball head:
- Ensure the Quick Release Plate is securely attached to your camera.
- Verify that the quick release clamp on the tripod head is fully closed and its locking knob is tightened after inserting the plate.
- Check that the main locking knob on the 360° Ball Head is tightened after positioning your camera.
Center column cannot be stabilized after transverse rotation:
- Ensure the calibration line on the center column is precisely aligned before tightening the Transverse Center Column Locks. Misalignment can prevent proper locking.
Specifications
| Feature | Detail |
|---|---|
| Brand | GEEKOTO |
| Model | B08CVD3Q2C |
| Material | Aluminum, Metal, Rubber |
| Maximum Height | 75 Inches (191 cm) |
| Folded Size | 24 Inches (60 cm) |
| Tripod Head Type | Ball Head |
| Compatible Devices | Camera (DSLR, Mirrorless, etc.) |
| Special Features | Rotatable Transverse Center Column, 360° Panoramic Ball Head, Converts to Monopod, Quick Release Plate, Bubble Level, Weight Hook |
Warranty and Support
GEEKOTO products are manufactured to high-quality standards. For information regarding warranty coverage, technical support, or service inquiries, please refer to the contact information provided with your purchase or visit the official GEEKOTO website.
For further assistance, please contact GEEKOTO customer service.