1. Introduction
This manual provides instructions for the safe and effective use of your onlyfire Stainless Steel Multi-Purpose Rotisserie and Pizza Combo Kit. This kit is designed to enhance your 18-inch kettle grill, allowing for both rotisserie cooking and pizza baking. Please read this manual thoroughly before assembly and operation to ensure proper use and maintenance.
2. Safety Information
Always follow these safety guidelines to prevent injury or damage to the product.
- Ensure the grill is on a stable, level surface away from flammable materials.
- Do not operate the rotisserie motor in wet conditions.
- Always use heat-resistant gloves when handling hot components.
- Keep children and pets away from the grill during operation.
- Disconnect the rotisserie motor from the power source before cleaning or when not in use.
- Do not use this kit with Weber Smokey Mountain cookers. It is designed for 18-inch kettle grills only.
- Be aware that high temperatures, especially during pizza cooking, can affect plastic components of your grill, such as vent handles. Monitor temperatures carefully.
3. Package Contents
Verify that all components are present before beginning assembly:
- Rotisserie Ring (Stainless Steel)
- Rotisserie Kit (including 110V electric motor, spit rod, and meat forks)
- 13-inch Round Cordierite Pizza Stone
- Baking Peel (Pizza Peel)
- 4 Support Chips (for supporting cooking grate)
- Detachable Front Baffle

Image: All components of the onlyfire Stainless Steel Multi-Purpose Rotisserie and Pizza Combo Kit, including the rotisserie ring, motor, spit rod, pizza stone, pizza peel, and support chips.
4. Setup and Assembly
Follow these steps to assemble your rotisserie and pizza combo kit onto your 18-inch kettle grill.
4.1 Installing Support Chips
The included support chips are used to elevate your cooking grate or provide additional support within the rotisserie ring.
- Locate the designated slots or rim inside your kettle grill.
- Insert the support chips into these locations, ensuring they are securely seated.
- Place your cooking grate onto the installed support chips.
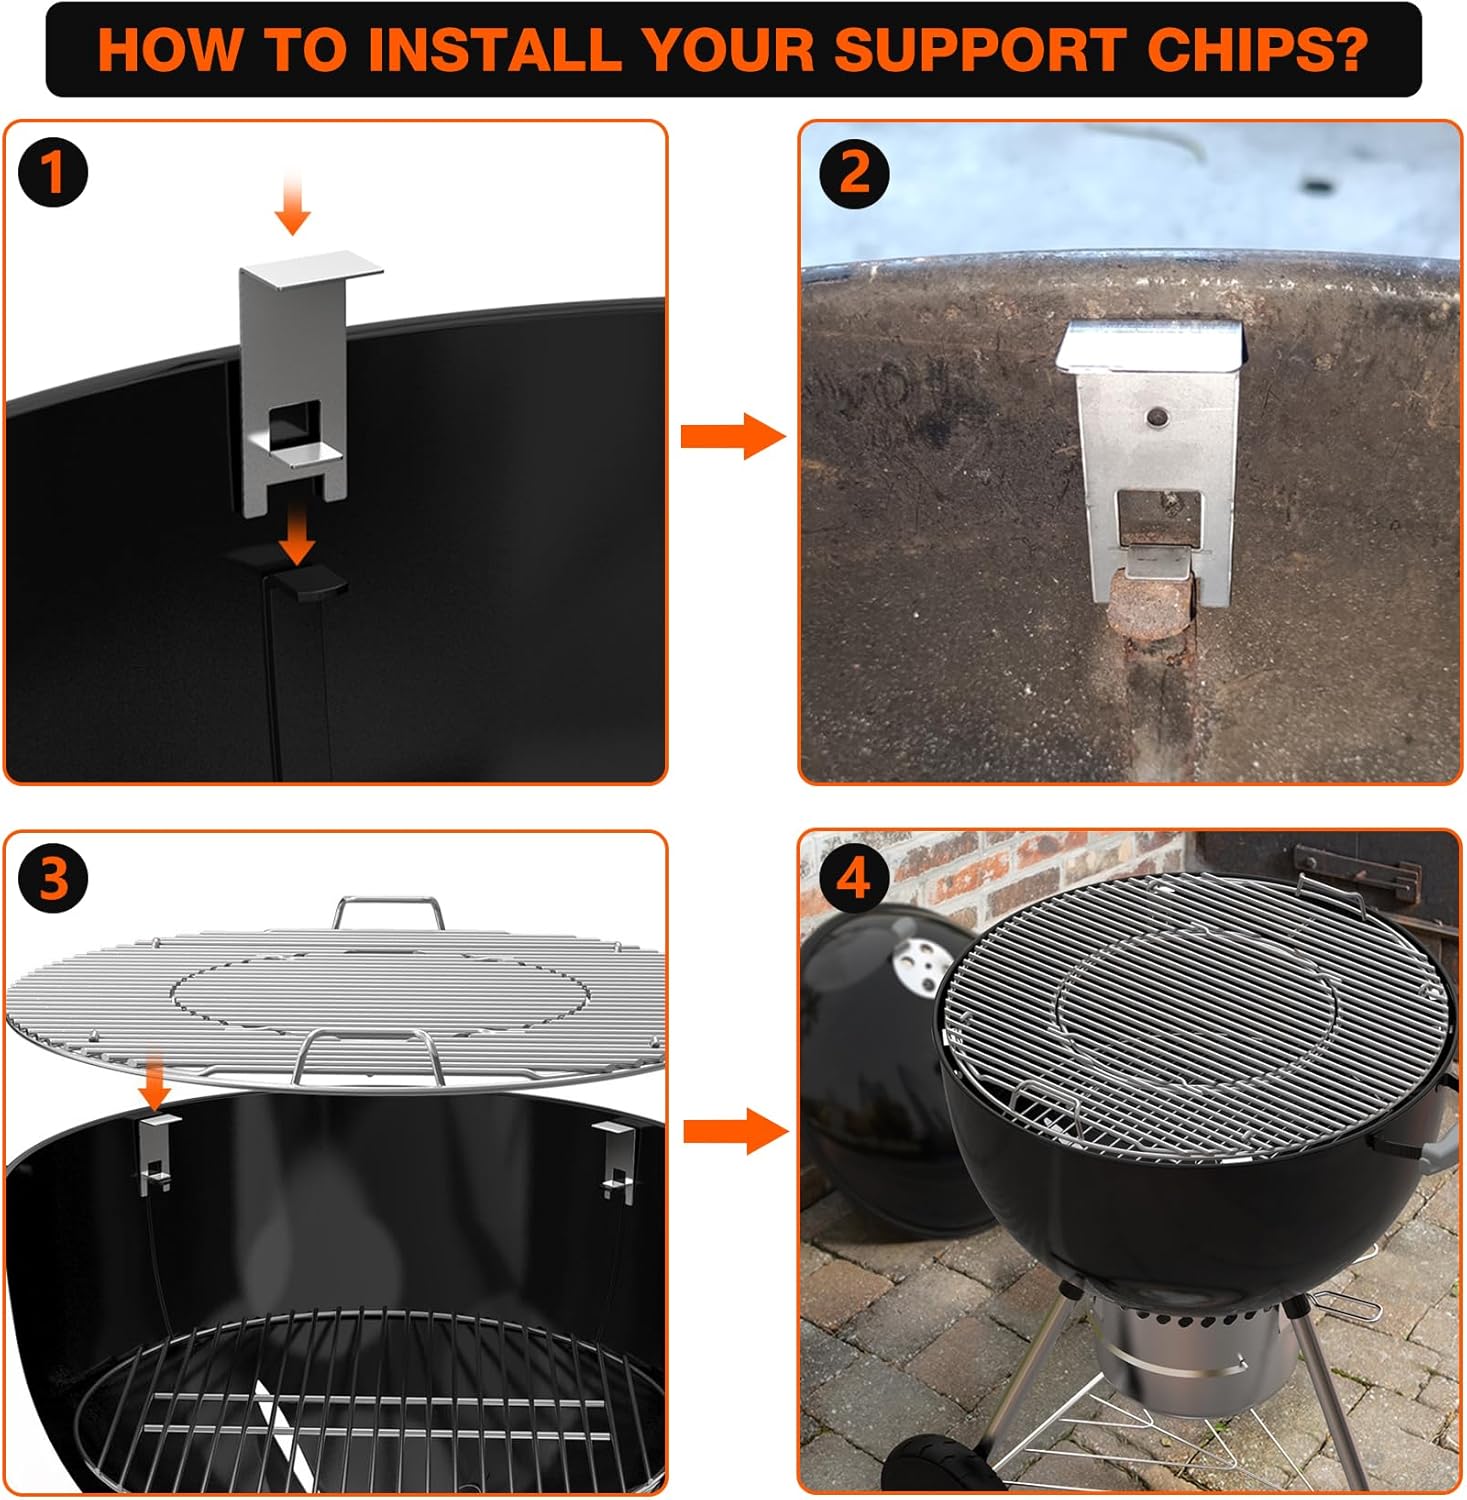
Image: A four-panel diagram illustrating the process of installing the support chips into the kettle grill, followed by placing the cooking grate on top of them.
4.2 Assembling the Rotisserie Ring
- Place the stainless steel rotisserie ring securely on top of your 18-inch kettle grill base. Ensure it sits flush.
- Attach the 110V electric motor to the designated bracket on the rotisserie ring.
- Insert the spit rod through the opening in the motor and through the opposite side of the rotisserie ring.
- Secure the meat forks onto the spit rod as needed for rotisserie cooking.
- The front baffle can be attached or detached depending on whether you are using the pizza oven function or prefer to close the opening during rotisserie cooking.

Image: A detailed view of the onlyfire rotisserie ring, showing its dimensions (18.5 inches / 47 cm diameter, 6 inches / 15.2 cm height) with the electric motor and spit rod attached.
5. Operating Instructions
5.1 Rotisserie Cooking
The rotisserie function is ideal for roasting whole chickens, roasts, or other large cuts of meat, ensuring even cooking and self-basting.
- Prepare your kettle grill with charcoal for indirect heat.
- Securely attach the meat to the spit rod using the meat forks. Ensure the meat is balanced to prevent strain on the motor.
- Insert the spit rod into the rotisserie ring, engaging it with the motor.
- Plug in the 110V electric motor to a suitable power outlet.
- Place the grill lid on top of the rotisserie ring. Monitor cooking progress and internal meat temperature.

Image: A large roast cooking on the rotisserie spit over charcoal in a kettle grill, demonstrating the rotisserie function of the onlyfire kit.
5.2 Pizza Oven Operation
Transform your kettle grill into a high-temperature pizza oven for crispy crusts and perfectly cooked toppings.
- Remove the spit rod and motor if previously installed.
- Place the 13-inch cordierite pizza stone on the cooking grate inside the rotisserie ring.
- Prepare your kettle grill with charcoal, aiming for high direct heat. Consider placing charcoal towards the back to create a hotter zone for the top of the pizza.
- Preheat the pizza stone for at least 20-30 minutes to reach optimal cooking temperature (650-700°F or higher).
- Use the baking peel to transfer your prepared pizza onto the hot stone.
- Cook for a few minutes, rotating the pizza as needed for even cooking. The detachable front baffle can be used to retain heat.
- Once cooked, use the baking peel to remove the pizza.

Image: An 18-inch kettle grill equipped with the onlyfire pizza kit, showing a pizza baking inside the oven attachment. The pizza peel is visible, ready for use.

Image: A side-by-side view displaying the dimensions of the 13-inch round cordierite pizza stone and the pizza peel (11.8 inches / 30 cm wide, 22.2 inches / 56.5 cm long including handle).
6. Maintenance and Cleaning
Regular cleaning and maintenance will prolong the life of your kit.
- Stainless Steel Components: Clean the rotisserie ring, spit rod, and meat forks with warm soapy water and a non-abrasive cloth. Rinse thoroughly and dry completely to prevent water spots.
- Pizza Stone: Allow the pizza stone to cool completely before cleaning. Scrape off any excess food with a spatula. For stubborn residue, use a stiff brush and warm water. Do not use soap on the pizza stone, as it can be absorbed and affect future food flavors. Air dry completely before storage.
- Electric Motor: Wipe the motor housing with a damp cloth. Do not immerse the motor in water. Store in a dry place.
- Storage: Store all components in a dry, protected area when not in use.
7. Troubleshooting
| Problem | Possible Cause | Solution |
|---|---|---|
| Rotisserie motor not turning. | Not plugged in; power outage; motor malfunction; meat unbalanced. | Check power connection; ensure power supply; balance meat on spit rod; contact support if motor is faulty. |
| Pizza not cooking evenly. | Insufficient preheating; uneven charcoal distribution; lack of pizza rotation. | Ensure pizza stone is fully preheated; distribute charcoal for even heat; rotate pizza frequently during cooking. |
| Heat loss during pizza cooking. | Front baffle not used; grill lid not properly seated. | Utilize the detachable front baffle; ensure grill lid is placed correctly on the rotisserie ring. |
| Plastic grill components melting. | Excessive heat directly on plastic parts. | Monitor grill temperature closely, especially during high-heat pizza cooking. Consider using a heat shield or adjusting charcoal placement to protect vulnerable areas. |
8. Specifications
- Model: B08CV63FBM
- Compatibility: 18-inch kettle grills (e.g., Weber and similar brands). Not compatible with Weber Smokey Mountain cookers.
- Material: Stainless Steel (Rotisserie Ring, Spit Rod, Meat Forks, Pizza Peel)
- Pizza Stone Material: Cordierite
- Pizza Stone Diameter: 13 inches (33 cm)
- Rotisserie Ring Dimensions: Approximately 18.5 inches (47 cm) diameter, 6 inches (15.2 cm) height
- Electric Motor: 110V
- Package Dimensions: 19 x 19 x 6.8 inches
- Item Weight: 7 pounds
- Manufacturer: onlyfire
9. Warranty and Support
For warranty information or technical support, please contact onlyfire customer service. Refer to your purchase documentation for specific warranty terms and contact details.
You can often find support information on the manufacturer's official website or through the retailer where the product was purchased.