1. Introduction
Welcome to the exciting world of Hot Wheels! This manual provides essential information for setting up, operating, and maintaining your Hot Wheels Energy Track with Double Loop, Fire Ring, and included car. Designed for children aged 4 and up, this track set offers thrilling racing action and encourages imaginative play.
The Hot Wheels Energy Track is a buildable track set featuring a double loop and a fire ring obstacle, providing dynamic challenges for your Hot Wheels vehicles. It includes one Hot Wheels car to get you started immediately.

Figure 1.1: Hot Wheels Energy Track product packaging, illustrating the track's main features.
2. Safety Information
Please read all safety warnings before assembly and use. Keep this manual for future reference.
- WARNING: Not suitable for children under 36 months due to small parts that may present a choking hazard.
- Adult supervision is recommended during assembly and play.
- Ensure all track pieces are securely connected before launching cars.
- Do not modify the track or cars, as this may affect performance and safety.
- Keep hair, loose clothing, and fingers away from moving parts.
3. Setup and Assembly
The Hot Wheels Energy Track requires assembly. Follow these steps carefully to ensure proper setup and optimal performance.
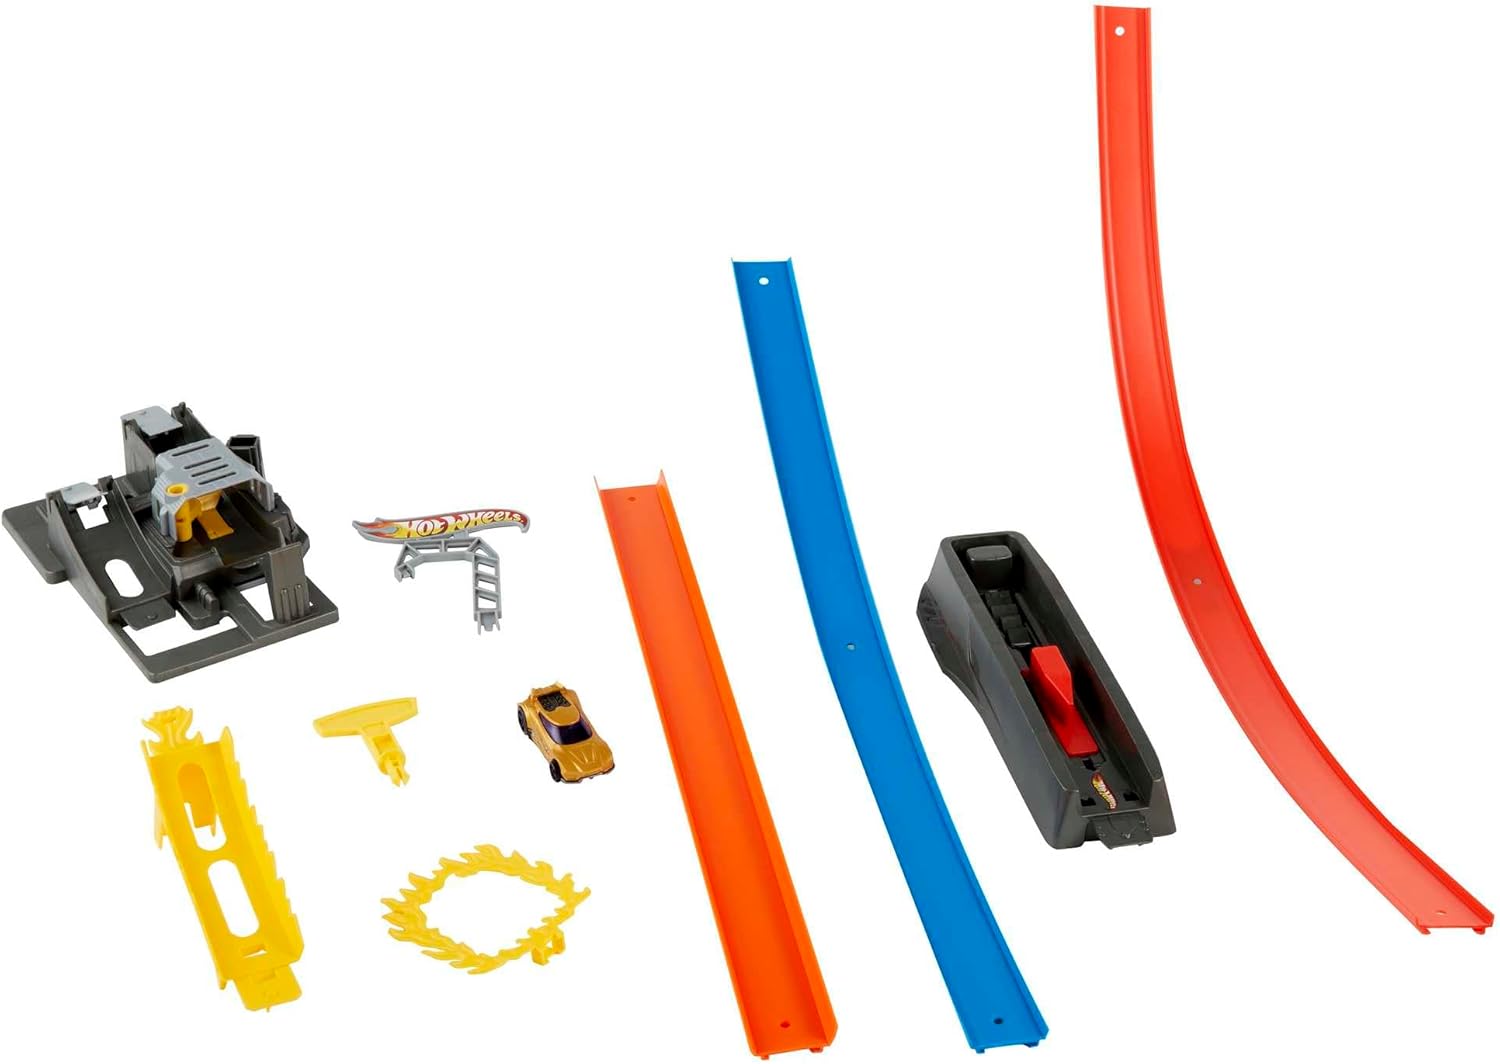
Figure 3.1: Unpacked components of the Hot Wheels Energy Track.
- Unpack Components: Carefully remove all track pieces, connectors, the launcher, loop supports, the fire ring, and the included Hot Wheels car from the packaging. Refer to Figure 3.1 to identify all parts.
- Assemble Base and Launcher: Connect the launcher mechanism to the main base unit. Ensure it clicks securely into place.
- Attach Track Sections: Begin by connecting the straight track sections to the launcher and base. Pay attention to the alignment pins and slots for a snug fit.
- Construct the Double Loop: Assemble the red and blue loop sections. Connect them to the designated points on the track and secure them with the provided supports. The loops should stand firmly upright.
- Install the Fire Ring: Attach the yellow fire ring accessory to the end of the track, ensuring it is stable and aligned for cars to pass through.
- Final Check: Once all pieces are connected, gently lift the assembled track to ensure all connections are secure and the structure is stable.
4. Operating Instructions
Once assembled, your Hot Wheels Energy Track is ready for action! Follow these steps to launch your cars and experience the thrill of the track.
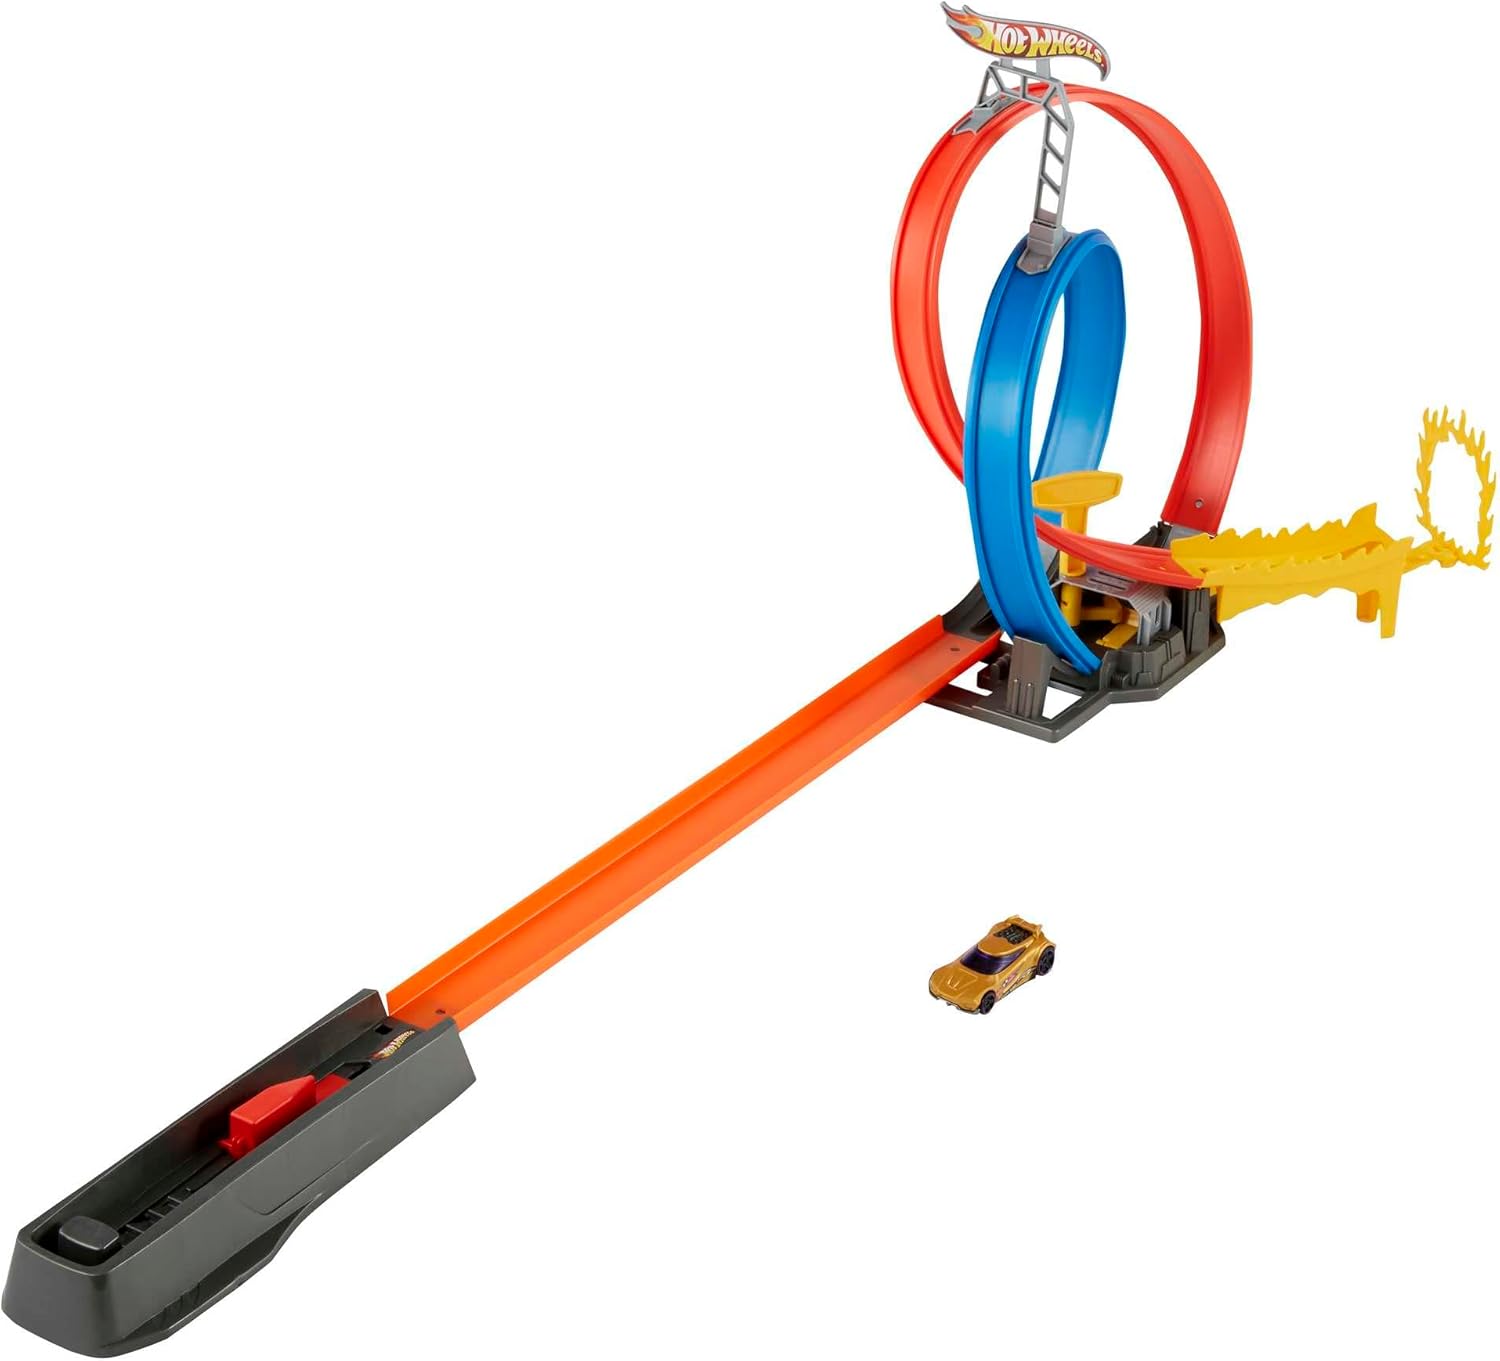
Figure 4.1: The Hot Wheels Energy Track fully assembled and ready for play.
- Place Car: Position the included Hot Wheels car (or another compatible 1:64 scale Hot Wheels vehicle) at the starting point of the launcher. Ensure the car is seated correctly.
- Prepare Launcher: Pull back the launcher mechanism until it locks into place. This action primes the spring-loaded system for maximum speed.
- Launch Car: Press the release button or lever on the launcher to propel the car forward. The car will speed along the track, navigate the double loop, and pass through the fire ring.
- Observe and Adjust: If the car does not complete the loop or pass through the fire ring consistently, ensure the track connections are tight and the launcher is fully primed. Experiment with different Hot Wheels cars for varied performance.
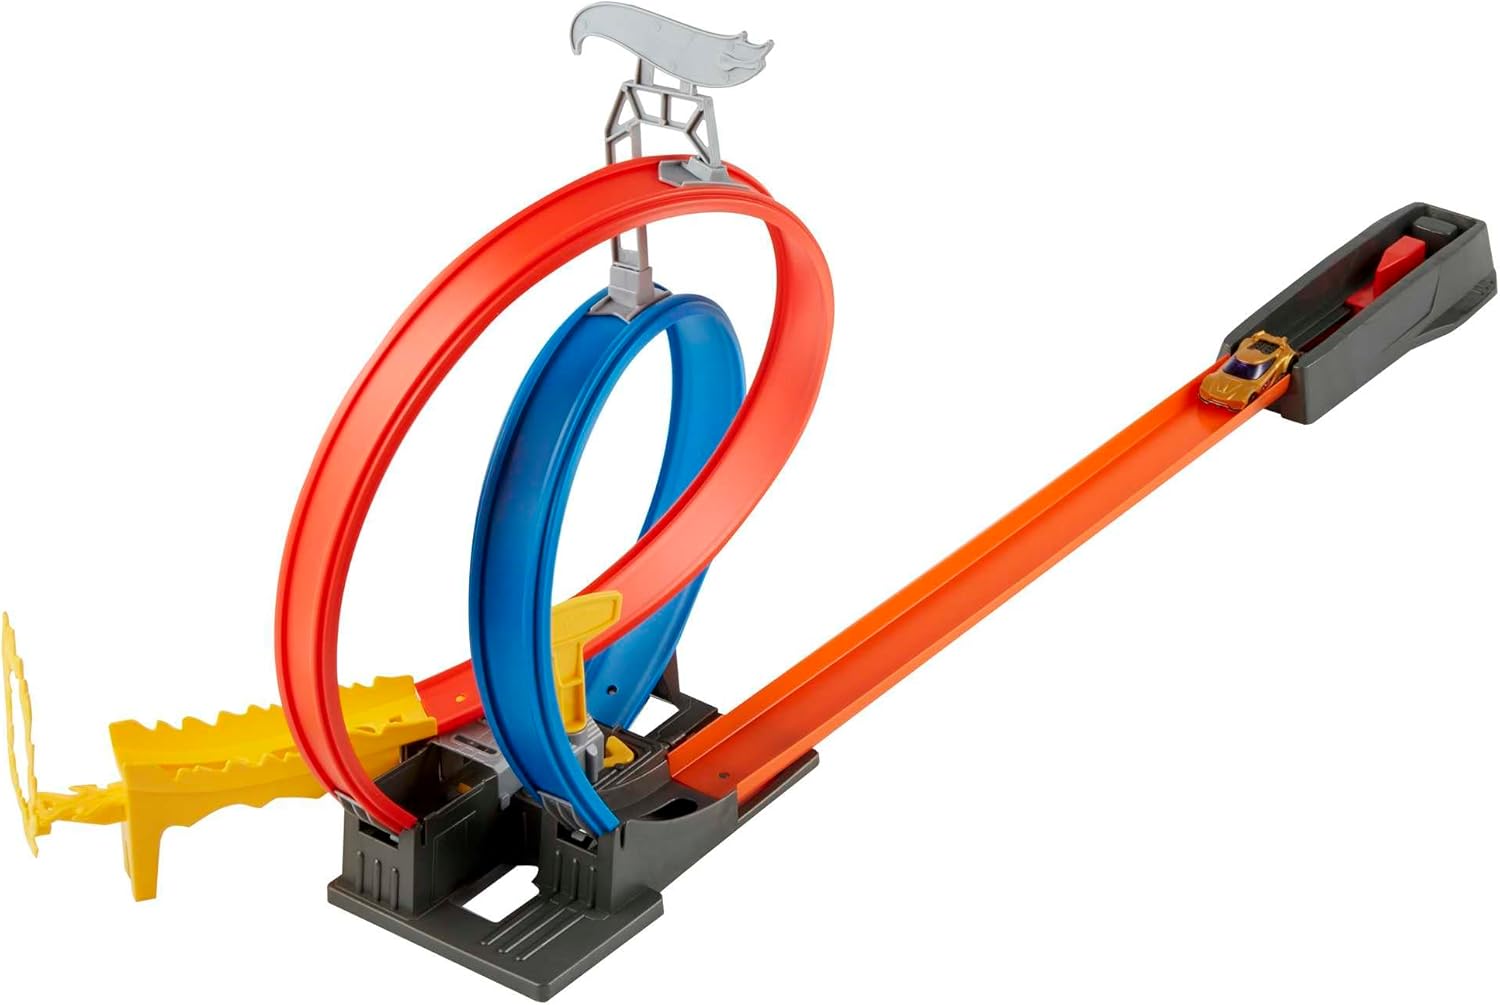
Figure 4.2: A Hot Wheels car navigating the double loop and approaching the fire ring.
5. Maintenance
Proper maintenance will help extend the life of your Hot Wheels Energy Track and ensure continued enjoyment.
- Cleaning: Wipe down track pieces and the launcher with a soft, dry cloth. Avoid using harsh chemicals or abrasive cleaners, as these can damage the plastic.
- Storage: When not in use, disassemble the track into its main components and store them in the original box or a suitable container to prevent damage and loss of parts. Store in a cool, dry place away from direct sunlight.
- Inspection: Periodically inspect all track pieces and the launcher for any signs of wear, cracks, or damage. Replace any broken parts immediately to ensure safe operation.
6. Troubleshooting
If you encounter issues with your Hot Wheels Energy Track, refer to the following common problems and solutions:
| Problem | Possible Cause | Solution |
|---|---|---|
| Car does not complete the loop or fire ring. |
|
|
| Launcher mechanism feels weak or broken. |
|
|
| Track pieces do not connect securely. |
|
|
7. Specifications
| Feature | Detail |
|---|---|
| Product Model Number | GND92 |
| Product Dimensions (L x W x H) | 7.62 x 50.8 x 30.48 cm |
| Product Weight | 500 grams |
| Recommended Age | 4+ Years (Manufacturer recommended: 0-3 years, but product title and safety warning state 4+ years) |
| Material | Plastic |
| Scale of Included Car | 1:64 |
| Assembly Required | Yes |
| Batteries Required | No |
| Educational Objectives | Hand-eye coordination, problem-solving skills, spatial reasoning |
8. Warranty and Support
Hot Wheels products are manufactured to high-quality standards. For information regarding warranty coverage, replacement parts, or technical support, please visit the official Hot Wheels website or contact their customer service department.
Please retain your proof of purchase for any warranty claims.
For further assistance, you may also refer to the Hot Wheels Store on Amazon.