Italeri IT6196 1/72 Redus Gladiator Training Institute Plastic Model Instruction Manual
Model: IT6196 | Brand: Italeri
1. Introduction
This manual provides instructions for the assembly and care of the Italeri IT6196 1/72 scale Redus Gladiator Training Institute plastic model kit. This kit allows for the creation of a detailed diorama depicting an ancient Roman gladiator training arena, complete with figures and accessories.
The main arena structure is constructed from laser-cut MDF (Medium-Density Fiberboard), while the figures and other accessories are plastic components requiring assembly and painting.
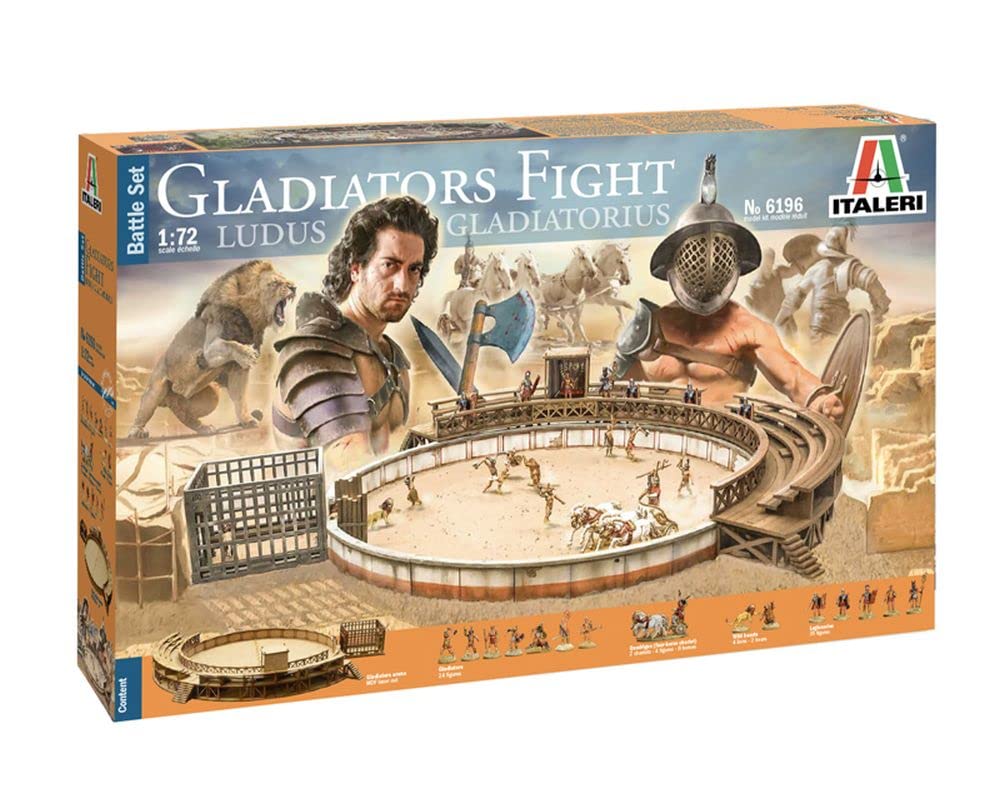
Image 1.1: Fully assembled Redus Gladiator Training Institute model with figures and chariots.
2. Package Contents
Verify that all components are present before beginning assembly. The kit includes:
- Laser-cut MDF parts for the circular arena, spectator seating, and beast cage.
- Plastic sprues containing 1/72 scale figures:
- Gladiators (approximately 24 figures)
- Legionaries (approximately 35 figures)
- Quadrigas (two four-horse chariots with 4 figures and 8 horses)
- Wild beasts (4 lions, 2 bears)
- Instruction sheet (this document).

Image 2.1: Overview of the battle set contents, including figures, chariots, wild beasts, and the arena.
3. Assembly Instructions
3.1. Required Tools and Materials
- Plastic model cement (for plastic parts).
- Wood glue or PVA glue (for MDF parts).
- Hobby knife or sprue cutters.
- Fine sandpaper or file.
- Paints and brushes (acrylic or enamel, suitable for plastic and wood).
- Tweezers (optional, for small parts).
3.2. MDF Arena Assembly
The arena structure is made from laser-cut MDF. Carefully detach parts from the MDF sheets. Use wood glue or PVA glue for assembly. Refer to the diagrams on the packaging or included sheet for specific part identification and assembly sequence.
- Identify the base plate and main circular wall sections.
- Assemble the inner and outer walls of the arena, ensuring proper alignment.
- Attach the spectator seating tiers to the outer wall structure.
- Assemble the beast cage and attach it to the designated area of the arena.
- Allow sufficient drying time for all glued MDF components before handling.

Image 3.1: Unassembled laser-cut MDF components for the arena structure.

Image 3.2: A different perspective of the unassembled MDF arena parts.
3.3. Figure and Accessory Assembly
The plastic figures and chariot components are provided on sprues. Use plastic model cement for these parts.
- Carefully cut each figure and accessory part from its sprue using a hobby knife or sprue cutters.
- Trim any excess plastic (flash) with a hobby knife or file.
- Assemble multi-part figures and chariots according to the diagrams. Ensure a strong bond with plastic cement.
- Allow assembled plastic parts to dry completely before painting.

Image 3.3: Example of a plastic sprue containing unpainted gladiator figures.
3.4. Painting and Finishing
This kit is unpainted and requires painting to achieve the desired appearance. Use model paints suitable for plastic and wood. It is recommended to paint the figures and arena separately before final arrangement.
- Prime all plastic and MDF parts before applying color coats for better paint adhesion.
- Use fine brushes for detailed work on figures.
- Consider weathering techniques to enhance realism for the arena and figures.
- Apply a clear protective coat (matte or satin) once painting is complete and dry.
4. Display and Setup
Once all components are assembled and painted, arrange the figures and chariots within the arena to create a dynamic scene. The finished arena has a diameter of approximately 43 cm at its widest point.
- Place gladiators in combat poses on the arena floor.
- Position chariots and horses as desired.
- Place wild beasts within the cage or entering the arena.
- Arrange legionaries or spectators on the seating tiers.

Image 4.1: A detailed diorama setup showing the assembled arena with figures and environmental elements.

Image 4.2: Close-up of the beast cage, showing a gladiator and a lion figure.
5. Care and Maintenance
To ensure the longevity of your assembled model, follow these care guidelines:
- Dusting: Regularly dust the model with a soft, dry brush or a can of compressed air to prevent dust buildup.
- Handling: Handle the model carefully, avoiding excessive force on delicate parts.
- Storage: Store the model in a cool, dry place away from direct sunlight and extreme temperature fluctuations to prevent warping or paint fading.
- Cleaning: Avoid using harsh chemicals or abrasive cleaners. For stubborn dirt, a slightly damp cloth can be used, but ensure the model is completely dry afterward.
6. Troubleshooting
Common issues and their solutions during assembly:
- Parts not fitting: Ensure all sprue gates and flash are completely removed. Lightly sand or file the mating surfaces if necessary.
- Weak glue joints: Apply sufficient glue to both surfaces and hold parts firmly together until the glue sets. For plastic, ensure the cement melts the plastic slightly for a strong bond.
- Warped parts: If a plastic part is slightly warped, it can sometimes be gently reshaped by immersing it in warm water, carefully bending it into shape, and then cooling it in cold water to set.
- Paint adhesion issues: Ensure surfaces are clean and free of oils or mold release agents. Priming before painting is highly recommended.
7. Specifications
| Brand | Italeri |
| Model Number | IT6196 |
| Scale | 1:72 |
| Material | Plastic, MDF (Medium-Density Fiberboard) |
| Finished Diameter (Arena) | Approximately 43 cm (widest point) |
| Item Weight | 0.16 Kilograms |
| Item Dimensions (L x W x H) | 7 x 44 x 27 centimetres (packaging) |
| Age Range (Description) | Unisex - Adults |
8. Safety Precautions
- Small Parts: This kit contains small parts and is not suitable for children under 3 years due to choking hazards.
- Adhesives and Paints: Use adhesives and paints in a well-ventilated area. Avoid inhaling fumes. Keep out of reach of children.
- Sharp Tools: Exercise caution when using hobby knives and other sharp tools. Always cut away from your body.
- Eye Protection: Consider wearing eye protection when cutting or sanding parts.
9. Warranty and Support
Information regarding product warranty or customer support is not provided in the available product details. For inquiries, please contact Italeri directly or refer to their official website.