
1. Introduction
Thank you for choosing the Profi Cook PC-EKM 1205 Electric Coffee Grinder. This appliance is designed to provide freshly ground coffee beans for various brewing methods, from coarse French press to extra-fine Turkish coffee. To ensure safe and efficient operation, please read this manual thoroughly before first use and retain it for future reference.
2. Important Safety Instructions
When using electrical appliances, basic safety precautions should always be followed to reduce the risk of fire, electric shock, and/or injury to persons, including the following:
- Read all instructions carefully before operating the appliance.
- Do not immerse the appliance, power cord, or plug in water or other liquids.
- Close supervision is necessary when any appliance is used by or near children.
- Unplug from outlet when not in use, before assembling or disassembling parts, and before cleaning.
- Avoid contact with moving parts.
- Do not operate any appliance with a damaged cord or plug, or after the appliance malfunctions or has been damaged in any manner.
- The use of attachments not recommended or sold by the manufacturer may cause fire, electric shock, or injury.
- Do not use outdoors.
- Do not let cord hang over edge of table or counter, or touch hot surfaces.
- Do not place on or near a hot gas or electric burner, or in a heated oven.
- Always attach plug to appliance first, then plug cord into the wall outlet. To disconnect, turn any control to “off,” then remove plug from wall outlet.
- This appliance is for household use only.
- Ensure the lid of the bean container is securely in place before operating.
- Never put anything other than roasted coffee beans into the grinder.
3. Product Overview
The Profi Cook PC-EKM 1205 is an electric coffee grinder featuring a professional stainless steel cone grinder. It offers adjustable grinding levels and cup quantity settings for various coffee preparations.

Figure 3.1: Profi Cook PC-EKM 1205 Electric Coffee Grinder with ground coffee and a latte.
This image displays the complete Profi Cook PC-EKM 1205 coffee grinder, showcasing its stainless steel housing, transparent bean hopper, and ground coffee container. A cup of latte is positioned next to it, illustrating its use for various coffee beverages.
Components:
- Bean Hopper with Aroma Protective Lid (Capacity: up to 230g coffee beans)
- Professional Stainless Steel Cone Grinder (removable for cleaning)
- Grinding Level Selector (16-stage adjustable, coarse to extra fine)
- Cup Quantity Selector (1-12 cups, electronic timer)
- Removable Powder Collection Container (Capacity: 125g ground coffee)
- Motor Unit (200 Watt)
- Non-slip Rubber Feet
- Cleaning Brush / Measuring Spoon

Figure 3.2: Key features of the PC-EKM 1205 grinder.
This image highlights the main features: the 230g bean container, the 16-stage adjustable grinding level, the adjustable cup quantity dial, and the 125g powder collection container.

Figure 3.3: Visual representation of 16 grind levels.
This image illustrates the range of 16 grinding levels, from coarse (for French press) to extra fine (for Turkish coffee), demonstrating the versatility of the grinder for different brewing methods.
4. Setup
- Unpacking: Carefully remove all packaging materials and ensure all components are present. Keep packaging for potential future transport or returns.
- Initial Cleaning: Before first use, clean all removable parts (bean hopper, powder container, grinding mechanism) with a damp cloth. Ensure they are completely dry before reassembly. Refer to the Maintenance section for detailed cleaning instructions.
- Placement: Place the coffee grinder on a stable, flat, and dry surface. Ensure there is sufficient space around the appliance for ventilation and operation. Do not place it near heat sources or in direct sunlight.
- Power Connection: Ensure the voltage specified on the appliance matches your local power supply. Plug the power cord into a grounded wall outlet.
- Assemble Components: Ensure the grinding mechanism is correctly seated, the bean hopper is securely attached, and the powder collection container is properly inserted into its position.
5. Operating Instructions
Follow these steps to grind your coffee beans:
5.1. Filling the Bean Hopper
- Ensure the appliance is unplugged.
- Remove the aroma protective lid from the bean hopper.
- Pour roasted coffee beans into the hopper. Do not exceed the MAX fill line (approx. 230g).
- Replace the aroma protective lid securely.
5.2. Adjusting Grinding Level
The PC-EKM 1205 offers 16 adjustable grinding levels. Rotate the grinding level selector ring to choose your desired fineness.
- Coarse: Ideal for French Press or percolators.
- Medium: Suitable for drip coffee makers or pour-over.
- Fine: Recommended for espresso machines.
- Extra Fine: Best for Turkish coffee.
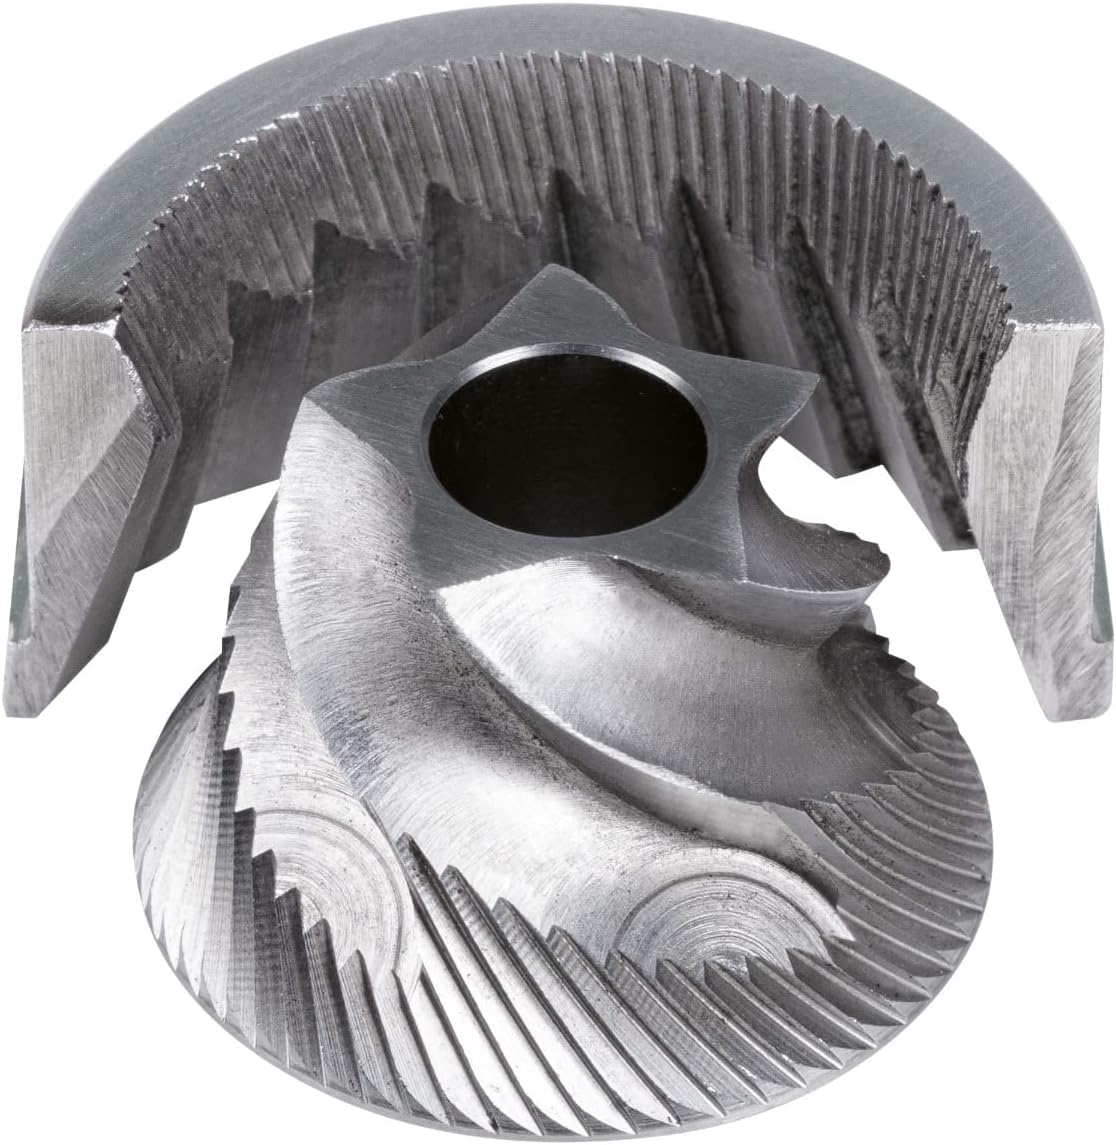
Figure 5.1: Grinding level adjustment dial.
This close-up shows the grinding mechanism and the ring for adjusting the fineness, with markings for 'FINE', 'MEDIUM', and 'COARSE' to guide selection.
5.3. Setting Cup Quantity
Use the electronic timer dial to select the desired number of cups (1-12 cups). The dial is illuminated for easy visibility.
- Ensure the powder collection container is correctly inserted.
- Rotate the cup quantity dial to the desired number of cups. The grinder will automatically stop once the selected quantity is ground.
5.4. Grinding Process
- After setting the grinding level and cup quantity, ensure the appliance is plugged in.
- Press the START/STOP button (usually integrated with the cup quantity dial or a separate button). The grinding process will begin.
- The grinder will automatically stop when the selected quantity is reached. You can manually stop the process at any time by pressing the START/STOP button again.
- Once grinding is complete, unplug the appliance.
- Carefully remove the powder collection container and use the freshly ground coffee.
6. Maintenance and Cleaning
Regular cleaning ensures optimal performance and extends the lifespan of your coffee grinder.
- Always unplug the appliance before cleaning.
- Emptying: Remove the bean hopper lid and the powder collection container. Empty any remaining coffee beans or ground coffee.
- Cleaning the Grinding Mechanism:
- Carefully remove the upper burr grinder. This is typically done by twisting it counter-clockwise or by releasing a latch. Refer to Figure 6.1.
- Use the provided cleaning brush to remove any coffee residue from both the upper and lower burrs.
- Do not wash the burrs with water. If necessary, wipe with a slightly damp cloth and ensure they are completely dry before reassembly.
- Reinsert the upper burr grinder and secure it by twisting clockwise or engaging the latch.
- Cleaning Containers: The bean hopper and powder collection container can be washed with warm soapy water. Rinse thoroughly and dry completely before reattaching.
- Cleaning the Housing: Wipe the exterior of the grinder with a soft, damp cloth. Do not use abrasive cleaners or immerse the main unit in water.
- Storage: Store the clean and dry appliance in a cool, dry place.

Figure 6.1: Removable grinding mechanism and cleaning accessories.
This image demonstrates how the grinding mechanism can be easily removed for thorough cleaning, and also shows the included measuring spoon/cleaning brush.

Figure 6.2: Internal view of the grinder with the upper burr removed.
A detailed view of the grinder's interior with the upper burr removed, illustrating the lower burr and the area that requires regular brushing to remove coffee grounds.
7. Troubleshooting
| Problem | Possible Cause | Solution |
|---|---|---|
| Grinder does not start. | Not plugged in; lid not secured; powder container not inserted correctly. | Check power connection; ensure bean hopper lid is securely closed; ensure powder container is fully inserted. |
| Grinding is inconsistent or stops prematurely. | Grinding mechanism clogged with old coffee grounds; too many beans in hopper; foreign object present. | Unplug and clean the grinding mechanism thoroughly; do not overfill the bean hopper; check for and remove any foreign objects. |
| Ground coffee is too fine/coarse. | Grinding level setting is incorrect. | Adjust the grinding level selector to the desired fineness. |
| Excessive static cling of ground coffee. | Common issue with dry coffee beans and plastic containers. | Lightly mist beans with a few drops of water before grinding (Ross Droplet Technique) or tap the container gently after grinding. |
8. Specifications
| Feature | Detail |
|---|---|
| Brand | Profi Cook |
| Model Number | PC-EKM 1205 (501205) |
| Power / Wattage | 200 Watts |
| Voltage | 220-240 V, 50/60 Hz |
| Bean Hopper Capacity | Up to 230 g |
| Powder Container Capacity | 125 g |
| Grinding Levels | 16-stage adjustable (coarse to extra fine) |
| Cup Quantity Setting | 1-12 cups (electronic timer) |
| Material | Stainless Steel Housing, mixed materials |
| Product Dimensions (L x W x H) | 20.5 x 15.5 x 27 cm (approx. 20L x 15W x 27H centimeters) |
| Item Weight | 2.2 kg |

Figure 8.1: Dimensions and power details.
This image provides a visual representation of the grinder's dimensions (270mm height, 205mm depth, 155mm width) and highlights its 200W motor and 230g bean capacity.
9. Warranty and Support
Profi Cook products are manufactured with quality and reliability in mind. For information regarding warranty coverage, terms, and conditions, please refer to the warranty card included with your purchase or visit the official Profi Cook website. For technical support, spare parts, or service inquiries, please contact your local distributor or the Profi Cook customer service department.
Please have your model number (PC-EKM 1205) and purchase date ready when contacting support.


