1. Introduction
This manual provides comprehensive instructions for the setup, operation, and maintenance of your Philips Audio TAR5505/10 Portable DAB+/FM Radio. Please read this manual thoroughly before using the device to ensure proper functionality and to maximize your listening experience. Keep this manual for future reference.
2. Important Safety Information
Warning: For external use only.
- Do not expose the device to dripping or splashing.
- Do not place any sources of danger on the device (e.g., liquid-filled objects, lighted candles).
- Ensure adequate ventilation around the device.
- Use only attachments/accessories specified by the manufacturer.
- Refer all servicing to qualified service personnel.
3. What's in the Box
Carefully unpack the contents and check that the following items are included:
- Philips Audio TAR5505/10 Portable Radio
- AC/DC Power Adapter
- Quick Start Guide
4. Product Overview
The Philips Audio TAR5505/10 is a versatile portable radio featuring DAB+ and FM tuners, Bluetooth connectivity for wireless audio streaming, and a convenient kitchen timer function. It can be powered by either the included AC adapter or batteries for portable use.
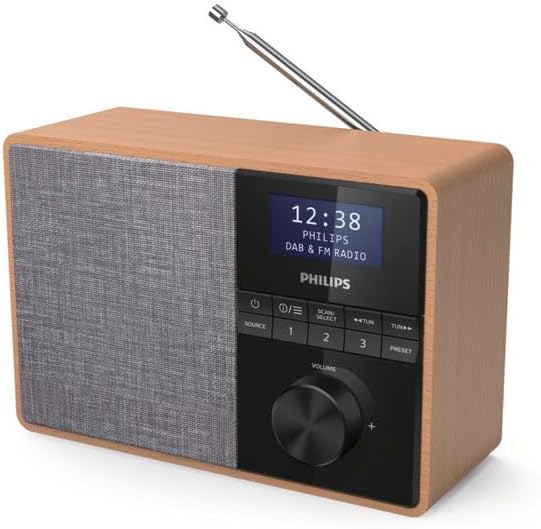
Image 1: Angled view of the Philips Audio TAR5505/10 Portable Radio, showcasing its wooden casing and fabric speaker grille.

Image 2: Front view of the radio, highlighting the display, control buttons, and volume knob.
5. Setup
5.1 Power Connection
Your radio can be powered by AC mains or batteries.
5.1.1 AC Power
- Connect the supplied AC/DC power adapter to the DC IN socket on the back of the radio.
- Plug the adapter into a wall power outlet.
5.1.2 Battery Power
For portable use, you can insert batteries (not included).
- Open the battery compartment cover on the back of the radio.
- Insert the required number of C-type batteries, ensuring correct polarity (+/-).
- Close the battery compartment cover securely.
5.2 Antenna Adjustment
For optimal radio reception, fully extend the telescopic antenna. Adjust its position for the best signal quality.
5.3 Initial Scan (DAB+)
When you power on the radio for the first time, it will automatically perform a full scan for available DAB+ stations. This process may take a few minutes. Once complete, the radio will store all found stations and tune to the first available station.
6. Operating Instructions
6.1 Power On/Off
Press the Power button (usually marked with a circle and a vertical line) to turn the radio on or off.
6.2 Source Selection
Press the SOURCE button repeatedly to switch between DAB+, FM, and Bluetooth modes.
6.3 DAB+ Radio
6.3.1 Scanning for Stations
In DAB+ mode, press the SCAN/SELECT button to initiate a full scan for new stations.
6.3.2 Selecting Stations
Use the TUN +/- buttons to navigate through the list of available DAB+ stations.
6.3.3 Saving Presets
To save a station as a preset:
- Tune to your desired DAB+ station.
- Press and hold the PRESET button until 'Preset Store' appears on the display.
- Use the TUN +/- buttons to select a preset number (1-20).
- Press SCAN/SELECT to confirm.
6.3.4 Recalling Presets
To recall a saved preset, briefly press the PRESET button, then use TUN +/- to select the desired preset number, and press SCAN/SELECT.
6.4 FM Radio
6.4.1 Tuning Stations
In FM mode, press and hold the TUN +/- buttons to automatically scan for the next available station. Briefly press TUN +/- for manual tuning.
6.4.2 Saving and Recalling Presets
The process for saving and recalling FM presets is similar to DAB+ presets.
6.5 Bluetooth Operation
6.5.1 Pairing a Bluetooth Device
- Switch the radio to Bluetooth mode using the SOURCE button. The display will show 'Pairing' or 'Bluetooth'.
- Enable Bluetooth on your mobile device (smartphone, tablet, etc.).
- Search for 'Philips TAR5505' in your device's Bluetooth list and select it to pair.
- Once paired, the radio will indicate a successful connection.
6.5.2 Playing Audio
After successful pairing, you can play audio from your connected device, and the sound will be streamed through the radio. Use your device or the radio's volume control to adjust the sound level.
6.6 Kitchen Timer
The radio includes a kitchen timer function.
- Press the TIMER button (if available, or refer to quick start guide for specific button).
- Use the TUN +/- buttons to set the desired countdown time in hours, minutes, and seconds.
- Press SCAN/SELECT to start the timer. The countdown will be displayed on the screen.
- An audible alert will sound when the timer reaches zero.
6.7 Volume Control
Rotate the VOLUME knob clockwise to increase the volume and counter-clockwise to decrease it.
7. Maintenance
7.1 Cleaning
To clean the radio, use a soft, dry cloth. Do not use abrasive cleaners, alcohol, or benzene, as these can damage the surface. Ensure no liquids enter the device.
7.2 Battery Care
If the radio will not be used for an extended period, remove the batteries to prevent leakage and corrosion.
8. Troubleshooting
If you encounter issues with your radio, refer to the following table for common problems and solutions.
| Problem | Solution |
|---|---|
| No power | Check if the AC adapter is securely connected to both the radio and the power outlet. If using batteries, ensure they are inserted correctly and are not depleted. |
| Poor radio reception | Fully extend and adjust the telescopic antenna. Try moving the radio to a different location, away from potential interference sources like other electronic devices. |
| Bluetooth device cannot pair | Ensure the radio is in Bluetooth pairing mode. Make sure Bluetooth is enabled on your device and it is within range. Try restarting both the radio and your Bluetooth device. |
| No sound | Check the volume level on both the radio and your connected Bluetooth device (if applicable). Ensure the correct source (DAB+, FM, or Bluetooth) is selected. |
9. Specifications
| Feature | Detail |
|---|---|
| Brand | Philips |
| Model Number | TAR5505/10 |
| Color | Black |
| Display Technology | LCD |
| Functions | Bluetooth, Kitchen Timer |
| Tuner | DAB+, FM |
| Connectivity Technology | Bluetooth |
| Compatible Devices | Bluetooth-enabled devices |
| Product Dimensions (L x W x H) | 20.66 x 10.6 x 14.06 cm |
| Weight | 860 grams |
| Power Source | Corded Electric (AC/DC adapter) / Batteries (C-type, not included) |
| Supported Radio Bands | FM / DAB+ |
| Included Components | Radio, AC/DC Power Adapter, Quick Start Guide |

Image 3: Product dimensions of the Philips Audio TAR5505/10 Portable Radio.
10. Warranty and Support
10.1 Manufacturer's Warranty
This product is covered by a 2-year manufacturer's warranty. Please retain your proof of purchase for warranty claims.
10.2 Customer Support
For further assistance, technical support, or warranty inquiries, please visit the official Philips support website or contact their customer service department. Refer to the Quick Start Guide for specific contact details in your region.