Introduction
The DaToo Aquarium CO2 Regulator is designed to provide accurate, stable, and safe CO2 supply for planted aquariums. This manual provides essential information for the proper setup, operation, and maintenance of your CO2 regulator to ensure optimal plant growth and system longevity.

Image: The DaToo Aquarium CO2 Regulator Dual Gauge, showcasing its compact design and dual pressure gauges.
Important Safety Information
- Do not immerse the regulator in water. Always keep electrical connections dry to prevent electric shock.
- After the power is turned off, the regulator requires 3 to 5 minutes to release any remaining gas. The micro-adjustable valve can be used to quickly release residual gas.
- The pressure gauge indicates inlet pressure only. Output working pressure can be estimated by observing the bubble counter.
- Ensure the CO2 tank interface is CGA320 for compatibility.
Package Contents
Please verify that all items are present in the package:
- DaToo Aquarium CO2 Regulator (Dual Gauge)
- Tighten Tool (Wrench)
- O-rings (Spare seals)
- Instruction Manual
- Power Adapter
- Bubble Counter

Image: All components included in the DaToo Aquarium CO2 Regulator package, laid out for inspection.
Product Overview
The DaToo Aquarium CO2 Regulator features a robust design for reliable performance. Key components include:
- High Pressure Gauge: Displays the pressure within the CO2 cylinder (0-2000 PSI).
- Low Pressure Gauge: Displays the output working pressure (0-150 PSI).
- Solenoid Valve: Controls CO2 flow, allowing for automated on/off cycles when connected to a timer.
- Bubble Counter: Provides a visual indication of CO2 flow rate (bubbles per second).
- Micro-adjustable Valve: For precise control over CO2 output.
- Check Valve: Prevents water backflow into the regulator.
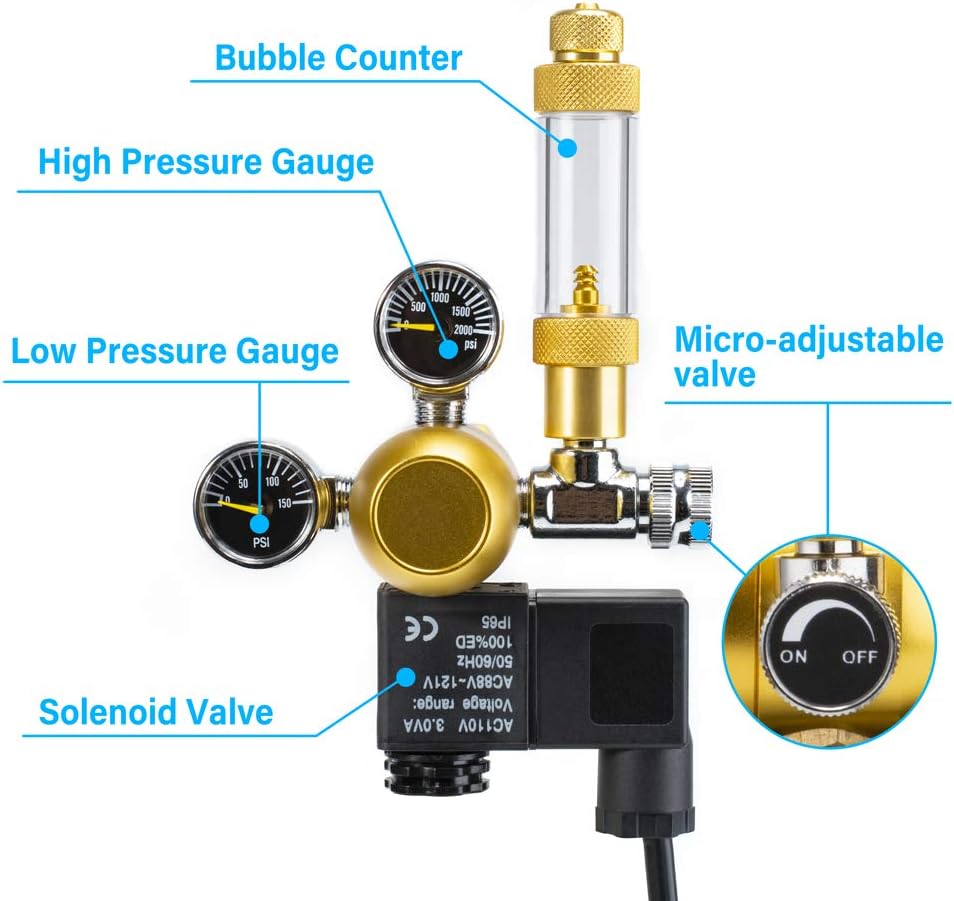
Image: Diagram illustrating the main components of the DaToo CO2 Regulator, including gauges, solenoid valve, and bubble counter.
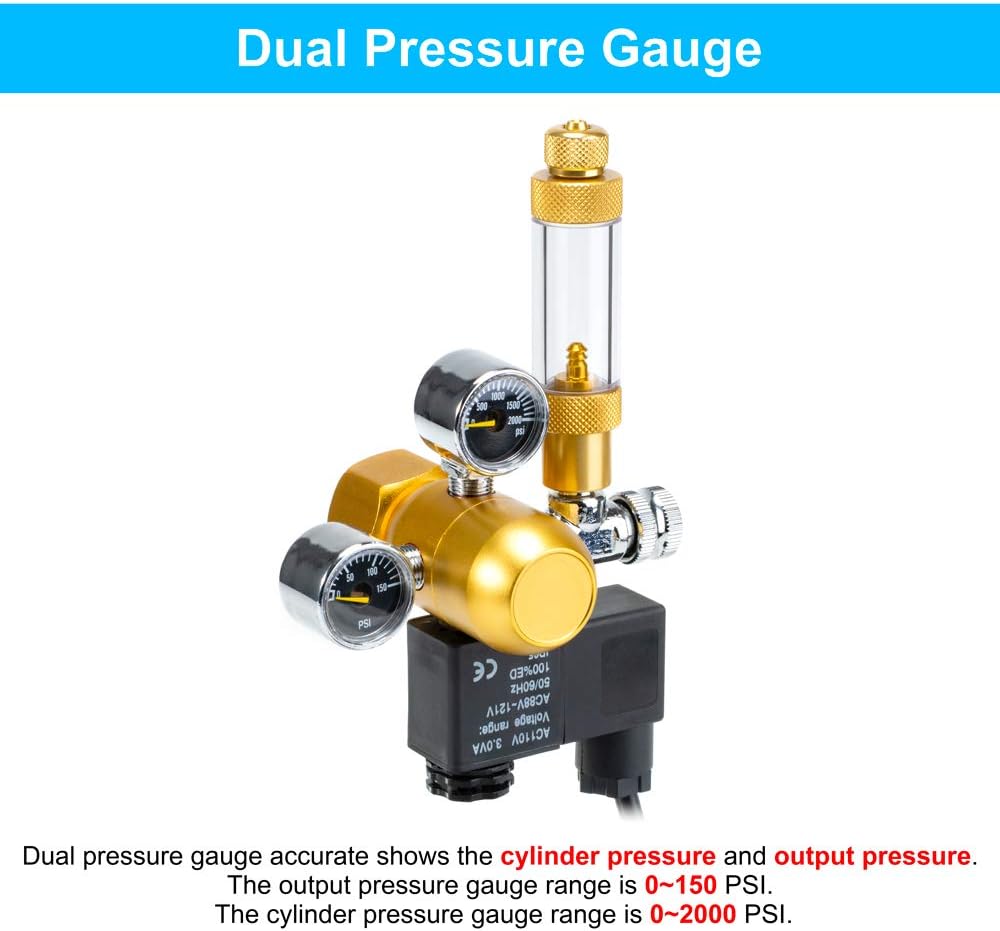
Image: Close-up view of the dual pressure gauges, showing the cylinder pressure range (0-2000 PSI) and output pressure range (0-150 PSI).

Image: Highlighting the robust construction of the regulator, featuring a high-purity aluminum body and a professional-grade solenoid valve with cold-touch technology.
Specifications
| Feature | Detail |
|---|---|
| Brand | DaToo |
| Model | Dual Gauge |
| Material | Aluminum |
| Max Inlet Pressure | 1500 PSI |
| Max Output Pressure | 45 PSI |
| Pressure Gauge Range (Inlet) | 0-2000 PSI |
| Pressure Gauge Range (Output) | 0-150 PSI |
| CO2 Tank Interface | CGA320 (US Standard) |
| Voltage | 110V |
| Item Weight | 0.71 Kilograms (1.56 pounds) |
Setup Instructions
Follow these steps to correctly install your DaToo Aquarium CO2 Regulator:
- Prepare the CO2 Tank: Ensure the main valve of your CO2 tank is closed.
- Attach the Regulator: Carefully connect the CO2 regulator to a CO2 tank with a CGA320 interface. Hand-tighten the regulator securely. No wrench should be required for this connection if the handwheel is designed for easy tightening.
- Install Bubble Counter: Fill the bubble counter approximately 3/4 full with water. Install the bubble counter onto the needle valve outlet of the regulator. The quick-plug design allows for easy attachment and universal rotation.
- Connect Tubing: Attach the high-density CO2 tubing to the top of the bubble counter and secure it. Connect the other end of the tubing to your CO2 diffuser or other aquarium CO2 equipment.
- Connect Solenoid Valve: Connect the lead wire of the solenoid valve to the power adapter.
- Power On: Plug the power adapter into an electrical outlet. The solenoid valve will activate.
- Open CO2 Tank Valve: Slowly open the main valve of the CO2 cylinder. Observe the high-pressure gauge to confirm the cylinder pressure.
- Adjust Output Pressure: Use the micro-adjustable valve to set the desired CO2 output rate, typically measured in bubbles per second (bps) via the bubble counter.

Image: Illustrates the compatibility of the regulator with CGA320 thread CO2 tanks and high-density tubing.
Setup Video Guide
Video: A step-by-step guide demonstrating the installation of a dual gauge CO2 regulator with a solenoid valve and bubble counter onto a CO2 cylinder. This video shows how to connect the regulator, fill the bubble counter, and adjust the flow rate.
Video: An instructional video detailing the installation process of an aquarium carbon dioxide regulator, including connecting to the CO2 tank, attaching the bubble counter, and setting up the tubing for CO2 delivery.
Operating Instructions
Once installed, operating your DaToo CO2 Regulator is straightforward:
- Daily Operation: If using a timer, the solenoid valve will automatically turn the CO2 supply on and off according to your set schedule.
- Adjusting CO2 Flow: Use the micro-adjustable valve to fine-tune the CO2 bubble rate. Observe the bubble counter to achieve the desired bubbles per second (bps) for your aquarium size and plant density.
- Monitoring Pressure: Regularly check the high-pressure gauge to monitor the remaining CO2 in your cylinder. The low-pressure gauge indicates the working pressure of the system.

Image: Demonstrates the precision adjustment design and pressure-reducing valve, ensuring continuous, safe, and stable CO2 output for planted aquariums.
Maintenance
Proper maintenance ensures the longevity and optimal performance of your CO2 regulator:
- Regular Cleaning: Keep the exterior of the regulator clean and dry. Avoid using harsh chemicals.
- Check for Leaks: Periodically check all connections for CO2 leaks using a soapy water solution. Bubbles indicate a leak.
- Bubble Counter Water: Replace the water in the bubble counter regularly to prevent algae buildup and ensure clear visibility of bubbles.
- Solenoid Valve Care: Ensure the solenoid valve remains dry and free from water ingress.
Preventing Solenoid Valve Failure
Video: This video provides crucial tips on how to prevent solenoid valve failure in aquarium CO2 systems, including proper handling during setup and maintenance to avoid fluid ingress.
Troubleshooting
If you encounter issues with your CO2 regulator, refer to the following common problems and solutions:
- No CO2 Flow:
- Check if the CO2 cylinder valve is fully open.
- Verify that the high-pressure gauge shows sufficient CO2 in the cylinder.
- Ensure the solenoid valve is powered on and functioning (if applicable).
- Check for blockages in the tubing or diffuser.
- CO2 Leaks:
- Tighten all connections, especially where the regulator meets the tank and tubing.
- Apply soapy water to connections to identify leaks (bubbles will form). Replace O-rings if necessary.
- Inconsistent Bubble Rate:
- Ensure the micro-adjustable valve is securely set and not vibrating loose.
- Check for pressure fluctuations in the CO2 cylinder (if nearly empty).
- Solenoid Valve Not Activating:
- Verify the power adapter is correctly plugged in and receiving power.
- Check the power cable for damage.
Warranty and Support
The DaToo Aquarium CO2 Regulator comes with a One-Year Warranty. For any product-related inquiries, technical assistance, or warranty claims, please contact our professional customer service team. We are committed to providing 24-hour support to ensure your satisfaction.
Please refer to the contact information provided with your product packaging or visit the official DaToo website for support details.