1. Introduction
This manual provides comprehensive instructions for the proper use, setup, and maintenance of your SMARTEK SW-832 Smartwatch. Please read this manual thoroughly before operating the device to ensure optimal performance and longevity.
The SMARTEK SW-832 is a versatile smartwatch designed to integrate with your mobile communication and activity tracking needs. It features Bluetooth connectivity, a touchscreen interface, and the capability to function as a standalone mobile device with a Micro-SIM card.
2. Package Contents
Verify that all items are present in your product package:
- SMARTEK SW-832 Smartwatch
- Charging Cable
- User Manual (this document)
- 32GB Micro SD Card (if included in your specific package)
3. Device Overview
Familiarize yourself with the physical components of your SMARTEK SW-832 Smartwatch.
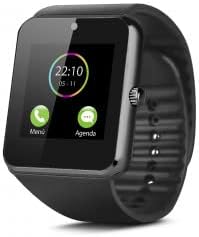
This image displays the SMARTEK SW-832 Smartwatch from the front. The square touchscreen shows a digital clock (22:10) and two icons labeled 'Menú' (Menu) and 'Agenda' (Calendar). A circular physical button is visible on the right side of the watch casing. The watch features a black silicone strap.
- Touchscreen Display: Main interface for interaction.
- Power Button/Home Button: Typically located on the side, used for powering on/off and returning to the home screen.
- Microphone: For calls and voice input.
- Speaker: For call audio and notifications.
- Charging Port: For connecting the charging cable.
- SIM Card Slot: For inserting a Micro-SIM card.
- Micro SD Card Slot: For expanding storage.
- Camera: Integrated camera for capturing images.
4. Setup
4.1 Charging the Device
- Connect the charging cable to the smartwatch's charging port.
- Connect the other end of the cable to a compatible USB power adapter or a computer's USB port.
- Allow the device to charge fully before first use. A full charge typically takes approximately 2-3 hours. The battery indicator on the screen will show charging status.
4.2 Inserting SIM Card (Optional)
To use the smartwatch as a standalone phone, insert a Micro-SIM card.
- Ensure the smartwatch is powered off.
- Locate the SIM card slot, usually on the side or under the back cover. Refer to the device diagram for exact location.
- Carefully open the SIM card slot cover.
- Insert a Micro-SIM card with the gold contacts facing down and the notched corner aligned correctly.
- Gently push the SIM card until it clicks into place.
- Close the SIM card slot cover securely.
4.3 Inserting Micro SD Card (Optional)
To expand storage for photos, music, and other files, insert a Micro SD card (up to 32GB supported).
- Ensure the smartwatch is powered off.
- Locate the Micro SD card slot, often adjacent to the SIM card slot.
- Carefully open the Micro SD card slot cover.
- Insert the Micro SD card with the gold contacts facing down.
- Gently push the card until it clicks into place.
- Close the Micro SD card slot cover securely.
4.4 Powering On/Off
- To Power On: Press and hold the Power button until the screen illuminates.
- To Power Off: Press and hold the Power button until a power-off menu appears. Select "Power Off" or similar option on the screen.
4.5 Pairing with Smartphone (Bluetooth)
To extend functionality and receive notifications from your smartphone, pair the smartwatch via Bluetooth.
- Ensure Bluetooth is enabled on both your smartwatch and your smartphone.
- On your smartwatch, navigate to the Bluetooth settings menu.
- On your smartphone, search for available Bluetooth devices.
- Select "SW-832" or a similar device name from the list on your smartphone.
- Confirm the pairing request on both devices if prompted.
- For full functionality, you may need to install a companion application on your smartphone. Refer to the smartwatch's on-screen instructions or packaging for app details.
5. Operating the Smartwatch
5.1 Basic Navigation
- Touchscreen: Tap to select items, swipe left/right/up/down to navigate through menus and screens.
- Power/Home Button: Press once to return to the home screen.
5.2 Making and Receiving Calls
- With SIM Card: Access the Dialer application to make calls directly from the smartwatch.
- Via Bluetooth (Paired with Smartphone): When paired, you can answer incoming calls or initiate calls through the smartwatch, which will route audio through its speaker and microphone.
5.3 Sending and Receiving Messages
- With SIM Card: Use the Messaging application to send and receive SMS messages.
- Via Bluetooth (Paired with Smartphone): Receive notifications for incoming messages from your smartphone. Some functionality may allow for quick replies or viewing full messages.
5.4 Camera Functionality
Access the Camera application from the main menu. Tap the screen to take a photo. Images are saved to the internal memory or the inserted Micro SD card.
5.5 Music Control
When paired with your smartphone, the smartwatch can control music playback (play, pause, skip tracks) on your phone. If a Micro SD card with music files is inserted, the smartwatch can play music directly.
5.6 Activity Tracker
The smartwatch includes an activity tracker to monitor steps, distance, and calories. Access the dedicated application to view your daily activity data.
5.7 Notifications
When paired with your smartphone, the smartwatch will display notifications for calls, messages, and other applications. Manage notification settings through the companion app on your smartphone.
5.8 Internet Browsing (with SIM)
If a SIM card with data connectivity is inserted, you can access basic internet browsing functionality through the built-in browser application.
6. Maintenance
6.1 Cleaning
- Wipe the screen and body of the smartwatch with a soft, lint-free cloth.
- Avoid using harsh chemicals, abrasive cleaners, or aerosol sprays.
- Do not submerge the device in water.
6.2 Battery Care
- Avoid extreme temperatures, as they can affect battery life.
- Charge the battery regularly, but avoid leaving it fully discharged for extended periods.
- Use only the provided charging cable or a certified compatible charger.
6.3 Storage
When storing the smartwatch for an extended period, ensure it is partially charged (around 50%) and stored in a cool, dry place.
7. Troubleshooting
| Problem | Possible Solution |
|---|---|
| Device does not power on. | Ensure the battery is charged. Connect to the charger and try again. |
| Cannot pair with smartphone. |
|
| SIM card not detected. |
|
| Screen is unresponsive. | Perform a soft reset by pressing and holding the Power button until the device restarts. If unresponsive, allow the battery to fully discharge and then recharge. |
| Poor battery life. |
|
8. Specifications
| Feature | Detail |
|---|---|
| Model | SMARTEK SW-832 |
| Processor | MTK626111D |
| Display | 1.54 inch IPS LCD, 240 x 240 pixels |
| GSM Bands | 850/900/1800/1900 MHz |
| Bluetooth Version | 4.0 |
| Battery | 380 mAh 3.7V Lithium-Polymer |
| Usage Time | Up to 72 hours (normal use) |
| RAM | 64 MB |
| Internal Storage (ROM) | 64 MB |
| Expandable Storage | Up to 32 GB via Micro SD card |
| SIM Card Type | Micro-SIM |
| Camera | 1.3 Megapixel |
| Weight | 65 grams |
| Dimensions (L x W x H) | 46 x 42 x 11.5 mm |
| Operating System | Proprietary OS with smartphone connectivity features |
| Compatible Devices | Smartphones, Tablets (Android/iOS via Bluetooth) |
9. Warranty and Support
For warranty information, please refer to the warranty card included with your purchase or visit the official SMARTEK website. Support contact details are typically provided with your product documentation or on the manufacturer's website.
Please retain your proof of purchase for warranty claims.