1. Introduction
This manual provides essential information for the proper installation, operation, and maintenance of your new Ferilter 753-06258A Carburetor. Designed as a direct replacement part, this carburetor is compatible with various Ryobi 2-cycle 25cc weed eaters and trimmers. Adhering to these instructions will help ensure optimal performance and longevity of your equipment.
2. Safety Information
Always prioritize safety when working with power tools and fuel systems.
- Ensure the engine is turned off and cooled down before beginning any work.
- Disconnect the spark plug wire to prevent accidental starting.
- Work in a well-ventilated area to avoid inhaling fuel fumes.
- Wear appropriate personal protective equipment (PPE), including safety glasses and gloves.
- Handle fuel with extreme care. Store it in approved containers away from heat sources and open flames.
- Keep children and pets away from the work area.
3. Compatibility
The Ferilter 753-06258A Carburetor is a replacement for the following part numbers and models:
3.1. Replacement Part Numbers:
- MTD 753-06258A, 753-06258
- Ryobi 307160001, 307160011, 307160009, 316299372, 316773800
3.2. Compatible Ryobi 2-Cycle 25cc Engines:
- RY251PH
- RY252CS
- RY253SS
- RY254BC
- RY 25 PHEMC
- RY 25 CSEMC
- RY 25 CSEMC VNM
3.3. Compatible Craftsman Models:
- 316791960
- 316711930
- 316791210
- 316791700
- 316791840
- 316791841 Trimmer
This carburetor is also suitable for various Sears Yard Machines, Troy Bilt, Cub Cadet, Bolens, and Remington 2-cycle 25cc trimmers, weed wackers, and brush cutters. Always verify compatibility with your specific machine's air filter and other components.
4. Package Contents
The Ferilter 753-06258A Carburetor kit typically includes the following components:
- 1 x Carburetor
- 2 x Air Filters
- 2 x Primer Bulbs
- 1 x Gasket
- 2 x Fuel Filters
- 1 x Fuel Line
- 1 x Spark Plug

Image 4.1: Overview of the Ferilter 753-06258A Carburetor kit, showing the carburetor, air filters, primer bulbs, gasket, fuel filters, fuel line, and spark plug.
Video 4.2: A detailed view of the Ferilter 753-06258A Carburetor kit components, including the carburetor, fuel line, filters, and spark plug.
5. Installation
Carburetor replacement requires basic mechanical skills. If you are unsure about any step, consult a qualified technician.
5.1. Preparation:
- Ensure the engine is cool and the spark plug wire is disconnected.
- Drain any remaining fuel from the fuel tank into an approved container.
- Remove the air filter cover and the old air filter.
5.2. Removing the Old Carburetor:
- Carefully disconnect the fuel lines from the old carburetor. Note their positions for reinstallation.
- Disconnect the throttle linkage.
- Unbolt the old carburetor from the engine.
- Remove the old gasket.
5.3. Installing the New Carburetor:
- Place the new gasket onto the engine mounting surface.
- Mount the new Ferilter 753-06258A Carburetor, ensuring it is properly seated.
- Secure the carburetor with the bolts, tightening them evenly.
- Reconnect the throttle linkage.
- Reconnect the fuel lines to their correct ports on the new carburetor.
- Install the new air filter and replace the air filter cover.
- Replace the old spark plug with the new one provided in the kit.
- Replace the fuel filter inside the tank and the primer bulbs if necessary.
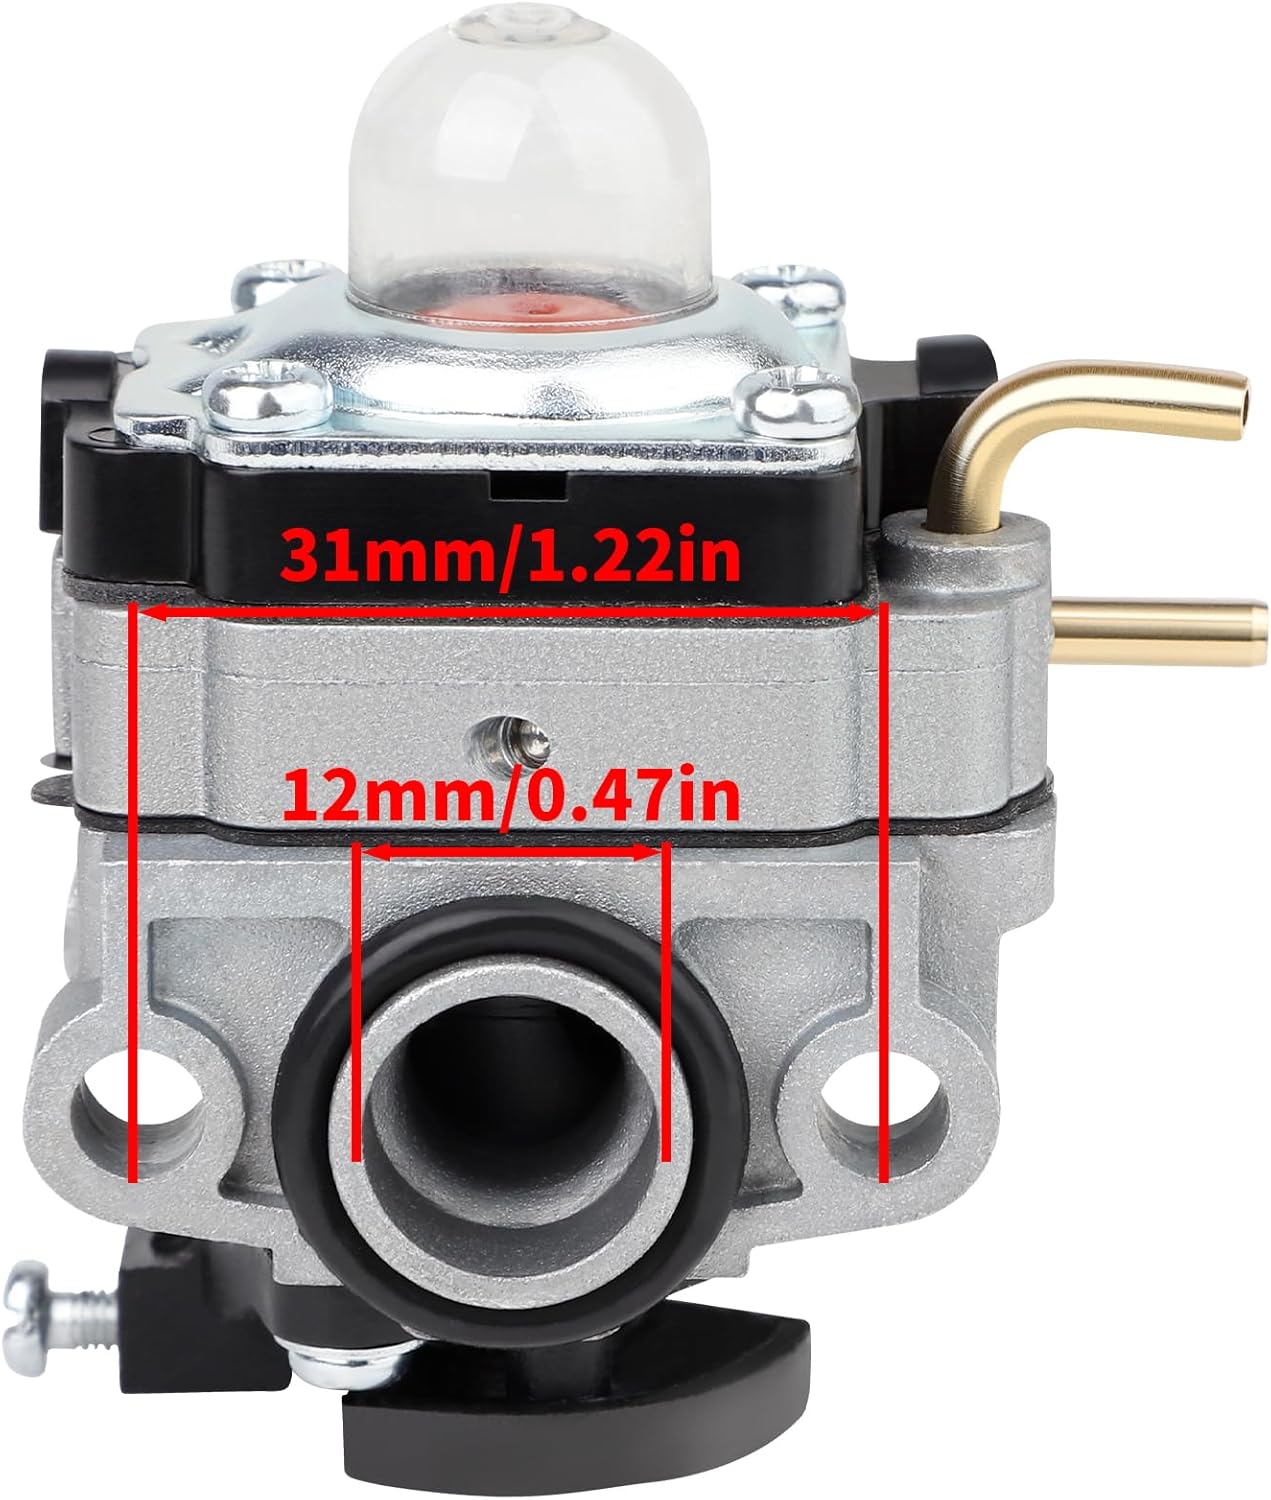
Image 5.1: Front view of the carburetor, showing key dimensions for fitment.
Video 5.2: A 360-degree view of the Ferilter 753-06258A Carburetor, highlighting its design and features, including the primer bulb and fuel line connections.
6. Operation
After installation, follow your equipment's specific starting procedure. General steps for a 2-cycle engine are:
- Fill the fuel tank with the correct fuel/oil mixture as specified by your equipment manufacturer.
- Prime the carburetor by pressing the primer bulb several times until fuel is visible in the bulb and flows freely.
- Set the choke to the 'Full Choke' position for a cold start.
- Pull the starter rope firmly until the engine attempts to start (usually a few pulls).
- Once the engine 'pops' or briefly starts, move the choke to the 'Half Choke' or 'Run' position.
- Pull the starter rope again until the engine starts and runs smoothly.
- Allow the engine to warm up for a few moments before engaging the throttle.
This carburetor is typically pre-adjusted for optimal performance and may not require further tuning. If your equipment does not start or runs poorly after following these steps, refer to the troubleshooting section.
Video 6.1: A demonstration of the carburetor's features and components, useful for understanding its function during operation.
7. Maintenance
Regular maintenance of your carburetor and associated components is crucial for reliable engine performance.
- Air Filter: Inspect and clean or replace the air filter regularly, especially in dusty conditions. A clogged air filter can restrict airflow and affect engine performance.
- Fuel Filter: Replace the in-tank fuel filter annually or if you notice fuel delivery issues.
- Spark Plug: Check the spark plug for wear and proper gap. Replace it if it's fouled or worn.
- Fuel Lines: Inspect fuel lines for cracks, hardening, or leaks. Replace them if any damage is found.
- Fuel Quality: Always use fresh, properly mixed fuel. Stale fuel can cause carburetor issues.
8. Troubleshooting
If you encounter issues after installing the new carburetor, consider the following common problems and solutions:
| Problem | Possible Cause | Solution |
|---|---|---|
| Engine won't start | No fuel, incorrect choke setting, spark plug issue, fuel lines reversed | Check fuel level and mixture. Verify choke position. Inspect spark plug. Ensure fuel lines are connected correctly. |
| Engine starts but stalls | Improper choke setting, clogged fuel filter, air leak | Adjust choke. Replace fuel filter. Check for loose connections around the carburetor. |
| Poor engine performance (lack of power, rough idle) | Clogged air filter, old fuel, minor carburetor adjustment needed | Replace air filter. Use fresh fuel. While typically not needed, minor idle speed adjustment may be possible if your model allows. |
| Fuel leaks | Loose connections, damaged fuel lines, faulty primer bulb | Tighten all fuel line connections. Replace damaged fuel lines or primer bulb. |
If these steps do not resolve the issue, it is recommended to seek assistance from a professional small engine repair service.
9. Specifications
- Brand: Ferilter
- Model Number: 753-06258A
- Vehicle Service Type: Lawn Mower, String Trimmer, Weed Wacker, Brush Cutter
- Flange Type: Bolt On
- Fuel Type: Gasoline (2-Cycle Mix)
- Item Weight: 5.9 ounces
- Package Dimensions: 5.16 x 4.09 x 1.73 inches
- UPC: 766970770687
- Manufacturer Part Number: 753-06220A (Note: This may refer to a broader part family, while 753-06258A is the specific carburetor model)
10. Warranty and Support
For warranty information or technical support, please refer to the contact details provided with your purchase or visit the official Ferilter store on Amazon. Keep your purchase receipt as proof of purchase.
For additional resources, you may find helpful videos from other sellers demonstrating similar carburetor installations or features: