
Preciva 992D
Preciva 992D Professional Soldering and Desoldering Station User Manual
Model: 992D
1. Introduction
Thank you for choosing the Preciva 992D Professional Soldering and Desoldering Station. This dual-function station combines a hot air rework system and a soldering iron, designed for precision electronic work, including soldering and desoldering of sensitive components like SOIC, MFF, and SMD. This manual provides detailed instructions for safe operation, setup, maintenance, and troubleshooting to ensure optimal performance and longevity of your device.

Figure 1.1: Preciva 992D Soldering and Desoldering Station
2. Safety Instructions
Please read all safety warnings and instructions carefully before using this product. Failure to follow these instructions may result in electric shock, fire, or serious injury.
- Always operate the station in a well-ventilated area to avoid inhaling fumes from soldering.
- Wear appropriate personal protective equipment, including safety glasses and heat-resistant gloves.
- Do not touch the hot air gun nozzle or soldering iron tip when the unit is powered on or cooling down. Temperatures can reach up to 480°C (896°F).
- Ensure the power cord is securely connected and the unit is placed on a stable, heat-resistant surface.
- Keep flammable materials away from the working area.
- Unplug the unit from the power outlet when not in use or before cleaning/maintenance.
- Hot Air Gun Specific Warning: When the temperature is set above 380°C, it is recommended that the wind speed is not lower than 50 L/min. Operating with low wind speed at high temperatures can cause heat accumulation and potentially melt the hot air gun handle.
- Do not use nozzles smaller than 5mm with the hot air gun.
- Do not immerse the unit or any of its components in water or other liquids.
- This appliance is not intended for use by persons (including children) with reduced physical, sensory, or mental capabilities, or lack of experience and knowledge, unless they have been given supervision or instruction concerning use of the appliance by a person responsible for their safety.
3. Package Contents
Please check the package contents upon receipt to ensure all items are present and undamaged:
- Preciva 992D Soldering and Desoldering Station Main Unit
- Hot Air Gun Handle
- Soldering Iron Handle
- Soldering Iron Stand with Cleaning Sponge and Brass Wool
- Hot Air Gun Nozzles (4 types: 5mm, 8mm, 10mm, 13x13mm)
- Soldering Iron Tips (1 original + 5 replacement tips of various sizes/shapes)
- Lead-Free Solder Wire (approx. 30g, 0.8mm diameter)
- Power Cord
- User Manual (English version available upon request if package contains German)
4. Product Overview
Familiarize yourself with the components and controls of your Preciva 992D station:

Figure 4.1: Front Panel and Components
- Airflow Adjustment Knob / Cold/Hot Air Mode Switch: Controls hot air volume and switches between hot/cold air.
- User Mode Button: For selecting user-defined settings.
- Hot Air Gun Power Switch: Turns the hot air gun on/off.
- Soldering Iron Power Switch: Turns the soldering iron on/off.
- Soldering Iron Socket: Connection port for the soldering iron.
- Hot Air Gun Fahrenheit / Celsius Temperature Display: Shows the current and target temperature for the hot air gun.
- Hot Air Gun Temperature Up Button (+): Increases hot air temperature.
- Hot Air Gun Temperature Down Button (-): Decreases hot air temperature.
- Soldering Iron Temperature Up Button (+): Increases soldering iron temperature.
- Soldering Iron Temperature Down Button (-): Decreases soldering iron temperature.
- Hot Air Gun Manual / Automatic Mode Display: Indicates the current operating mode for the hot air gun.
- Soldering Iron Sleep Time Display: Shows the set sleep duration.
- Soldering Iron Fahrenheit / Celsius Temperature Display: Shows the current and target temperature for the soldering iron.
- Soldering Iron Working Indicator: Lights up when the soldering iron is active.
- Hot Air Gun Temperature Display: Shows the current hot air temperature.
- Hot Air Gun Wind Speed Display: Shows the current hot air volume.
5. Setup
Follow these steps to set up your soldering station for the first time:
- Unpack: Carefully remove all components from the packaging.
- Placement: Place the main unit on a stable, flat, and heat-resistant surface, ensuring adequate ventilation around the unit.
- Connect Soldering Iron: Plug the soldering iron cable into the Soldering Iron Socket (5) on the front panel. Place the soldering iron in its stand.
- Connect Hot Air Gun: Plug the hot air gun cable into its designated socket on the left side of the main unit. Place the hot air gun in its holder on the side of the unit.
- Attach Nozzle (Hot Air Gun): Select the appropriate hot air nozzle for your task and attach it securely to the hot air gun.
- Power Connection: Connect the power cord to the main unit and then plug it into a grounded electrical outlet.
- Initial Check: Ensure both the Hot Air Gun Power Switch (3) and Soldering Iron Power Switch (4) are in the OFF position before plugging into the mains.
6. Operating Instructions
6.1 Power On/Off
- To power on the hot air gun, flip the Hot Air Gun Power Switch (3) to the ON position.
- To power on the soldering iron, flip the Soldering Iron Power Switch (4) to the ON position.
- To power off, simply flip the respective switches to the OFF position. The hot air gun will enter a cooling cycle before shutting down completely.
6.2 Temperature Adjustment

Figure 6.1: LCD Display showing temperature settings
- Soldering Iron: Use the Soldering Iron Temperature Up Button (+) (9) and Down Button (-) (10) to adjust the temperature. The soldering iron temperature range is 200°C to 480°C (392°F to 896°F). The LCD display (13) will show the target and current temperature.
- Hot Air Gun: Use the Hot Air Gun Temperature Up Button (+) (7) and Down Button (-) (8) to adjust the temperature. The hot air gun temperature range is 100°C to 480°C (212°F to 896°F). The LCD display (6) will show the target and current temperature.
- The station utilizes PID temperature control technology, monitoring and correcting temperature every 20 milliseconds for stable and accurate heating.

Figure 6.2: Key Features Overview
6.3 Airflow Adjustment (Hot Air Gun)
- Rotate the Airflow Adjustment Knob (1) to increase or decrease the hot air volume. The maximum airflow is 120 L/min.
- The display (16) will show the current wind speed.
- The hot air gun supports both manual and automatic modes for airflow control.
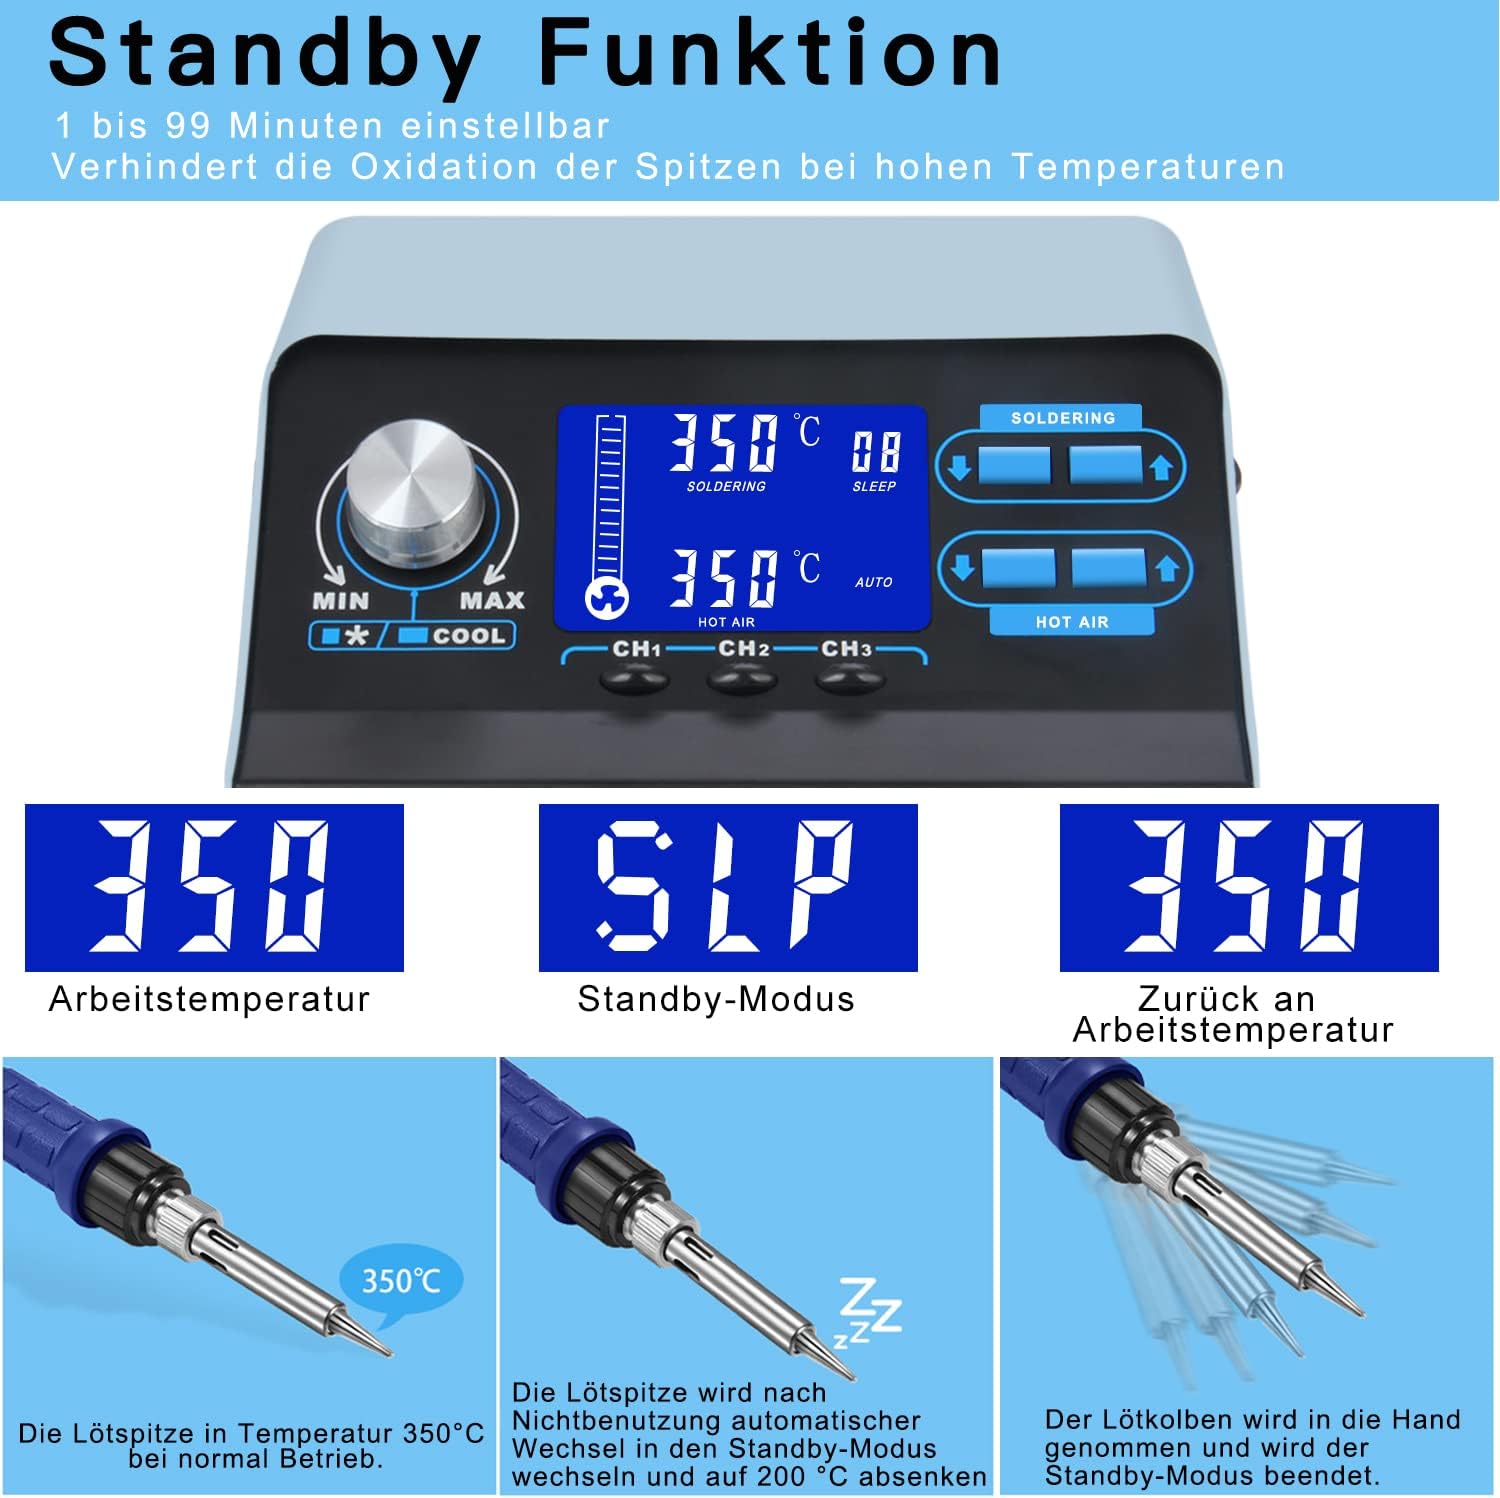
Figure 6.3: Hot Air Gun Nozzles
6.4 Fahrenheit/Celsius Conversion
- The station allows for easy switching between Celsius (°C) and Fahrenheit (°F) temperature displays. Refer to the manual's specific button combination for this function, usually indicated by a dedicated button or a long press on a temperature adjustment button.

Figure 6.4: Temperature Unit Conversion
6.5 Sleep Function (Soldering Iron)
- The soldering iron features an adjustable sleep function (0 to 99 minutes). When the iron is placed in its stand and remains inactive for the set duration, it will automatically enter sleep mode, reducing the tip temperature to 200°C. This prevents oxidation and prolongs tip life.
- To resume operation, simply pick up the soldering iron from its stand. It will quickly return to the previously set working temperature.

Figure 6.5: Soldering Iron Sleep Function
6.6 Memory Function
- The station includes a memory function allowing you to save up to three frequently used temperature and airflow settings (CH1, CH2, CH3).
- To save a setting: Adjust the hot air gun and soldering iron to your desired temperatures and airflow. Then, press and hold the desired channel button (CH1, CH2, or CH3) until the display indicates the setting has been saved.
- To recall a setting: Simply press the corresponding channel button (CH1, CH2, or CH3). The station will automatically adjust to the saved parameters.

Figure 6.6: Data Memory Function
7. Maintenance
Regular maintenance ensures the longevity and optimal performance of your soldering station.
- Cleaning the Soldering Iron Tip: Always clean the soldering iron tip before and after use. Use the included cleaning sponge (dampened) or brass wool to remove excess solder and oxidation. A clean tip ensures efficient heat transfer.
- Tinning the Tip: After cleaning, apply a small amount of fresh solder to the tip. This 'tinning' protects the tip from oxidation and improves its lifespan.
- Replacing Tips: When a tip becomes worn or damaged, replace it with a new one. Ensure the station is off and the tip has cooled before attempting replacement.
- Cleaning the Hot Air Gun Nozzles: Periodically inspect and clean the hot air gun nozzles to ensure unobstructed airflow.
- General Cleaning: Wipe down the main unit and handles with a soft, dry cloth. Do not use abrasive cleaners or solvents.
- Storage: When not in use for extended periods, store the station in a clean, dry environment, away from direct sunlight and extreme temperatures.

Figure 7.1: Soldering Iron Tips and Solder Wire
8. Troubleshooting
This section addresses common issues you might encounter. If the problem persists, please contact customer support.
| Problem | Possible Cause | Solution |
|---|---|---|
| Station does not power on. | No power supply; Power switch off; Faulty power cord. | Check power outlet; Ensure power switches are ON; Inspect power cord for damage. |
| Soldering iron/Hot air gun not heating up. | Power switch off; Heating element failure; Loose connection. | Ensure respective power switch is ON; Check cable connections; Contact support if heating element is suspected faulty. |
| Temperature display is erratic or inaccurate. | Sensor issue; Loose connection; Environmental factors. | Ensure connections are secure; Operate in a stable environment; Contact support. |
| Hot air gun has low or no airflow. | Airflow knob set too low; Nozzle clogged; Fan malfunction. | Adjust airflow knob; Clean nozzle; Contact support if fan is faulty. |
| Soldering iron tip oxidizes quickly. | Tip not tinned; Operating at excessively high temperature; Poor quality solder. | Always tin the tip; Use appropriate temperature for the task; Use good quality lead-free solder. |
9. Technical Specifications
| Feature | Specification |
|---|---|
| Model Number | 992D |
| Brand | Preciva |
| Dimensions (L x W x H) | 148 x 99 x 134 cm; 3.33 kilograms |
| Voltage | 230 Volts |
| Power | 750 Watts |
| Display Type | LCD |
| Number of Channels | 2 |
| Temperature Stability | ±1°C |
| Soldering Iron Temperature Range | 200°C - 480°C (392°F - 896°F) |
| Hot Air Gun Temperature Range | 100°C - 480°C (212°F - 896°F) |
| Max. Air Volume | 120 L/min |
| UPC | 789371129649 |
10. Warranty and Support
Preciva products are manufactured to high-quality standards. For warranty information, technical support, or service inquiries, please refer to the warranty card included with your product or contact Preciva customer service directly through their official website or the retailer where you purchased the product. Please have your model number (992D) and purchase details ready when contacting support.
Ask a question about this manual
Ask about setup, troubleshooting, compatibility, parts, safety, or missing instructions. Manuals+ will review the question and use this page’s manual context to help answer it.