Meike MK-A7R IV
Meike MK-A7R IV Professional Vertical Battery Grip
User Manual for Sony Alpha A7IV, A7RIV, and A9II Cameras
Introduction
This manual provides comprehensive instructions for the proper use and care of your Meike MK-A7R IV Professional Vertical Battery Grip. Designed to enhance the handling and battery life of your Sony Alpha A7IV, A7RIV, and A9II cameras, this grip offers extended shooting time and improved ergonomics for vertical photography. Please read this manual thoroughly before using the product to ensure optimal performance and longevity.
Safety Precautions
- Do not attempt to disassemble or modify the product. Unauthorized modifications can lead to malfunction and void the warranty.
- Keep the battery grip away from water, moisture, and extreme temperatures.
- Use only compatible batteries as specified by your camera manufacturer.
- Ensure the battery grip is securely attached to the camera before use to prevent accidental detachment.
- Turn off the camera and remove batteries when the grip is not in use for extended periods.
- Avoid dropping the grip or subjecting it to strong impacts.
Package Contents
Please verify that all items are present in your package:
- Meike MK-A7R IV Vertical Battery Grip
- Battery Holder for NP-FZ100 batteries (x2)
- Instruction Manual (this document)
Part Names and Functions

Figure 1: Overview of the Meike MK-A7R IV Battery Grip controls and their functions.
- Shutter Button: Functions identically to the camera's shutter button for vertical shooting.
- C1/C2 Custom Buttons: Programmable buttons that mirror the camera's custom functions.
- ON/OFF Switch: Powers the grip's controls on or off. Note: This switch controls the grip's buttons, not the camera's power.
- Front Control Dial: Adjusts camera settings such as aperture or shutter speed.
- AF-ON Button: Activates autofocus.
- Magnify Button: Magnifies the image during playback or live view.
- Multiple Button (Joystick): Used for navigating menus and selecting AF points.
- AEL Button: Activates Auto Exposure Lock.


Figure 2: Detailed view of the grip's custom buttons, ON/OFF switch, joystick, and AF-ON button.
Setup
Attaching the Battery Grip to the Camera

Figure 3: The battery grip securely mounted to a compatible Sony Alpha camera.
- Ensure your camera is powered off.
- Open the battery compartment door on your camera. Remove the camera's battery.
- Detach the camera's battery compartment door. Most cameras allow this door to be removed and stored within the grip to prevent loss.
- Align the battery grip's mounting screw with the camera's tripod socket.
- Insert the grip's electrical contact into the camera's battery compartment.
- Tighten the mounting screw on the grip until it is firmly secured to the camera. Do not overtighten.

Figure 4: Detail of the mounting screw for attaching the grip to the camera.
Installing Batteries
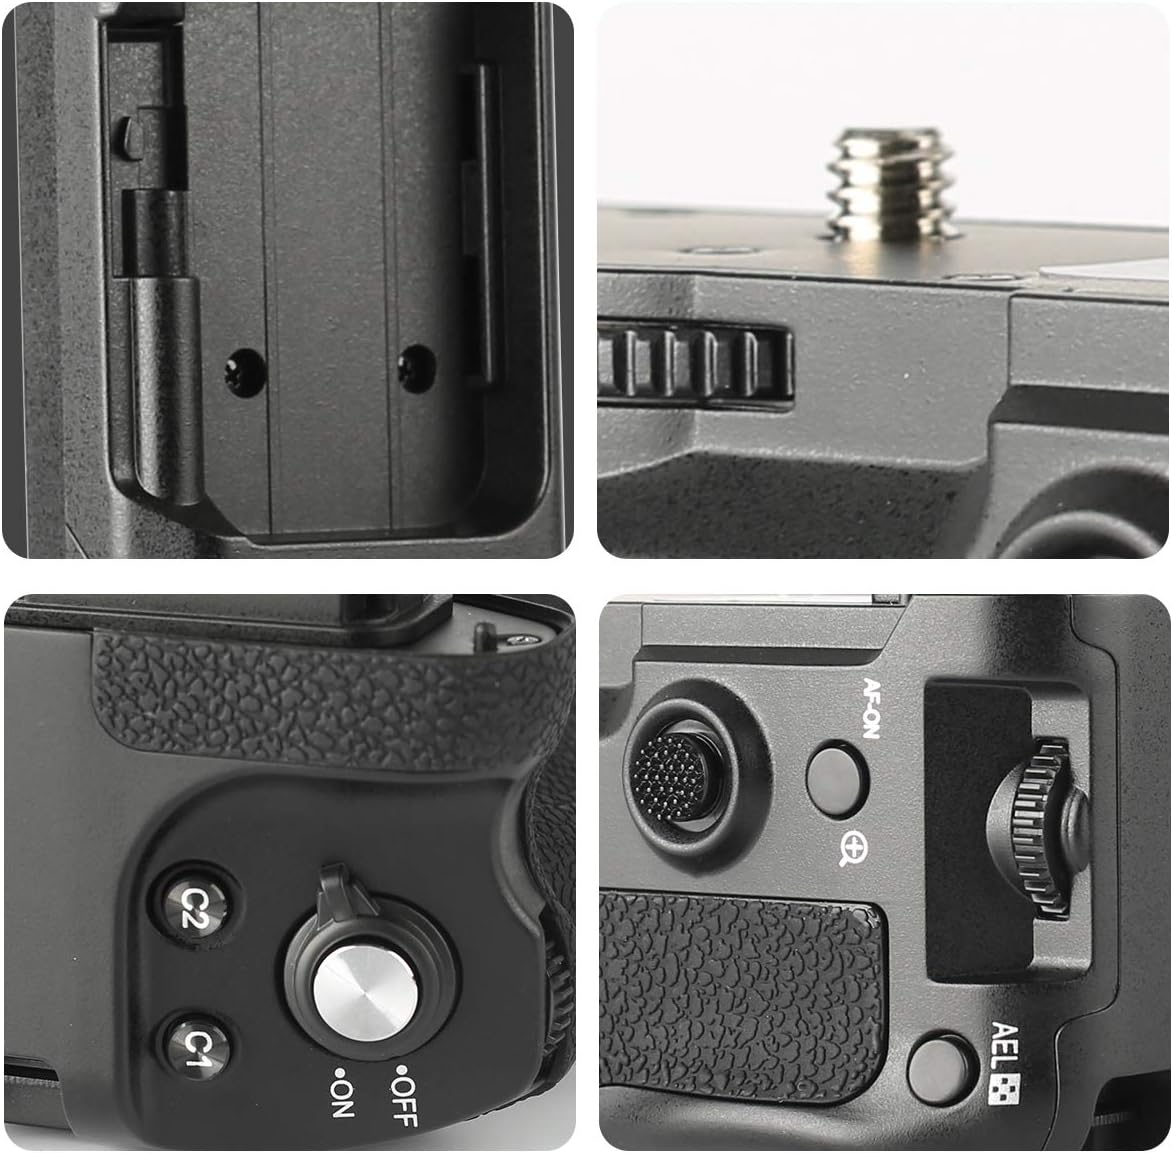
Figure 5: Visual guide for inserting batteries into the grip's tray.
- Ensure the grip's ON/OFF switch is in the OFF position.
- Open the battery tray cover on the grip.
- Insert up to two NP-FZ100 batteries into the battery holder, ensuring correct polarity.
- Slide the battery holder firmly into the grip until it locks into place.
- Close the battery tray cover securely.

Figure 6: Detail of the battery compartment door and latch mechanism.
Operating the Battery Grip
Vertical Shooting

Figure 7: The battery grip provides enhanced ergonomics for comfortable vertical shooting.
The primary benefit of the vertical battery grip is to provide a comfortable and stable grip for shooting in portrait orientation. The grip's integrated controls allow for seamless operation without needing to contort your wrist.
Using Controls
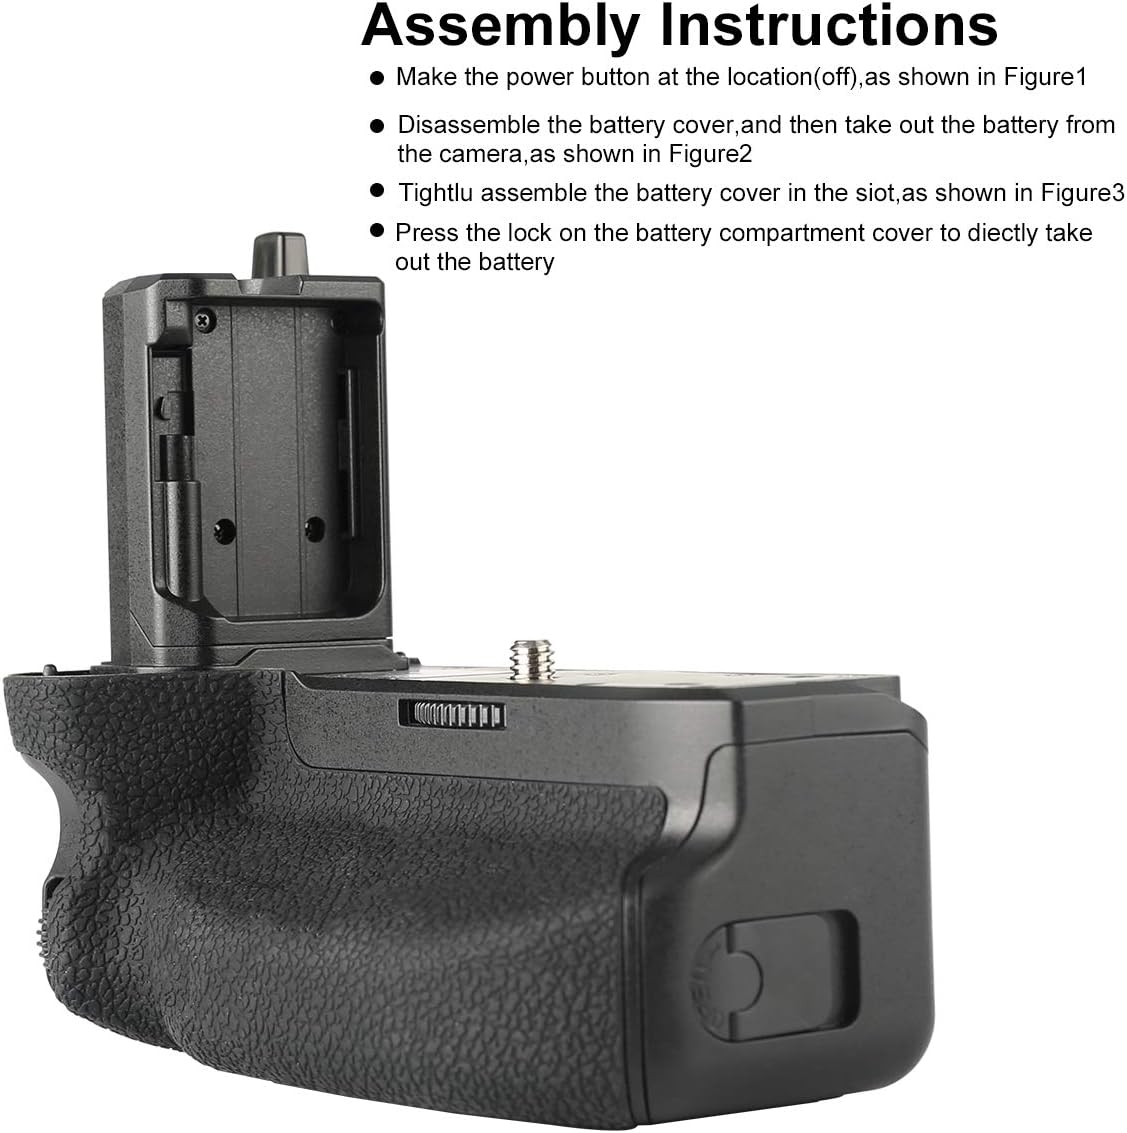
Figure 8: Close-up view of the grip's operational controls.
- Powering On/Off: After attaching the grip and inserting batteries, turn on your camera. Then, slide the ON/OFF switch on the grip to the 'ON' position to activate the grip's controls. Remember to turn it OFF when not actively using the grip's buttons to prevent accidental presses.
- Shutter Button: Press halfway to focus, press fully to take a picture.
- Control Dials: Rotate the front control dial to adjust settings as configured on your camera (e.g., aperture, shutter speed).
- Custom Buttons (C1/C2): These buttons replicate the functionality of your camera's C1 and C2 buttons. Their functions are determined by your camera's custom settings.
- Joystick/Multiple Button: Use this to navigate menus, select autofocus points, or perform other functions assigned in your camera settings.
Maintenance
- Cleaning: Use a soft, dry cloth to clean the exterior of the grip. For stubborn dirt, a slightly damp cloth can be used, followed by immediate drying. Do not use strong detergents or solvents.
- Storage: When not in use for extended periods, remove batteries from the grip and store it in a cool, dry place, away from direct sunlight.
- Contact Points: Periodically check the electrical contact points on both the grip and your camera for dust or debris. Clean gently with a dry, lint-free cloth if necessary.
Troubleshooting
| Issue | Possible Cause | Solution |
|---|---|---|
| Grip controls are unresponsive. |
|
|
| "Incompatibility battery error" message. |
|
|
| Camera crashes or stops recording. |
|
|
| Grip feels loose or wobbly. | Mounting screw is not fully tightened. | Tighten the mounting screw until the grip is firmly attached to the camera. |
Specifications
| Model | MK-A7R IV (ZN-A7RIV) |
| Compatible Cameras | Sony Alpha A7IV, A7RIV, A9II, A7SIII, A1 |
| Compatible Batteries | 2x NP-FZ100 (not included) |
| Operating Temperature | 0°C to 40°C (32°F to 104°F) |
| Dimensions | Approximately 5 x 2.64 x 4.33 inches (127 x 67 x 110 mm) |
| Weight | Approximately 9.9 ounces (280 grams) (without batteries) |
| Manufacturer | Meike |
Warranty and Support
Meike products are designed for reliability and performance. For specific warranty information and support inquiries, please refer to the warranty card included with your product or visit the official Meike website. You can also visit the Meike Store on Amazon for additional product information and customer service options.
Ask a question about this manual
Ask about setup, troubleshooting, compatibility, parts, safety, or missing instructions. Manuals+ will review the question and use this page’s manual context to help answer it.