
Orno 1300449
ORNO 4-Way 230V Black Power Strip (Model 1300449) Instruction Manual
Comprehensive guide for installation, operation, and maintenance.
1. Introduction
This manual provides detailed instructions for the safe and efficient use of your ORNO 4-Way 230V Black Power Strip, Model 1300449. Please read this manual thoroughly before installation and operation to ensure proper function and safety.
The ORNO power strip is designed for installation in various surfaces such as desks, table covers, and workbenches, offering convenient access to electrical outlets. It features a robust, low-profile design suitable for diverse environments.
2. Safety Instructions
- Always disconnect power before installation or maintenance.
- Ensure the power strip is installed by a qualified electrician if you are unsure about the process.
- Do not exceed the maximum load of 2500 W.
- This device is rated IP44, providing protection against splashing water and solid objects larger than 1mm when covers are closed. However, it is not designed for submersion.
- Use only the recommended cable type: OWY 3 × 1.5 mm square (not included).
- Do not modify the device in any way.
- Keep out of reach of children.
- Ensure proper grounding for all connected devices.
3. Product Components
The ORNO 4-Way Power Strip includes the following main components:
- 4 x French Type E Sockets with protective rubber covers.
- Integrated rubber cable gland for cable entry.
- Mounting holes for secure installation.
- Durable zinc alloy and steel sheet housing.

Figure 1: Front view of the ORNO 4-Way Power Strip with all protective covers closed. This image shows the compact and low-profile design of the unit.
4. Setup and Installation
The ORNO 4-Way Power Strip is designed for recessed or surface-mount installation in various surfaces such as desks, table covers, and workbenches. It can be mounted vertically or horizontally.
4.1 Required Tools and Materials (Not Included)
- Drill and appropriate drill bits.
- Jigsaw or similar cutting tool for creating the mounting hole (if recessed).
- Screwdriver.
- OWY 3 × 1.5 mm square electrical cable.
- Mounting screws suitable for your surface.
4.2 Installation Steps
- Prepare the Mounting Surface: Identify the desired location for the power strip. Ensure there is sufficient space beneath the surface for the unit and cable routing.
- Mark and Cut the Opening (for recessed installation): For recessed installation, carefully mark the area for the cutout. The product dimensions are approximately 38 cm (length) x 6.5 cm (width) x 4 cm (height). Note: Some product descriptions may contain conflicting cutout dimensions. Always refer to the precise dimensions provided on the product packaging or template for accurate cutting. Use a jigsaw or appropriate tool to create the opening. Ensure the edge thickness of the surface is suitable.
- Connect the Power Cable:
- Remove the removable cover at the end of the power strip to access the cable connector.
- Feed the OWY 3 × 1.5 mm square electrical cable through the integrated rubber cable gland.
- Connect the cable wires to the appropriate terminals inside the power strip. Ensure secure connections for live, neutral, and ground wires.
- Replace the removable cover, ensuring the cable gland provides a tight seal.
- Insert and Secure the Power Strip: Carefully insert the power strip into the prepared opening (if recessed) or position it on the surface. The device can be installed in both vertical and horizontal positions.
- Fasten the Unit: Use screws through the designated screw holes on the base of the unit to permanently attach it to the surface.
- Test Functionality: Once installed, connect the power strip to a main power source and test all sockets with a low-power device to ensure proper operation.

Figure 2: Angled view of the ORNO 4-Way Power Strip, highlighting the mounting points and the cable entry gland. This view helps in understanding the installation orientation.
5. Operating Instructions
Using your ORNO 4-Way Power Strip is straightforward:
- Accessing Sockets: Lift the protective rubber cover of the desired socket.
- Connecting Devices: Insert the plug of your electrical device into the socket.
- Disconnecting Devices: Gently pull the plug from the socket.
- Protecting Sockets: Always close the rubber covers when sockets are not in use to maintain IP44 protection against water and dust.
Important: Ensure the total power consumption of all connected devices does not exceed the maximum load of 2500 W.
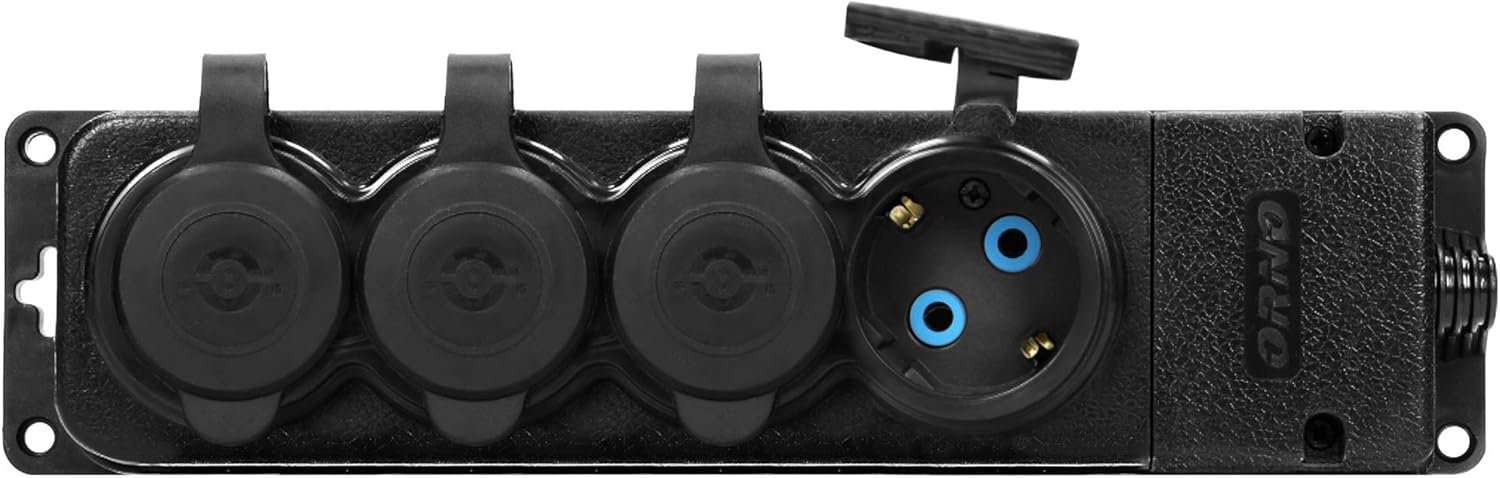
Figure 3: The ORNO 4-Way Power Strip with one protective cover open, revealing a French Type E socket. This demonstrates how to access and use the individual outlets.
6. Maintenance
Regular maintenance ensures the longevity and safe operation of your power strip.
- Cleaning: Disconnect the power strip from the main power supply before cleaning. Wipe the exterior with a soft, damp cloth. Do not use abrasive cleaners or solvents.
- Inspection: Periodically inspect the power strip for any signs of damage, such as cracks in the housing, frayed cables, or loose connections. If any damage is found, discontinue use immediately and have it inspected by a qualified technician.
- Protective Covers: Ensure the rubber protective covers are intact and properly seal the sockets when not in use to maintain IP44 rating.
7. Troubleshooting
If you encounter issues with your ORNO 4-Way Power Strip, refer to the following common problems and solutions:
| Problem | Possible Cause | Solution |
|---|---|---|
| No power to devices. |
|
|
| Protective covers do not seal properly. |
|
|
For problems not listed here, please contact ORNO customer support.
8. Technical Specifications
| Model Number | 1300449 |
| Part Number | SB-122 |
| Supply Voltage | 230 V~, 50 Hz |
| Max. Load | 2500 W |
| Number of Sockets | 4 |
| Socket Type | French (Type E), 2P+Z |
| Protection Rating | IP44 (when covers are closed) |
| Material | Zinc alloy + Steel sheet |
| Color | Black |
| Installation Type | Recessed or Surface-mount |
| Product Dimensions (L x W x H) | 38 x 6.5 x 4 cm |
| Item Weight | 280 g |
| Recommended Cable | OWY 3 × 1.5 mm square (not included) |
9. Warranty and Support
Information regarding warranty coverage and customer support for ORNO products can typically be found on the manufacturer's official website or through your point of purchase. Please retain your proof of purchase for warranty claims.
For technical assistance or inquiries, please visit the ORNO official website or contact their customer service department.
Ask a question about this manual
Ask about setup, troubleshooting, compatibility, parts, safety, or missing instructions. Manuals+ will review the question and use this page’s manual context to help answer it.