1. Introduction
This manual provides essential information for the safe and efficient installation, operation, and maintenance of your Pedrollo CPM150 centrifugal water pump. Please read these instructions carefully before installing or operating the pump. Retain this manual for future reference.
The Pedrollo CPM150 pump is designed for handling clean liquids with minimal sediment. It is suitable for various applications including industrial liquid recycling (cold or hot), filtration processes, water treatment, and general agricultural or domestic use.
2. Safety Instructions
Always observe the following safety precautions to prevent personal injury and damage to the pump:
- Ensure the pump is installed by qualified personnel in accordance with local electrical and plumbing codes.
- Disconnect power before performing any installation, maintenance, or repair work.
- Do not operate the pump with flammable, corrosive, or explosive liquids.
- Protect the pump from freezing temperatures.
- Ensure proper ventilation around the pump. The ambient temperature should not exceed 40°C.
- Never run the pump dry. This can cause severe damage.
- Wear appropriate personal protective equipment (PPE) during installation and maintenance.
3. Product Overview
The Pedrollo CPM150 is a robust centrifugal pump featuring a cast iron pump body with cataphoresis treatment. The impeller is made of INOX AISI 304 stainless steel, and the motor lantern is aluminum. The pump is designed for continuous service (S1).
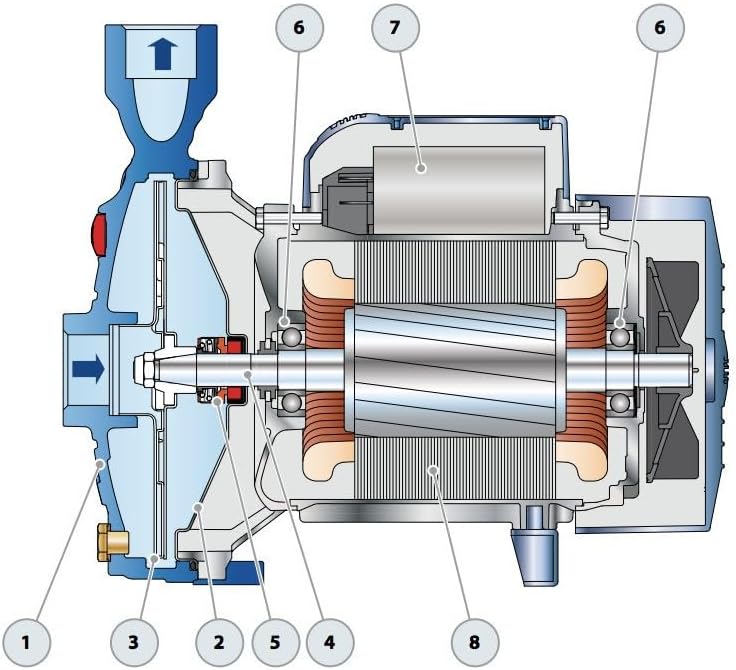
Figure 1: Exploded view of the Pedrollo CPM150 pump, showing internal components. Key parts include (1) Pump Body, (2) Impeller, (3) Mechanical Seal, (4) Motor Shaft, (5) Bearings, (6) Motor Casing, (7) Capacitor (for single-phase), and (8) Stator/Rotor Assembly.
The single-phase 220V motor includes integrated thermal protection to safeguard the pump against unexpected starts or overheating. The coupling shaft between the impeller and the electric motor is made of INOX EN 10088-3 - 1.4104. The mechanical seal, composed of carbon, ceramic, and nitrile, ensures a tight seal between the pump body and the electric motor.
4. Specifications
Below are the key technical specifications for the Pedrollo CPM150 pump:
| Feature | Specification |
|---|---|
| Model | CPM150 |
| Power | 0.75 kW |
| Voltage | 220 V Single-Phase |
| Frequency | 50 Hz |
| Flow Rate (Q) | 0 to 7.2 m³/h |
| Head (HMT) | 29.5 to 15 meters |
| Liquid Temperature Range | -10°C (with antifreeze) to +90°C |
| Ambient Temperature | Not exceeding 40°C |
| Pump Body Material | Cast Iron with Cataphoresis Treatment |
| Impeller Material | INOX AISI 304 Stainless Steel |
| Motor Protection | IPX4 |
| Insulation Class | F |
| Continuous Service | S1 |
| Rotation Speed | 2900 rpm |
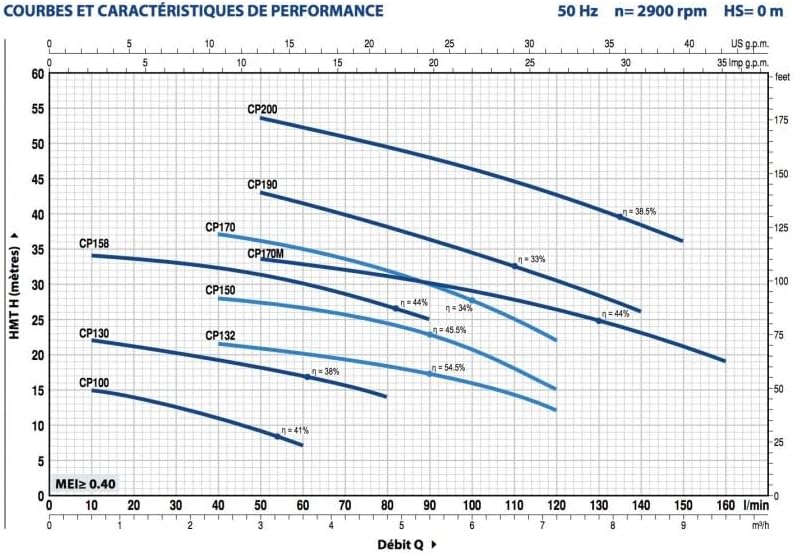
Figure 2: Performance curves for Pedrollo CP series pumps at 50 Hz and 2900 rpm. This graph illustrates the relationship between flow rate (Q) in l/min or m³/h and total head (HMT) in meters or feet for various models, including the CPM150.
5. Installation and Setup
Proper installation is crucial for the pump's performance and longevity. It is highly recommended that installation be carried out by a qualified professional.
5.1. Mounting
- Mount the pump on a solid, level, and vibration-free surface.
- Ensure the installation location is dry, well-ventilated, and protected from direct sunlight, rain, and freezing temperatures.
- Allow sufficient space around the pump for ventilation and maintenance access.
5.2. Piping Connections
- Use pipes of adequate diameter to minimize friction losses.
- Install a foot valve with a strainer on the suction line if the pump is not self-priming or if there's a risk of debris.
- Ensure all connections are airtight to prevent air leaks, which can affect priming and performance.
- Support piping independently to avoid stressing the pump's connections.
- Install isolation valves on both suction and discharge lines for easier maintenance.
5.3. Electrical Connection
- Verify that the power supply voltage and frequency match the pump's specifications (220V, 50Hz).
- Connect the pump to a dedicated circuit protected by a residual current device (RCD) and appropriate circuit breaker.
- Ensure proper grounding of the pump.
- The single-phase motor includes integrated thermal protection. Do not bypass this safety feature.
5.4. Priming the Pump
Before the first start-up, the pump body must be completely filled with the liquid to be pumped. Open the priming plug (if available) or slowly fill the suction line and pump casing until all air is expelled. Close the plug securely.
6. Operation
6.1. Initial Start-up
- Ensure the pump is properly primed (see Section 5.4).
- Open any isolation valves on the suction and discharge lines.
- Switch on the power supply to the pump.
- Monitor the pump for unusual noises or vibrations. If any occur, switch off immediately and investigate.
- Check for leaks at connections.
6.2. Normal Operation
- The pump is designed for continuous operation within its specified performance range.
- Avoid running the pump against a closed discharge valve for extended periods, as this can lead to overheating.
- Regularly check the pressure gauges (if installed) to ensure the pump is operating within expected parameters.
6.3. Shut-down
- Switch off the power supply to the pump.
- Close isolation valves if the system is to be drained or for maintenance.
7. Maintenance
Regular maintenance ensures optimal performance and extends the pump's lifespan. Always disconnect power before performing any maintenance.
7.1. Routine Checks (Weekly/Monthly)
- Inspect for any visible leaks around the pump and piping connections.
- Listen for unusual noises or vibrations.
- Check the motor temperature; it should not be excessively hot to the touch.
- Ensure the ventilation openings are clear of debris.
7.2. Annual Maintenance
- Inspect the mechanical seal for wear or leaks. Replace if necessary (requires professional service).
- Check the impeller for any signs of corrosion or damage.
- Clean any strainers or filters in the suction line.
- Verify electrical connections are secure and free from corrosion.
7.3. Winterization (if applicable)
If the pump is installed in an area subject to freezing temperatures and will not be used, it must be drained completely to prevent damage from ice expansion. Disconnect power, open drain plugs, and remove any remaining water from the pump casing and piping.
8. Troubleshooting
This section provides solutions to common problems. For complex issues, contact a qualified technician.
| Problem | Possible Cause | Solution |
|---|---|---|
| Pump does not start | No power supply Thermal overload tripped Motor fault | Check power connection and circuit breaker Allow motor to cool, check for cause of overload Contact qualified technician |
| Pump runs but no water or low flow | Pump not primed Air leak in suction line Suction line blocked Impeller damaged Discharge valve closed | Re-prime the pump Check all suction connections for leaks Clear obstruction Inspect/replace impeller (professional service) Open discharge valve |
| Excessive noise or vibration | Cavitation (air in system) Misalignment Worn bearings Loose mounting | Ensure proper priming, check for air leaks Check pump and motor alignment Contact qualified technician Tighten mounting bolts |
| Pump leaks | Loose connections Worn mechanical seal Cracked casing | Tighten connections Replace mechanical seal (professional service) Contact qualified technician |
9. Warranty and Support
For warranty information, please refer to the documentation provided at the time of purchase or contact your authorized Pedrollo dealer. Keep your proof of purchase for warranty claims.
For technical support, spare parts, or service, please contact your local Pedrollo distributor or the seller from whom you purchased the pump. Provide the model number (CPM150) and serial number (if available) when seeking assistance.
Pedrollo S.p.A. is committed to continuous product improvement. Specifications are subject to change without notice.