1. Introduction
This manual provides detailed instructions for the setup, programming, operation, and maintenance of your GDR PRO Universal Garage Door Opener Remote. This remote is designed for broad compatibility with various garage door opener brands and systems, offering a convenient solution for controlling up to two garage doors or gates.
2. Safety Information
- Always ensure the garage door area is clear of people and obstructions before operating the opener.
- Keep the remote control out of reach of children.
- Do not allow children to operate the garage door opener.
- Test the safety reverse system of your garage door opener monthly. Refer to your garage door opener manual for instructions.
- Replace batteries only with the specified type (CR2032 Lithium Cell).
3. Package Contents
Verify that all items are present in your package:
- GDR PRO Universal Garage Door Opener Remote
- Visor Clip
- CR2032 Lithium Cell Battery (pre-installed or included)
- Program Guide (this manual)

Image: The package contents include the remote control, a visor clip, a CR2032 battery, and the program guide.
4. Compatibility
The GDR PRO Universal Garage Door Opener Remote is compatible with most major garage door opener brands manufactured after 1993, including Chamberlain, Genie, LiftMaster (excluding MyQ systems), Craftsman, and Linear. It supports both dip switch and Smart Learn technology systems, operating within 315MHz to 390MHz frequencies.
Note: This remote is not compatible with Allstar, Marantec, Hormann, or LiftMaster MyQ openers.

Image: A detailed chart showing compatible brands, learn/dip switch types, year ranges, and frequencies for programming.
5. Setup and Programming
The remote can be programmed using either a Smart/Learn Button method or a Dip Switch method, depending on your existing garage door opener.
5.1. Programming for Smart/Learn Button Systems (Chart A)
This method applies to systems that use a learn button on the motor unit. Refer to the compatibility chart (Chart A) to determine the number of times to press the program button based on your opener's brand and learn button color.
- Ensure your garage door or gate is CLOSED.
- Open the remote control by sliding the battery cover down. Press and hold the program button until the LED on the remote illuminates.
- Press and release the Smart/Learn button on your garage door opener's motor unit.
- Select a button on your GDR PRO remote to program. Press this button the corresponding number of times as indicated in Chart A for your compatible brand. The LED on the remote will flash after each press. The code is accepted when one of the following occurs: the garage door opener light flashes, or the garage door moves.
- Press the program button on the remote to exit programming mode. Programming is now complete. Press the selected button on the remote to test.
Note: If there are problems programming to button 1, attempt to program to button 2.
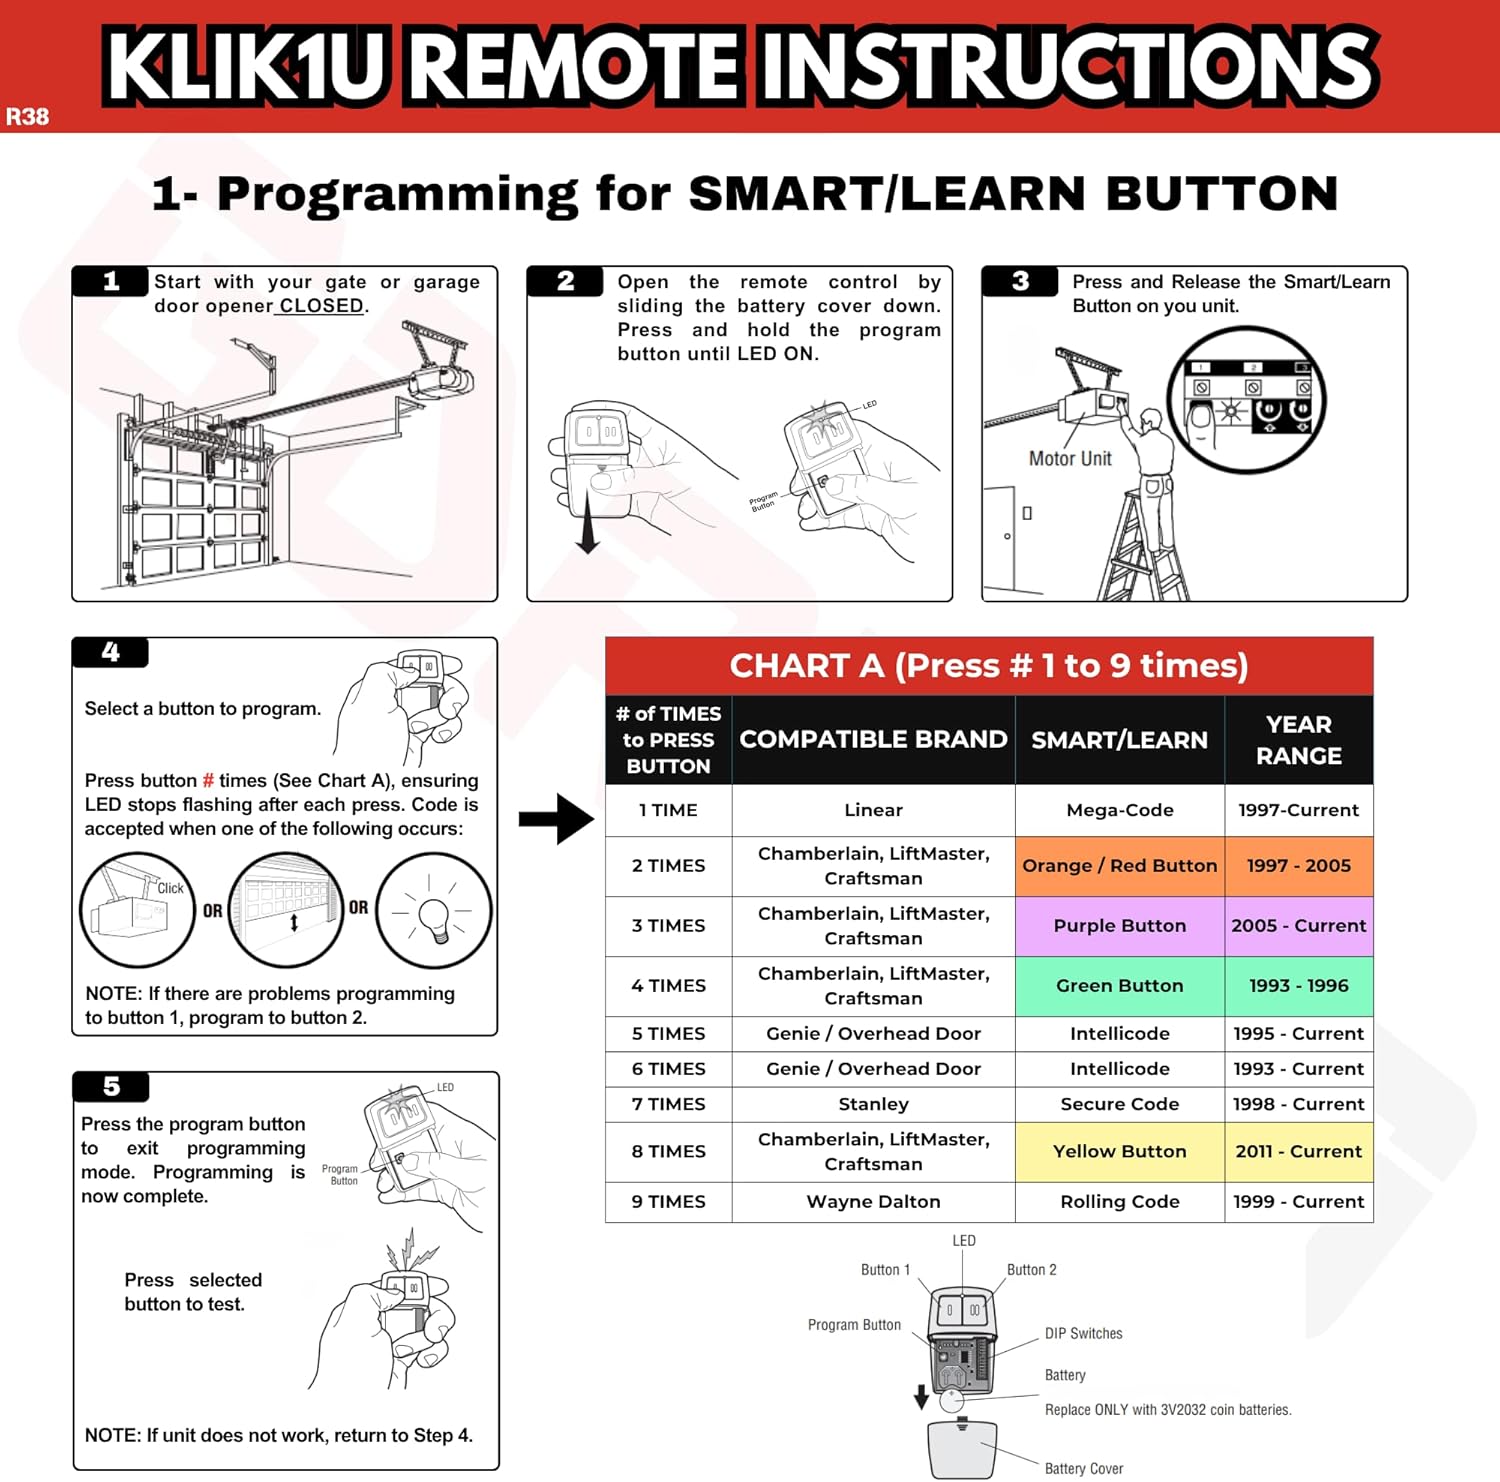
Image: Step-by-step visual guide for programming with a Smart/Learn button, including a chart (Chart A) for button press counts.
5.2. Programming for Dip Switch Systems (Chart B)
This method applies to older systems that use physical dip switches for coding. Refer to the compatibility chart (Chart B) to determine the number of times to press the program button based on your opener's brand and dip switch configuration.
- Ensure your garage door or gate is CLOSED.
- Open the remote control by sliding the battery cover down. Match the dip switches on your GDR PRO remote to those on your existing remote or motor unit. Turn extra switches OFF if your system has fewer than 12 dip switches.
- Press and hold the program button until the LED on the remote illuminates.
- Select a button on your GDR PRO remote to program. Press this button the corresponding number of times as indicated in Chart B for your compatible brand. The LED on the remote will flash after each press. The code is accepted when one of the following occurs: the garage door opener light flashes, or the garage door moves.
- Press the program button on the remote to exit programming mode. Programming is now complete. Press the selected button on the remote to test.
Note on Dip Switch Position: If programming fails, reverse the dip switch positions (OFF to ON and ON to OFF). For Chamberlain remotes, DO NOT use the "0" position; use "+" or "-". If you already have a button remote, dip switch #1 must be set to "+". If no large remote to open the door, it may be necessary to reprogram original remote controls.

Image: Step-by-step visual guide for programming with dip switches, including a chart (Chart B) for button press counts and dip switch configuration details.
6. Operating Instructions
Once programmed, operating your GDR PRO Universal Garage Door Opener Remote is straightforward:
- To Open/Close a Garage Door: Press the programmed button corresponding to the desired garage door or gate. The door will begin to move.
- To Stop a Moving Door: Press the programmed button again while the door is in motion.
- Dual Control: If you have programmed two different garage doors or gates, use the respective programmed buttons to control each one independently.
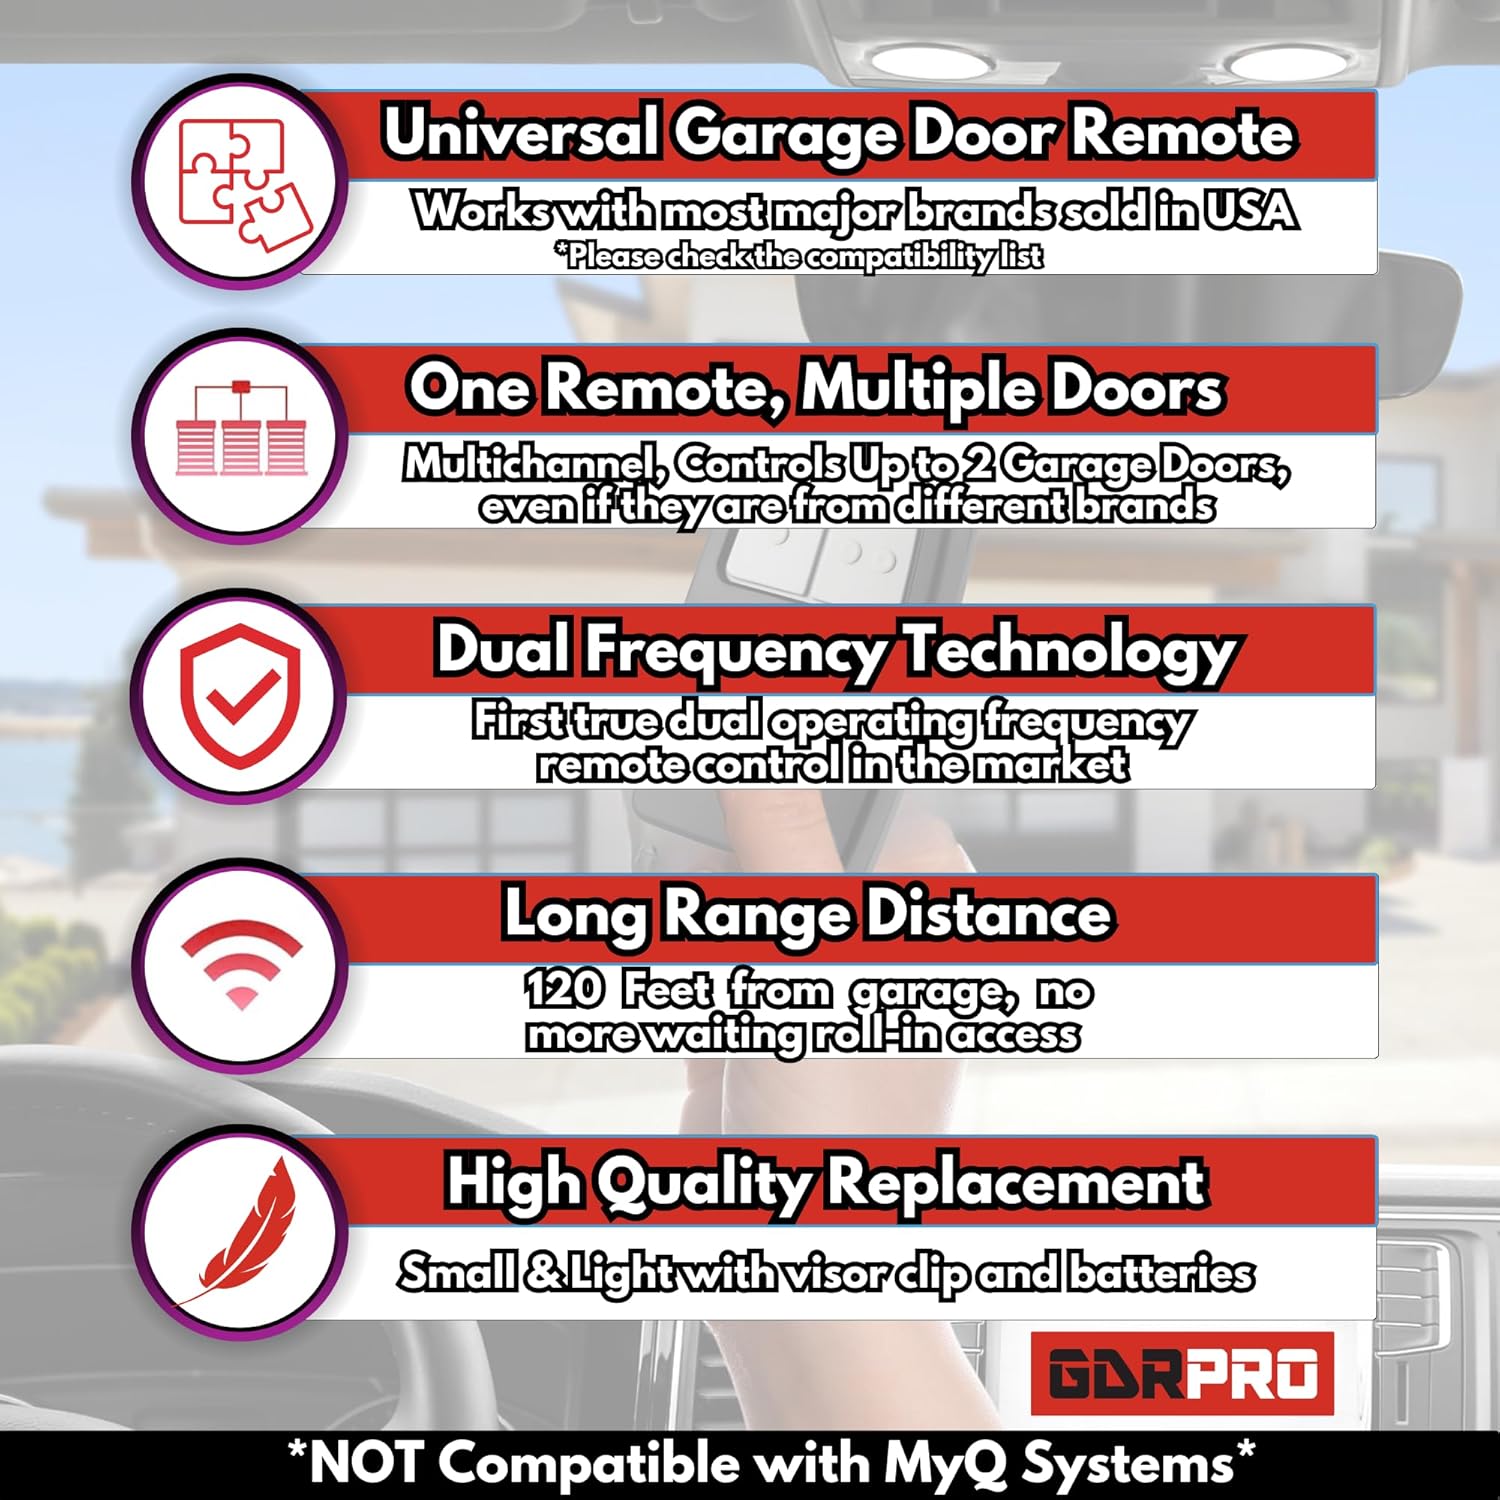
Image: An illustration emphasizing the remote's key features, including its ability to control multiple doors and its long-range capability.
7. Maintenance
7.1. Battery Replacement
The remote uses one CR2032 Lithium Cell battery. When the remote's range decreases or the LED indicator becomes dim or unresponsive, it's time to replace the battery.
- Slide the battery cover down to open the remote casing.
- Carefully remove the old CR2032 battery.
- Insert a new CR2032 Lithium Cell battery with the positive (+) side facing up.
- Slide the battery cover back into place until it clicks securely.
- Test the remote to ensure proper function.
8. Troubleshooting
- Remote not programming:
- Ensure the garage door opener is compatible (refer to Section 4).
- Verify you are pressing the program button on the remote and the learn button on the opener for the correct duration.
- Check the battery in the remote. Replace if necessary.
- For dip switch systems, ensure the dip switches on the remote precisely match those on your existing remote or opener. Try reversing the dip switch positions if programming fails.
- Try programming to the other button on the remote (e.g., if button 1 fails, try button 2).
- Remote has short range or is intermittent:
- Replace the battery in the remote.
- Ensure there are no obstructions between the remote and the garage door opener's antenna.
- Check if the antenna on the garage door opener is extended and unobstructed.
- Remote controls the wrong door:
- Reprogram the remote, ensuring you select the correct button for the intended garage door during the programming process.
9. Specifications
| Brand | GDR PRO |
| Model Numbers | KLIK1U / 375LM (Mfr Part Number: R38-CLK) |
| Connectivity Technology | Radio Frequency |
| Button Quantity | 2 |
| Max Number of Supported Devices | 2 |
| Maximum Range | 120 Feet |
| Battery Type | 1 Lithium Metal CR2032 (included) |
| Item Weight | 1 Ounce |
10. Warranty Information
For detailed warranty information regarding your GDR PRO Universal Garage Door Opener Remote, please refer to the manufacturer's official website or contact customer support directly. Warranty terms and conditions may vary.
11. Customer Support
If you encounter any issues or have questions not covered in this manual, please contact GDR PRO customer support for assistance. We offer 24/7 customer support to ensure your satisfaction.
Visit the official GDR PRO Store for more information and support: GDR PRO Store

Image: GDR PRO brand message highlighting customer support and product quality.