Solarhome 400091
Solarhome Control Box Assembly with Joystick User Manual
Brand: Solarhome | Model: 400091
Introduction
This manual provides comprehensive instructions for the Solarhome Control Box Assembly with Joystick, designed for use with various Skyjack Scissor Lifts. It covers essential information regarding installation, operation, maintenance, and troubleshooting to ensure the safe, efficient, and correct use of the product. Please read this manual thoroughly before operating the equipment.
Product Overview
The Solarhome Control Box Assembly (Part Number 400091 400091AJ) is a vital component for controlling Skyjack Scissor Lifts. It features a robust design, integrating a precise joystick controller and various control buttons and switches for comprehensive lift operation.
Components
- Joystick: Primary control for lift movement and direction.
- Emergency Stop Button: A prominent red button for immediate cessation of all lift functions.
- Key Switch: Used to activate or deactivate the control box and prevent unauthorized use.
- Control Knobs/Switches: Various rotary knobs and toggle switches for specific functions such as speed adjustment, platform leveling, and other auxiliary operations.
- Connector Cable: Durable cable with multi-pin connector for secure attachment to the scissor lift.
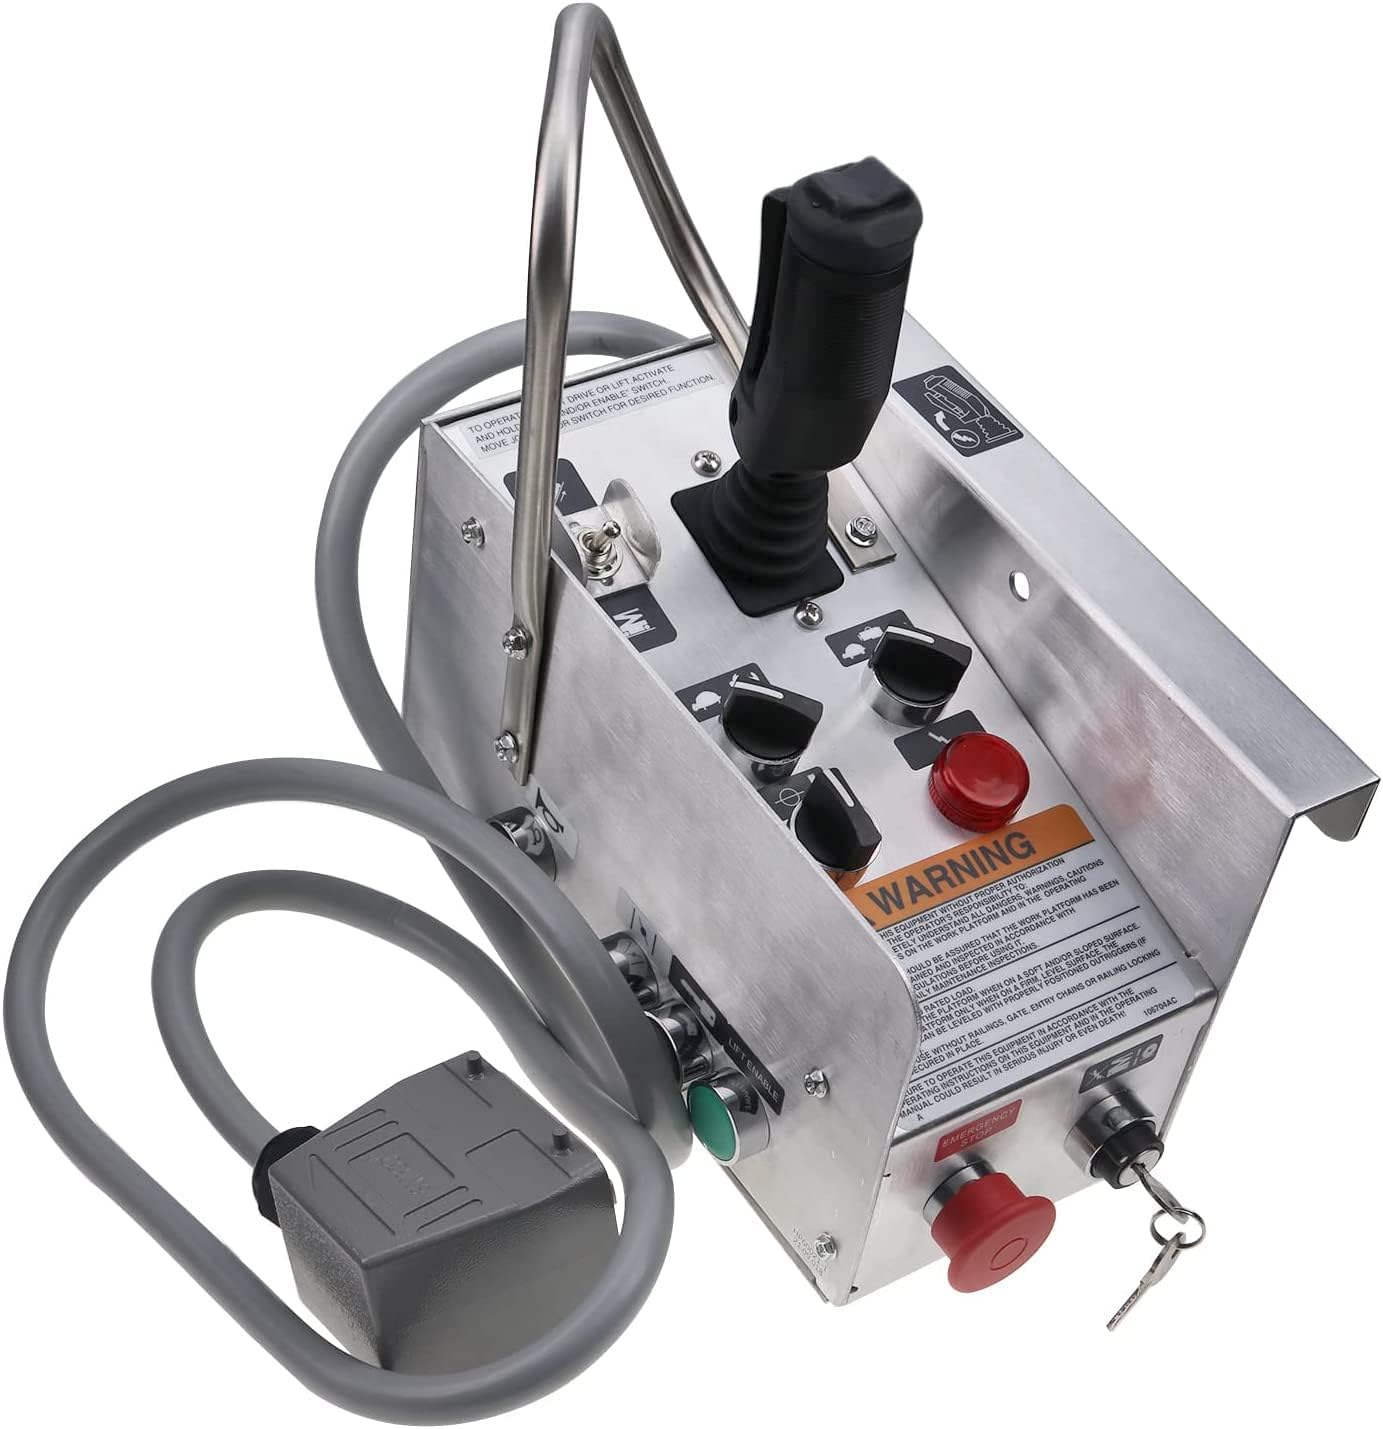
Figure 1: Top-front view of the Solarhome Control Box Assembly, showing the joystick, emergency stop, key switch, and various control knobs.

Figure 2: Side view of the control box, highlighting the robust handle and the attached connector cable.

Figure 3: Top view of the control box, clearly showing the warning label with important safety instructions.

Figure 4: Angled side view, providing a perspective of the control box's ergonomic design and handle.

Figure 5: Rear view of the control box, showing the secure entry point for the main connector cable.

Figure 6: Detailed close-up of the multi-pin connector, illustrating the robust design for reliable electrical connection.
Setup and Installation
Proper installation is critical for the safe and correct operation of the control box. Ensure all safety precautions are followed during the installation process.
- Prepare the Lift: Ensure the Skyjack Scissor Lift is completely powered off, de-energized, and secured according to the lift manufacturer's safety guidelines.
- Locate Connection Point: Identify the designated control box connection port on your Skyjack Scissor Lift. Refer to your lift's specific service manual if unsure.
- Connect the Cable: Carefully align the multi-pin connector of the Solarhome Control Box Assembly (Part Number 400091 400091AJ) with the corresponding port on the lift. Push firmly until the connector is fully seated and secured.
- Secure the Control Box: Mount the control box in its intended location on the lift. Ensure it is stable, easily accessible for the operator, and does not interfere with any moving parts. Use appropriate fasteners if required by the lift's design.
- Verify Connections: Double-check that all electrical connections are tight and secure. Ensure the cable is not pinched or exposed to potential damage.
- Initial Test: Before full operation, perform a basic functional test as outlined in the 'Operation' section to confirm proper installation.
Operation
This section details the operational procedures for the Solarhome Control Box Assembly. Always prioritize safety and follow the lift manufacturer's operating instructions in conjunction with this manual.
Basic Controls
- Joystick: Move the joystick in the desired direction to control the lift's drive, steer, and elevation functions. The speed and responsiveness may vary based on the lift model and selected settings.
- Emergency Stop Button: To activate, press the red button firmly. To reset, twist the button clockwise until it pops out. Always ensure it is reset before operation.
- Key Switch: Insert the key and turn it clockwise to the 'ON' position to power the control box. Turn counter-clockwise to 'OFF' and remove the key when not in use.
- Control Knobs/Switches: These are typically labeled for specific functions such as high/low speed, platform tilt, or auxiliary power. Refer to the labels on your specific control box for their exact purpose.
Operating Procedures
- Power On: Insert the key into the key switch and turn it to the 'ON' position.
- Reset Emergency Stop: Ensure the emergency stop button is in the 'OUT' (reset) position.
- Select Function: Use the appropriate control knobs or switches to select the desired operating mode or function (e.g., drive, lift).
- Control Movement: Slowly and carefully manipulate the joystick to control the lift's movement. Always be aware of your surroundings and maintain a safe operating distance from obstacles and personnel.
- Emergency Stop: In case of any unexpected movement, malfunction, or emergency, immediately press the emergency stop button.
- Power Off: When finished operating, return the lift to a safe position, turn the key switch to the 'OFF' position, and remove the key to prevent unauthorized use.
Maintenance
Regular maintenance is essential to ensure the continued safe and reliable operation of your Solarhome Control Box Assembly. Adhere to the following guidelines:
- Pre-Operation Inspection: Before each use, visually inspect the control box, joystick, buttons, switches, and especially the connector cable for any signs of damage, wear, fraying, or corrosion.
- Cleaning: Keep the control box clean and free from dirt, dust, debris, and moisture. Use a soft, dry cloth for cleaning. Avoid using harsh chemicals or abrasive materials that could damage the surface or internal components.
- Connection Integrity: Periodically check all electrical connections to ensure they are secure and free from looseness or corrosion. A loose connection can lead to intermittent operation or failure.
- Storage: When not in use, store the control box in a dry, clean, and protected environment, away from extreme temperatures, direct sunlight, and excessive moisture.
- Professional Service: Do not attempt to open or repair the internal components of the control box unless you are a qualified and authorized technician. Unauthorized repairs can void the warranty and pose safety risks.
Troubleshooting
This section provides solutions for common issues that may be encountered with the Solarhome Control Box Assembly. If the problem persists after attempting these solutions, please contact customer support.
| Problem | Possible Cause | Solution |
|---|---|---|
| Control box not powering on | Key switch is in 'OFF' position Emergency stop button is engaged Loose or disconnected cable | Turn key switch to 'ON' Reset the emergency stop button Check and securely connect the cable |
| Joystick unresponsive | Damaged cable or connector pins Internal fault within the joystick | Inspect cable and connector for damage; replace if necessary Contact customer support for further diagnosis |
| Intermittent function or erratic behavior | Loose electrical connections Moisture or debris inside the control box | Check and tighten all connections Ensure the unit is dry and clean; avoid operating in wet conditions |
| Buttons or switches not responding | Debris obstructing button movement Faulty switch or button | Clean around the buttons/switches Contact customer support for replacement or repair |
Specifications
Technical specifications for the Solarhome Control Box Assembly with Joystick.
| Feature | Detail |
|---|---|
| Part Name | Control Box Assy with Joystick Controller |
| Part Number | 400091 400091AJ |
| Applicable Models | Skyjack Scissor Lift Sj-600 Series (SJ800, SJ7027RT, SJ7127RT, SJ7135RT, Model 7027) |
| Manufacturer | Solarhome |
| Item Weight | 11.82 pounds |
| Package Dimensions | 14 x 14 x 8 inches |
| Country of Origin | China |
| Item Model Number | 400091 |
| Manufacturer Part Number | 400091 |
Warranty Information
The Solarhome Control Box Assembly with Joystick comes with a 1-year warranty from the date of purchase. This warranty covers defects in materials and workmanship under normal use. For warranty claims or service, please retain your proof of purchase and contact Solarhome customer support.
Customer Support
For further assistance, technical support, or any inquiries regarding your Solarhome Control Box Assembly, please utilize the following resources:
- Online Store: Visit the official Solarhome store on Amazon for product information, FAQs, and contact options.
- Contact: Refer to the contact information provided on the Solarhome Amazon store page for direct customer service.
Ask a question about this manual
Ask about setup, troubleshooting, compatibility, parts, safety, or missing instructions. Manuals+ will review the question and use this page’s manual context to help answer it.