Product Overview
The MicroKits Theremin Electronic Kit offers an engaging way to explore the principles of electronic music and engineering. This kit allows you to construct your own functional theremin, an instrument that produces sound through the manipulation of electric fields. Designed for ease of assembly, it requires no specialized tools and includes all necessary components, even batteries. It's an ideal educational tool for beginners, providing a step-by-step learning experience in electronics.

Figure 1: The MicroKits Theremin Electronic Kit packaging.
What's Included
Your MicroKits Theremin Electronic Kit comes complete with all the parts required for assembly, ensuring a hassle-free building experience. No additional tools are needed.
- Breadboard for circuit assembly
- Electronic components (resistors, capacitors, transistors, integrated circuits)
- LED (Light Emitting Diode)
- Speaker for audio output
- Pre-cut wires for connections
- Battery holder and 3 AA batteries
- Detailed 22-page instructional booklet
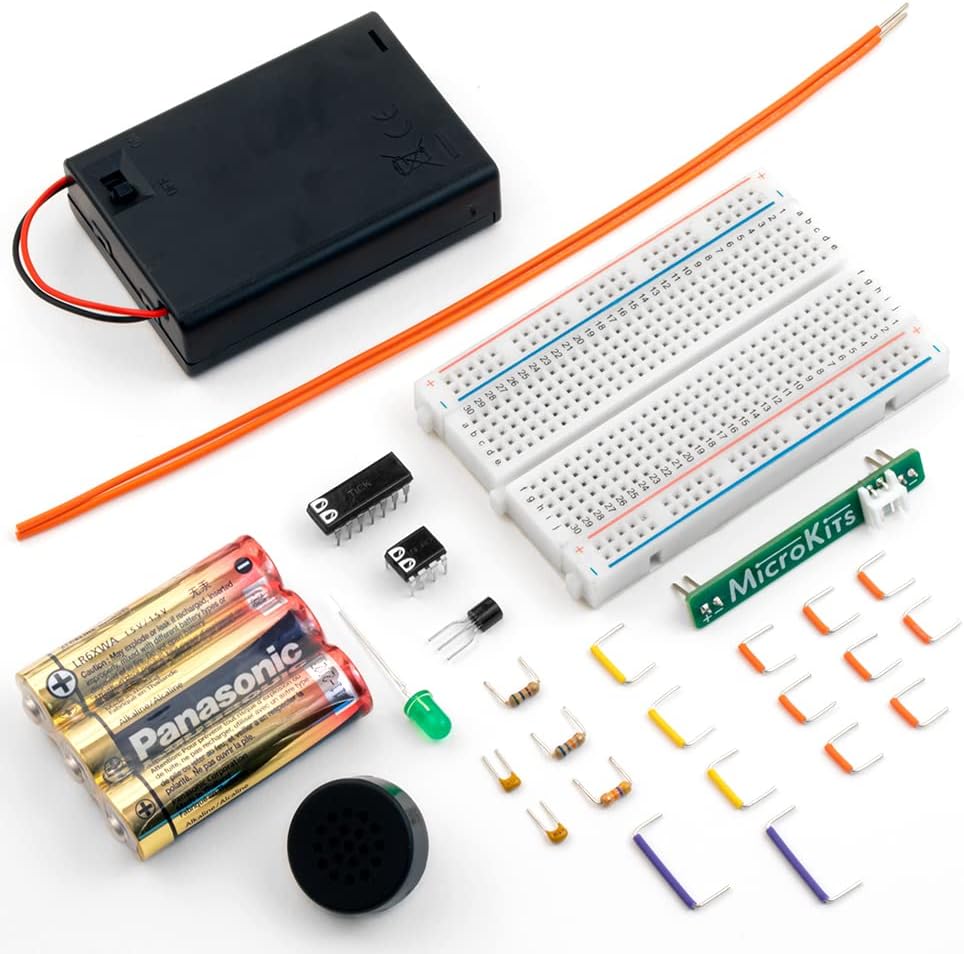
Figure 2: All components included in the MicroKits Theremin Electronic Kit.
Setup and Assembly
Follow the step-by-step instructions provided in the included 22-page instructional booklet. The assembly process is designed to be straightforward, with clear diagrams and explanations for each stage.
- Review the Booklet: Familiarize yourself with the components and the overall assembly plan by reading through the instructional booklet.
- Understand the Breadboard: The breadboard is your assembly platform. It holds wires and parts on a grid, allowing connections without soldering. Ensure parts are fully inserted into the correct points.
- Stage 1: Power and LED: Begin by setting up the power connections and the LED indicator. The booklet provides precise instructions for placing the Micro chip, capacitors, and connecting wires to power the circuit and light the LED.
- Stage 2: Audio: Proceed to assemble the audio components, including the speaker.
- Stage 3 & 4: Pitch and Volume Antennas: Install the antennas that control the theremin's pitch and volume. These stages involve connecting specific resistors and wires as detailed in the manual.
- Testing Along the Way: The instructional booklet includes checkpoints to test your circuit at various stages, ensuring correct assembly before proceeding.

Figure 3: Diagram illustrating the breadboard layout and how to insert components.
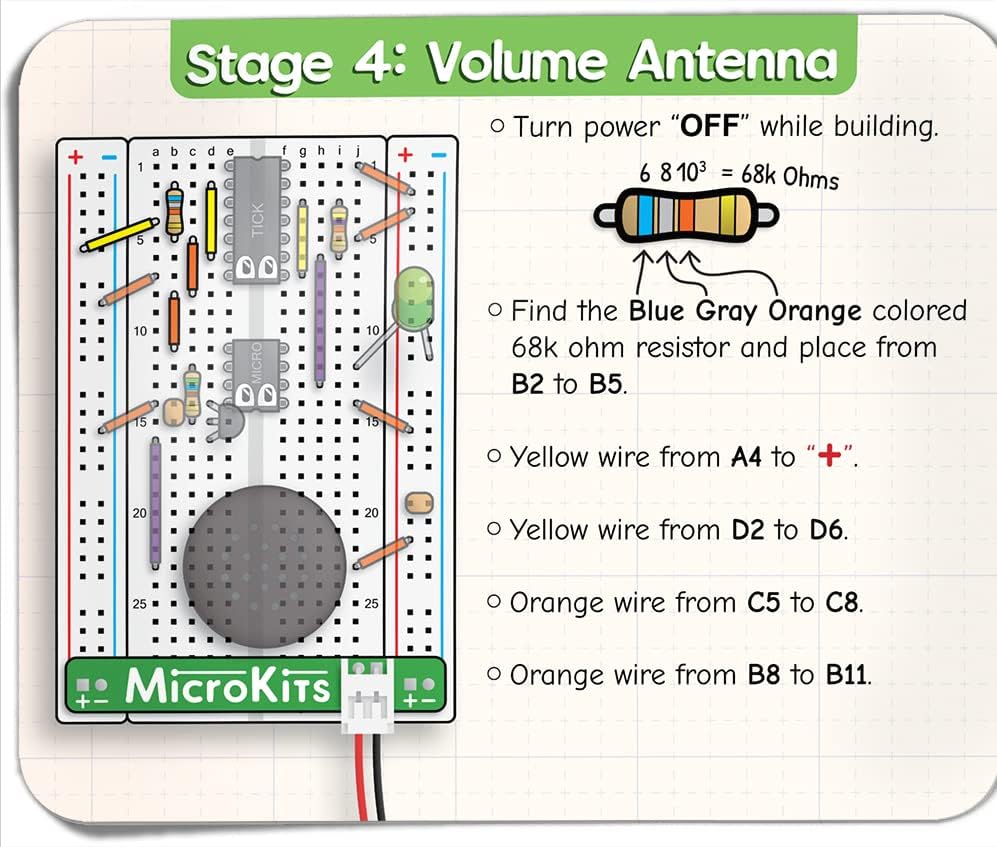
Figure 4: Example instruction page for assembling the volume antenna.

Figure 5: The comprehensive 22-page instructional booklet guides you through each step.
Operating Your Theremin
Once assembled, your MicroKits Theremin is ready to play. The theremin is unique in that it is played without physical contact, by manipulating electric fields around its antennas.
- Power On: Ensure the batteries are correctly installed and the power switch is in the 'ON' position.
- Pitch Control: Move one hand closer to or further from the pitch antenna (typically the vertical antenna) to change the frequency of the sound. Moving your hand closer generally increases the pitch, while moving it away decreases it.
- Volume Control: Use your other hand to control the volume by moving it closer to or further from the volume antenna (typically the horizontal loop antenna). Moving your hand closer usually decreases the volume, and moving it away increases it.
- Experiment: Practice smooth, controlled movements to create continuous tones and melodies. The sensitivity of the theremin allows for a wide range of expressive sounds.

Figure 6: Demonstrating hand movements to control pitch and volume of the theremin.
Care and Maintenance
To ensure the longevity and proper functioning of your MicroKits Theremin, follow these care and maintenance guidelines:
- Keep Dry: Protect the circuit from moisture and liquids, as water can damage electronic components.
- Handle with Care: While durable, avoid dropping the kit or applying excessive force to the components, especially the wires and antennas.
- Clean Gently: If necessary, gently wipe the breadboard and components with a dry, soft cloth. Do not use harsh chemicals or abrasive materials.
- Battery Storage: If storing the theremin for an extended period, remove the AA batteries to prevent leakage and corrosion.
- Store Properly: Keep the kit in a clean, dry place, away from extreme temperatures and direct sunlight.
Troubleshooting
If you encounter issues with your MicroKits Theremin, consider the following troubleshooting steps:
- No Sound/LED Off:
- Check battery installation and ensure they are fresh.
- Verify the power switch is in the 'ON' position.
- Inspect all wire connections on the breadboard to ensure they are fully inserted and in the correct positions as per the manual.
- Confirm the Micro chip and other components are oriented correctly and firmly seated.
- Erratic Sound/Unstable Pitch:
- Ensure the antennas are securely connected and not touching any other components or surfaces.
- Minimize external electrical interference by operating the theremin away from large metal objects or other electronic devices.
- Re-check component values (e.g., resistors) against the instructional booklet to ensure they are correctly placed.
- Missing or Damaged Parts:
- The kit includes a few extra parts. If you are missing a piece or have damaged one, MicroKits offers free replacement parts. Refer to the warranty section for contact information.
Product Specifications
| Feature | Detail |
|---|---|
| Product Dimensions | 4.75 x 5.75 x 1.3 inches |
| Item Weight | 7 ounces |
| Country of Origin | USA |
| ASIN | B08BJGSYSN |
| Item Model Number | TM2 |
| Manufacturer Recommended Age | 10 years and up |
| Batteries | 3 AA batteries required (included) |
| Manufacturer | MicroKits |
Warranty and Support
MicroKits is committed to providing a positive experience with their products. If you encounter any issues or require assistance, please reach out to MicroKits customer service.
- Free Replacement Parts: MicroKits offers free replacement parts if any components are missing or become damaged during assembly or use.
- Customer Service: For support, inquiries, or to request replacement parts, please visit the official MicroKits store on Amazon or their website.
- (Specific contact details like email or phone number are not provided in the product data. Please refer to the product packaging or official MicroKits website for direct contact information.)