Introduction
This manual provides comprehensive instructions for the safe and effective use of your iDOO Dog Training Collar, model RP-PCR01. This device is designed to assist in training dogs through beep, vibration, and static shock modes, helping to correct unwanted behaviors. Please read this manual thoroughly before operating the device.
Product Components
The iDOO Dog Training Collar system includes the following main components:
- Remote Transmitter
- Receiver Collar
- Adjustable Nylon Collar Strap
- 2-in-1 USB Charging Cable
- Short and Long Contact Points
- Conductive Rubber Covers (Short and Long)

Image: Detailed view of the remote transmitter and receiver collar, highlighting components such as the antenna, LED indicator light, LCD display, intensity level adjustment, beep button, channel selection, vibration button, shock button on the remote, and power button, LED indicator light, charging port, contact points, and conductive rubber covers on the receiver.
Setup Guide
1. Charging the Devices
Before first use, fully charge both the remote transmitter and the receiver collar. Use the provided 2-in-1 USB charging cable.
- Connect the charging cable to both the remote and receiver.
- Plug the USB end into a standard USB power adapter (not included).
- Charging typically takes 2-3 hours.
- The LED indicator on the receiver will turn green when fully charged. The remote's display will show a full battery icon.

Image: The remote transmitter and receiver collar connected to a 2-in-1 USB charging cable, illustrating the charging process. The image also indicates a remote standby time of 30 days and receiver standby time of 12 days after a 2-3 hour charge.
2. Attaching Contact Points and Rubber Covers
Select the appropriate contact points and rubber covers based on your dog's coat length.
- Use short contact points and covers for dogs with short coats.
- Use long contact points and covers for dogs with long coats.
- Screw the chosen contact points onto the receiver.
- Place the conductive rubber covers over the contact points to protect your dog's skin from direct metal contact and prevent irritation.
3. Fitting the Receiver Collar
Proper fit of the receiver collar is crucial for effective and safe operation.
- Place the receiver collar around your dog's neck so that the contact points are underneath, making direct contact with the skin.
- The collar should be snug, but not too tight. You should be able to fit one finger comfortably between the collar strap and your dog's neck.
- Adjust the nylon strap to ensure the contact points maintain consistent contact.
- Avoid leaving the collar on your dog for more than 12 hours per day to prevent skin irritation.
Operating Instructions
1. Turning On/Off
- Receiver Collar: Press and hold the power button on the receiver until the LED indicator lights up (usually green). To turn off, press and hold the power button until the LED indicator turns off.
- Remote Transmitter: Press any button to activate the remote. The LCD screen will light up. The remote will automatically enter sleep mode after a period of inactivity.
2. Training Modes
The iDOO Dog Training Collar offers three training modes: Beep, Vibration, and Static Shock.

Image: Visual representation of the three training modes: Beep Mode (suitable for initial training), Vibrate Mode (for correcting behaviors like digging, barking, jumping, biting, chewing), and Shock Mode (recommended as a last resort).
- Beep Mode: Press the Beep Button (speaker icon) on the remote. The receiver will emit an audible tone. This mode is ideal for initial training and gaining your dog's attention.
- Vibration Mode: Press the Vibration Button (vibration icon) on the remote. The receiver will vibrate. The vibration intensity can be adjusted from level 1 to 8 using the intensity level adjustment buttons on the side of the remote.
- Static Shock Mode: Press the Shock Button (lightning bolt icon) on the remote. The receiver will deliver a static shock. The shock intensity can be adjusted from level 1 to 16. This mode should be used as a last resort and with caution.
Important: Always start with the lowest intensity level for vibration and shock modes and gradually increase only if necessary, observing your dog's reaction. The goal is to get their attention, not to cause pain.
3. Remote Range
The remote transmitter has a wireless range of up to 330 yards (approximately 1000 feet), allowing for flexible training indoors, in your backyard, or during outdoor activities.
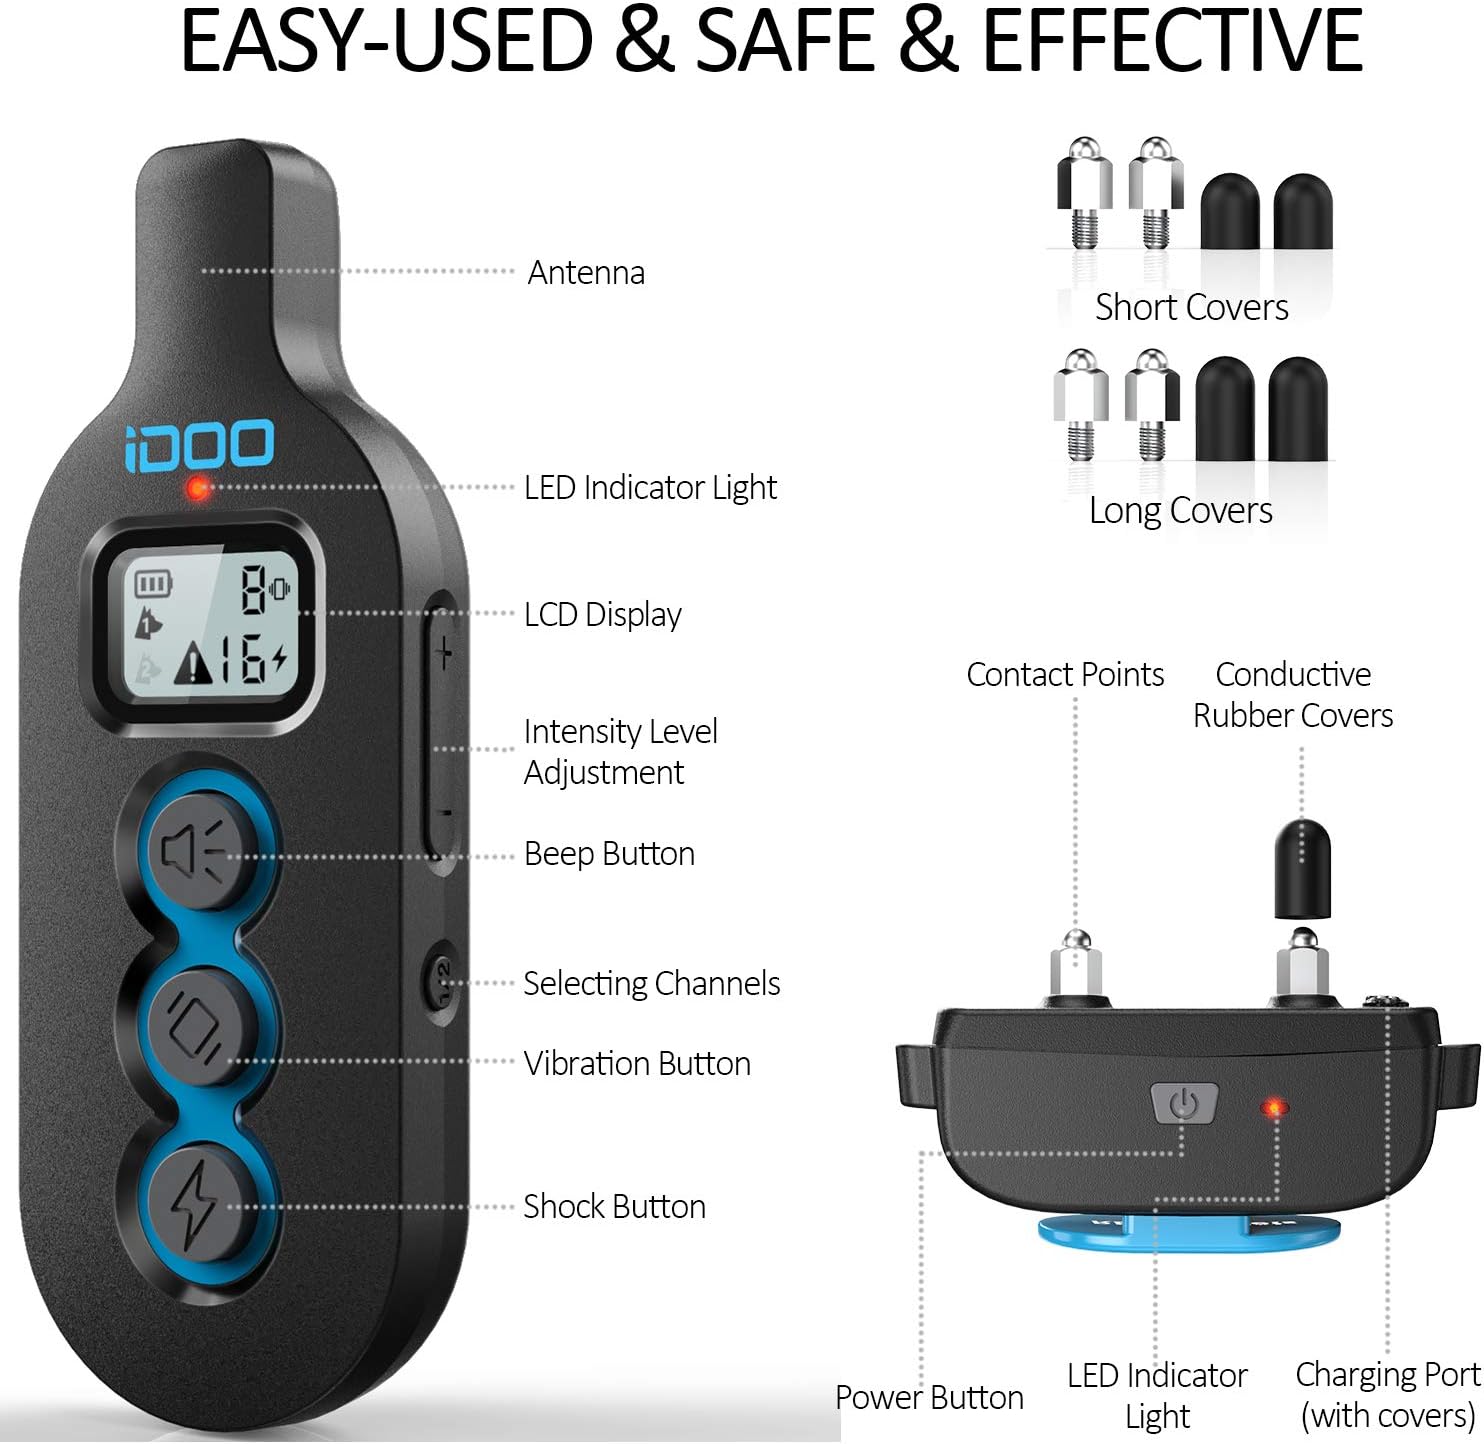
Image: A person holding the remote transmitter, with a dog playing in a backyard in the background, illustrating the 330-yard remote range for indoor and outdoor training.
4. Channel Selection
The remote transmitter allows for training multiple dogs (if additional receiver collars are purchased). Use the Selecting Channels button to switch between different receiver collars.
Maintenance
1. Cleaning
- Regularly clean the receiver collar and contact points with a damp cloth.
- Ensure the charging port is free of debris.
- The nylon collar strap is washable.
2. Waterproofing
The receiver collar has an IPX7 waterproof rating, meaning it can withstand immersion in water up to 1 meter for 30 minutes. This allows your dog to swim, bathe, or be trained in the rain without damaging the receiver.

Image: A dog swimming underwater with the iDOO collar, demonstrating its IPX7 waterproof capability, suitable for use in rain, during bathing, or while swimming.
3. Battery Care
- The receiver battery lasts up to 12 days on standby, and the remote battery lasts up to 30 days.
- Recharge the devices when the low battery indicator appears on the remote's LCD or the receiver's LED flashes red.
- Avoid overcharging or completely draining the battery for optimal lifespan.
Troubleshooting
| Problem | Possible Cause | Solution |
|---|---|---|
| Collar not responding to remote | Low battery; Out of range; Not paired; Receiver off. | Charge devices; Move closer to dog; Re-pair remote and receiver; Turn on receiver. |
| Dog not reacting to stimulation | Collar too loose; Contact points not touching skin; Intensity level too low; Wrong contact points. | Tighten collar (one finger fit); Ensure contact points are on skin; Increase intensity gradually; Use longer contact points for long-haired dogs. |
| Remote LCD screen is blank | Low battery; Remote in sleep mode. | Charge remote; Press any button to wake up. |
| Skin irritation on dog's neck | Collar worn too long; Collar too tight; Improper contact point use. | Remove collar for several hours daily; Ensure proper fit; Use rubber covers; Consult a vet if irritation persists. |
Specifications
- Model Number: RP-PCR01
- Training Modes: Beep, Vibration (1-8 levels), Static Shock (1-16 levels)
- Receiver Waterproof Rating: IEC 60529 IPX7
- Wireless Range: Up to 330 yards (1000 feet)
- Battery Type: Lithium Polymer
- Remote Battery Life: Up to 30 days (standby)
- Receiver Battery Life: Up to 12 days (standby)
- Charging Time: 2-3 hours
- Charging Method: 2-in-1 USB cable
- Material: Nylon, Rubber (collar strap and covers)
- Closure Type: Buckle
- Recommended Dog Breed Size: Small, Medium, Large (10 lbs - 150 lbs)
- Item Dimensions: 16 x 16 x 4.2 centimetres (packaging/product dimensions)
Safety Information
- This device is intended for training purposes only and should not be used as a punishment tool.
- Do not use this collar on puppies younger than 6 months old.
- Never leave the collar on your dog for more than 12 hours per day.
- Regularly check your dog's neck for any signs of skin irritation or sores. If irritation occurs, discontinue use and consult a veterinarian.
- Ensure the collar is fitted correctly; too loose or too tight can cause issues.
- The static shock mode should be used responsibly and as a last resort, at the lowest effective level.
- Keep out of reach of children.
Warranty and Support
iDOO products are designed for reliability and performance. For specific warranty details, please refer to the product packaging or contact iDOO customer support directly. Keep your purchase receipt as proof of purchase.
For technical assistance or further inquiries, please visit the official iDOO website or contact their customer service department.