1. Introduction
This manual provides comprehensive instructions for the AOPUTTRIVER AP-985B Non-Contact Infrared Thermometer. This device is designed for safe and accurate temperature measurement of surfaces from a distance. It is suitable for various industrial and household applications, including cooking, automotive maintenance, home repairs, and more.
Attention: This thermometer is not intended for measuring human body temperature. Readings obtained for this purpose will be inaccurate.

Figure 1: AOPUTTRIVER AP-985B Infrared Thermometer and included accessories.
2. Safety Information
Please read all safety warnings and instructions carefully before using this product. Failure to follow these instructions may result in injury or damage to the device.
- Laser Safety: Do not point the laser directly into eyes or indirectly off reflective surfaces. The laser is used for targeting only.
- Temperature Range: Do not use the thermometer to measure temperatures outside its specified range (-50℃ to 1360℃ / -58℉ to 2480℉).
- Electrical Hazards: Do not use the device near live electrical circuits or in environments with high electromagnetic fields, as this may affect accuracy.
- Maintenance: Do not attempt to disassemble or modify the thermometer. Refer all servicing to qualified personnel.
- Battery Handling: Ensure correct battery polarity. Remove batteries if the device will not be used for an extended period to prevent leakage. Dispose of batteries properly.
3. Product Overview
3.1 Components and Features

Figure 2: Labeled components and features of the AP-985B Infrared Thermometer.
The AOPUTTRIVER AP-985B Infrared Thermometer is equipped with several features to ensure accurate and convenient temperature measurement:
- Dual Laser Pointers: For precise targeting and accurate spot measurement.
- Wide Temperature Range: Measures from -50℃ to 1360℃ (-58℉ to 2480℉).
- Adjustable Emissivity: 0.1 to 1.0, allowing for accurate readings on various surfaces.
- Fast Response Time: Less than 250 milliseconds for quick measurements.
- Data Hold Function: Freezes the current reading on the display.
- Backlight: Illuminates the LCD screen for visibility in low-light conditions.
- Auto Power Off: Conserves battery life by automatically shutting down after a period of inactivity.
- ℃/℉ Selection: Easily switch between Celsius and Fahrenheit units.
- MAX/MIN/AVG Modes: Displays maximum, minimum, or average temperature readings during a measurement session.
- High/Low Temperature Alarms: Alerts the user with a buzzer when temperature exceeds or falls below set thresholds.
4. Setup
4.1 Battery Installation
The AP-985B thermometer requires one 9V (6F22) battery for operation. A battery is typically included in the package.
- Locate the screw holes on the handle of the thermometer.
- Use a small screwdriver (often included) to loosen the screw securing the battery door.
- Pull the battery door downwards to open the battery compartment.
- Insert the 9V battery, ensuring correct polarity (+ and - terminals match the markings inside the compartment).
- Close the battery door and tighten the screw.
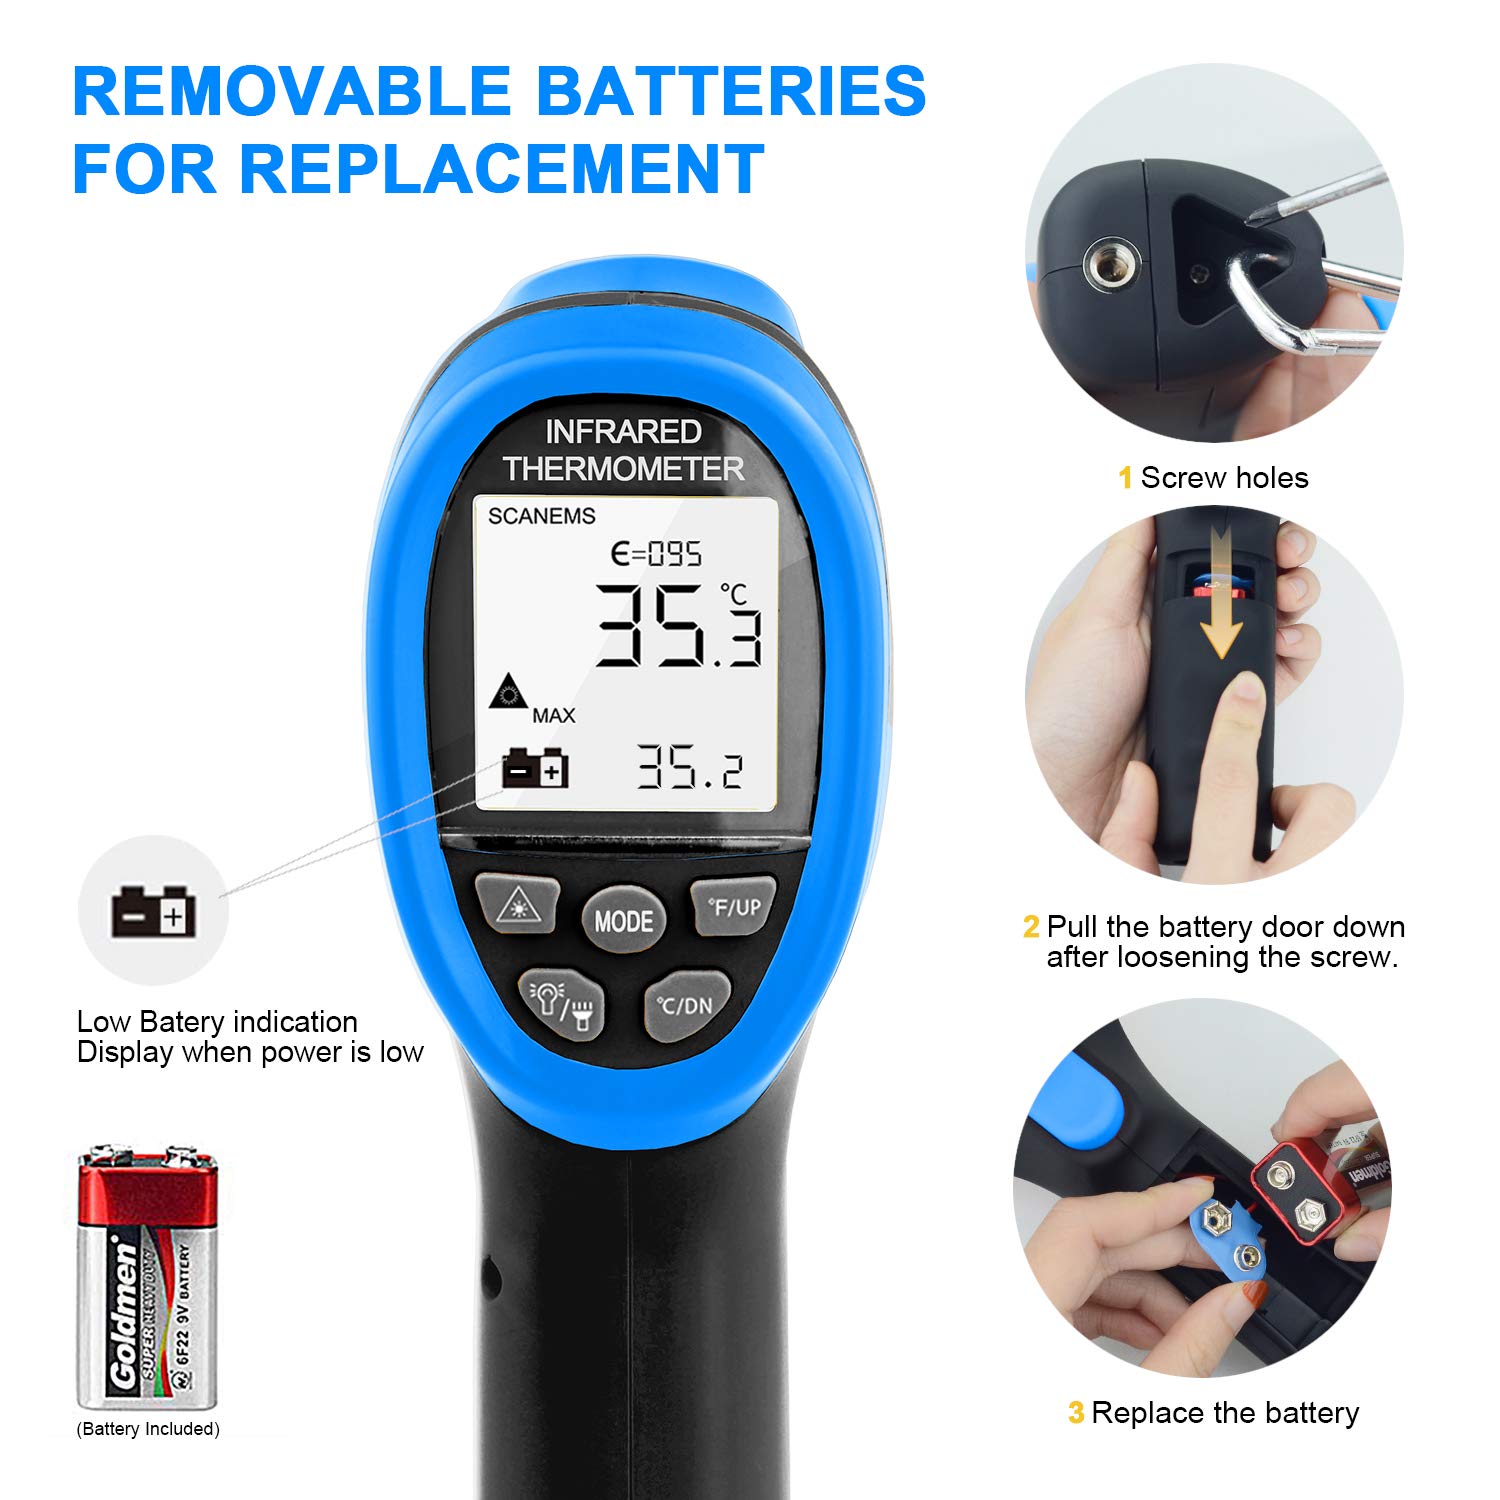
Figure 3: Steps for replacing the 9V battery.
A low battery indication will display on the screen when power is low, signaling that the battery needs replacement.
5. Operating Instructions
5.1 Basic Measurement
To take a temperature reading:
- Point the thermometer's laser at the target surface.
- Press and hold the trigger. The laser pointers will activate, indicating the measurement area.
- The temperature reading will appear on the LCD screen almost instantly (response time < 250ms).
- Release the trigger to hold the reading on the display (Data Hold function).

Figure 4: Example of using the thermometer to measure high temperatures.
5.2 Distance to Spot Ratio (D:S)
The AP-985B has a Distance to Spot Ratio (D:S) of 16:1. This means that at a distance of 16 units from the target, the measurement spot diameter will be 1 unit. For example, if you are 16 inches away from the target, the measurement area will be a 1-inch circle. To ensure accurate readings, the target area should be larger than the spot size.

Figure 5: Understanding the Distance to Spot Ratio (D:S).
5.3 Emissivity Adjustment
Emissivity (ε) is a measure of an object's ability to emit infrared energy. Different materials have different emissivity values. The AP-985B allows you to adjust the emissivity from 0.1 to 1.0 for more accurate readings on various surfaces. Refer to common emissivity tables for typical values of different materials. To adjust emissivity, press the 'SET' button and use the 'UP' and 'DOWN' buttons to change the value.
5.4 Mode Functions (MAX/MIN/AVG)
Press the 'MODE' button to cycle through different display modes:
- MAX: Displays the maximum temperature recorded during the current measurement session.
- MIN: Displays the minimum temperature recorded during the current measurement session.
- AVG: Displays the average temperature recorded during the current measurement session.
5.5 Temperature Unit Selection (℃/℉)
To switch between Celsius (℃) and Fahrenheit (℉), press the '℃/℉' button.
5.6 High/Low Temperature Alarms
The AP-985B features high (HI) and low (LOW) temperature alarms. When the measured temperature exceeds the set high limit or falls below the set low limit, the device will emit an audible beep and display 'HI' or 'LOW' on the screen.

Figure 6: High and Low Temperature Alarm indications.
To set the alarm thresholds:
- Press the 'ALARM' button (or 'SET' then navigate to alarm settings).
- Use the 'UP' and 'DOWN' buttons to adjust the desired high or low temperature limit.
- Press 'ALARM' again to confirm and exit the setting mode.
6. Maintenance
- Cleaning: Clean the lens and the device casing with a soft, damp cloth. Do not use abrasive cleaners or solvents. Ensure the lens is free of dust and debris for accurate readings.
- Storage: Store the thermometer in a dry, cool place, away from direct sunlight and extreme temperatures. If storing for an extended period, remove the battery.
- Battery Replacement: Replace the 9V battery when the low battery indicator appears on the display.
7. Troubleshooting
| Problem | Possible Cause | Solution |
|---|---|---|
| No display or weak display | Low battery or incorrect battery installation. | Replace the 9V battery, ensuring correct polarity. |
| Inaccurate readings | Incorrect emissivity setting, dirty lens, or target too small/far. | Adjust emissivity for the target material. Clean the lens. Ensure the target is larger than the measurement spot and within the D:S ratio. |
| Laser not working | Laser function disabled or fault. | Ensure the laser is enabled (if applicable via a button). If not, contact support. |
| Alarm not sounding | Alarm thresholds not set or alarm function disabled. | Set the high/low alarm thresholds as described in section 5.6. |
8. Specifications
| Parameter | Value |
|---|---|
| Temperature Range | -50℃ to 1360℃ (-58℉ to 2480℉) |
| Accuracy | ±3% of reading + 3℃ (-50℃ to 0℃); ±2% of reading + 2℃ (above 0℃) |
| Distance to Spot Ratio (D:S) | 16:1 |
| Emissivity | 0.1 to 1.0 (Adjustable) |
| Resolution | 0.1℃ or 0.1℉ (<1000℃); 1℃ or 1℉ (≥1000℃) |
| Response Time | <250ms (95% response) |
| Repeatability | ±1% of reading or ±1℃ |
| Power Supply | 1 x 9V (6F22) Battery |
| Dimensions | 192 x 95 x 63 mm |
| Weight | 160g (without battery) |
| Special Features | Automatic Shut-off, Backlight, Dual Laser, Data Hold, MAX/MIN/AVG, High/Low Alarm |
| Included Components | Infrared Thermometer, 9V Battery, Protective Bag, User Manual, Small Screwdriver |
9. Warranty and Support
AOPUTTRIVER offers a 2-year warranty and lifetime technical support for this product. If you have any questions or require assistance, please contact AOPUTTRIVER customer service. They commit to responding and resolving your inquiries within 24 hours.

Figure 7: Contents included in the package.


