1. Introduction and Overview
The FanJu FJ2245 is a wireless digital meat thermometer designed to help you achieve perfectly cooked food every time. It features a large LCD display, a durable stainless steel probe, and a wireless receiver that allows you to monitor temperatures from up to 200 feet away. With USDA-recommended preset temperatures for various meats and doneness levels, this thermometer simplifies your cooking process for grilling, smoking, baking, and more.
Package Contents:
- 1 x FanJu FJ2245 Thermometer Main Unit
- 1 x Wireless Receiver
- 1 x Food/Oven Temperature Probe (6.5-inch stainless steel)
- 1 x User Manual (English and German)
Note: Batteries are not included. The main unit requires 2x AA batteries, and the wireless receiver requires 2x AAA batteries.
2. Setup
2.1 Battery Installation
- Locate the battery compartments on the back of both the main unit and the wireless receiver.
- Open the battery covers.
- Insert 2x AA batteries into the main unit, observing the correct polarity (+/-).
- Insert 2x AAA batteries into the wireless receiver, observing the correct polarity (+/-).
- Close the battery covers securely.
2.2 Probe Connection
Insert the stainless steel probe connector firmly into the port on the side of the main thermometer unit.
2.3 Placement Options
The FanJu FJ2245 offers versatile placement options for convenience:
- Integrated Stand: The main unit features a fold-out stand on the back, allowing it to be placed upright on a countertop or table.
- Magnetic Back: A strong magnet on the back of the main unit allows it to be securely attached to metallic surfaces like an oven door or refrigerator.
- Hang Hole: A hang hole is provided on the back for wall mounting or hanging on a hook.

Image: The thermometer can stand on a table, attach magnetically to an oven, or hang from a hook.

Image: Labeled diagram of the thermometer's components and features.
3. Operating Instructions
3.1 Power On/Off
Press the power button on both the main unit and the wireless receiver to turn them on. To turn off, press and hold the power button until the display shuts down.
3.2 Selecting Meat Type and Doneness
- Press the MEAT button on the main unit to cycle through the 8 preset meat types (Beef, Lamb, Veal, Hamburger, Pork, Turkey, Chicken, Fish).
- Once a meat type is selected, press the TASTE button to select your desired doneness level (Rare, Medium Rare, Medium, Medium Well, Well Done).
- The target temperature will automatically adjust based on your selection, following USDA recommendations.
3.3 Custom Temperature Setting
To set a custom target temperature:
- After selecting a meat type, use the UP (^) and DOWN (v) arrow buttons to manually adjust the target temperature to your preference.
- The thermometer will remember your custom setting for that meat type until changed again.

Image: Meat and doneness selection options on the thermometer.
3.4 Monitoring Temperature
Insert the probe into the thickest part of the meat, avoiding bone or gristle. The current internal temperature of the food will be displayed on both the main unit and the wireless receiver. The display also shows the target temperature and a temperature trend indicator.

Image: Detailed view of the thermometer's LCD display.
3.5 Wireless Remote Function
The wireless receiver allows you to monitor your food's temperature from a distance of up to 200 feet. This means you can attend to other tasks or relax while your food cooks, without needing to constantly check the oven or grill. The receiver will alert you when the target temperature is reached.

Image: Illustration of the 200ft wireless remote range.
3.6 Alarm Function
When the food reaches the set target temperature, both the main unit and the wireless receiver will emit an audible alarm to notify you. This helps prevent overcooking and ensures your food is cooked to perfection.
4. Temperature Settings
The FanJu FJ2245 comes with USDA-recommended preset temperatures for 8 types of meat and 5 doneness levels. These settings are designed to ensure food safety and optimal taste.
Preset Meat Types:
- Beef
- Lamb
- Veal
- Hamburger
- Pork
- Turkey
- Chicken
- Fish
Doneness Levels:
- Rare
- Medium Rare
- Medium
- Medium Well
- Well Done
You can also adjust the temperature to your desired taste using the UP and DOWN arrow buttons.

Image: Visual guide to various meat types for temperature settings.
5. Maintenance
5.1 Cleaning
- Probe: Always clean the stainless steel probe thoroughly after each use. Wash with warm, soapy water and rinse well. Dry completely before storing. Do not immerse the probe connector or cable in water.
- Main Unit & Receiver: Wipe the main unit and wireless receiver with a damp cloth. Do not immerse either unit in water or place them in a dishwasher.
5.2 Storage
Store the thermometer and its components in a clean, dry place when not in use. Remove batteries if the device will not be used for an extended period to prevent leakage.
5.3 Battery Replacement
Replace batteries when the display becomes dim or the units fail to power on. Follow the battery installation steps in Section 2.1.
6. Troubleshooting
- No Display/Unit Not Powering On:
Check battery polarity. Ensure batteries are fresh and correctly inserted. Replace batteries if necessary. - Inaccurate Temperature Readings:
Ensure the probe is inserted into the thickest part of the meat, away from bone or gristle. Verify the probe is clean and undamaged. - Wireless Receiver Not Connecting/Losing Signal:
Ensure both the main unit and receiver are within the 200ft range. Check for obstructions between the units (e.g., thick walls, large metal objects). Replace batteries in both units. - Alarm Not Sounding:
Check if the target temperature has been set correctly. Ensure the units have sufficient battery power. - Probe Error Message:
Ensure the probe is fully and correctly inserted into the main unit's port. If the error persists, the probe may be damaged and require replacement.
7. Specifications
| Brand | FanJu |
| Model | FJ2245 |
| Main Material | ABS |
| Color | Black |
| Temperature Range | -50°C to 300°C (-30°F to 662°F) |
| Temperature Accuracy | ±1°C (±1°F) |
| Probe Length | 6.5 inches (food-grade stainless steel) |
| Cable Length | 40 inches (stainless steel mesh cable) |
| Wireless Remote Range | Up to 200 feet |
| Display Type | LCD |
| Power Source (Main Unit) | 2 x AA batteries (not included) |
| Power Source (Receiver) | 2 x AAA batteries (not included) |
| Response Time | 4-6 seconds |
| Main Unit Dimensions | 12.5 x 7.1 x 4.1 cm (4.9 x 2.8 x 1.6 inches) |
| Receiver Dimensions | 7.7 x 4.5 x 2.3 cm (3.0 x 1.8 x 0.9 inches) |
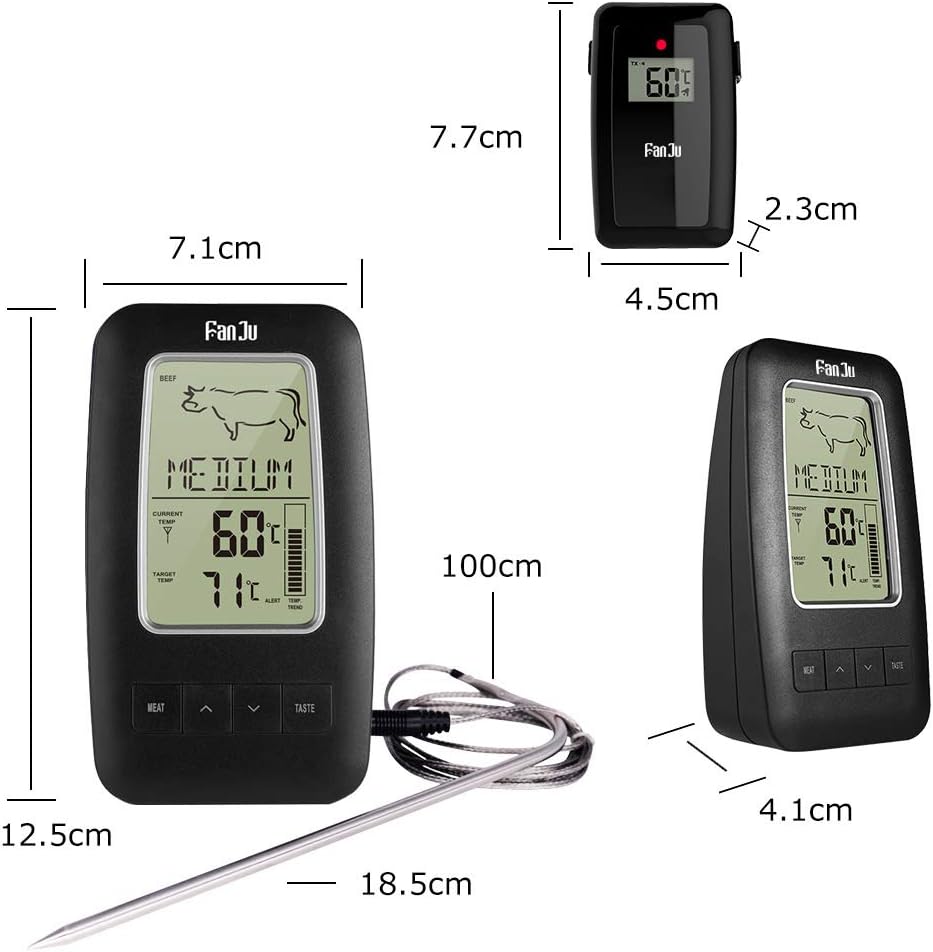
Image: Product dimensions for the thermometer and receiver.
8. Warranty and Support
Information regarding product warranty and customer support is not provided in the available product data. Please refer to the packaging or contact the retailer for details on warranty coverage and support options.