
AOPUTTRIVER UKHP-770D
AOPUTTRIVER HP-770D Digital Multimeter User Manual
Model: UKHP-770D
1. Introduction
The AOPUTTRIVER HP-770D is a professional high-precision digital multimeter designed for accurate measurement of various electrical parameters. It features a 40000-count display, auto/manual ranging, and a range of functions including NCV, True RMS, temperature measurement, and more. This manual provides essential information for the safe and effective operation of your HP-770D multimeter.

Figure 1: AOPUTTRIVER HP-770D Digital Multimeter and included accessories.
2. Package Contents
Please check the package contents upon unboxing to ensure all items are present:
- 1 x HP-770D Digital Multimeter
- 1 x Temperature Probe
- 1 x Operation Guide (this manual)
- 1 x Protective Case
- 2 x Test Leads (Red and Black)
- 1 x 9V Battery
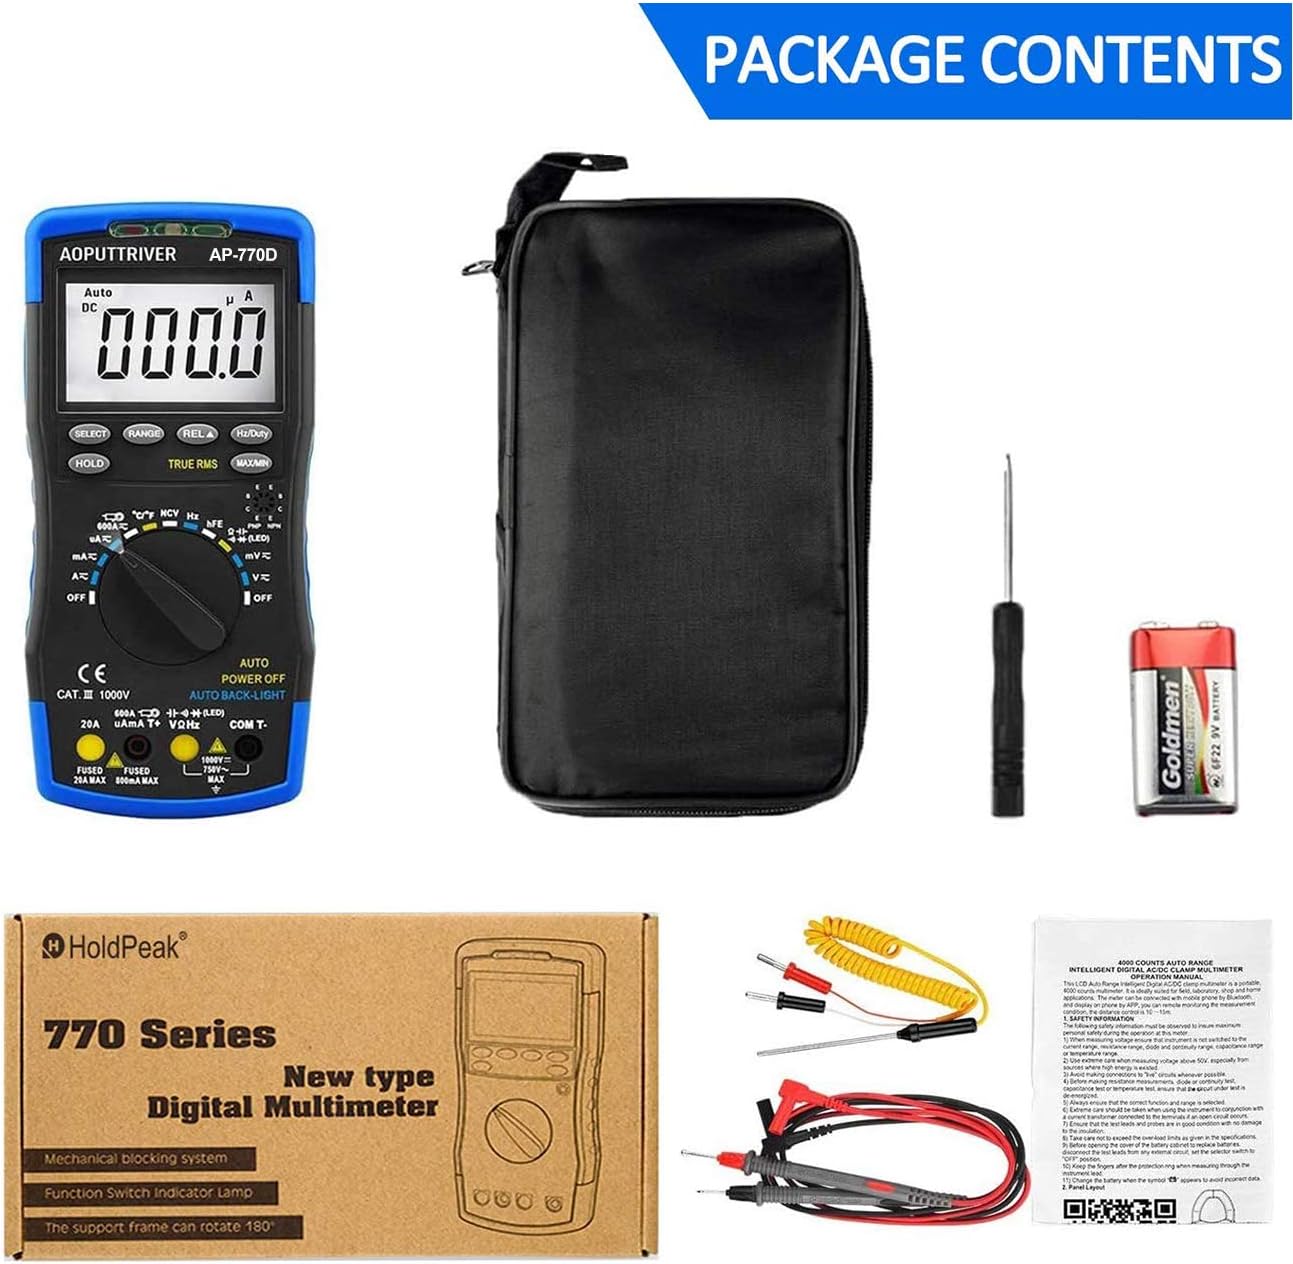
Figure 2: All items included in the HP-770D Multimeter package.
3. Product Overview and Key Functions
The HP-770D multimeter is equipped with various features for comprehensive electrical testing.

Figure 3: Labeled diagram of the HP-770D Multimeter's key functions.
- NCV Red Light: Indicates non-contact voltage detection.
- CDS Sensor: Light sensor for auto backlight function.
- NCV Green Light: Indicates non-contact voltage detection.
- NCV Detection Area: Area for non-contact voltage detection.
- Display: 40000-count digital display with bar graph.
- SELECT Key: Toggles between functions within a rotary switch position (e.g., AC/DC, Diode/Continuity).
- HOLD Key: Freezes the current display reading.
- RANGE Key: Switches between auto and manual ranging.
- REL Key: Activates relative measurement mode.
- Hz/Duty Key: Toggles between frequency and duty cycle measurements.
- MAX/MIN Key: Displays maximum and minimum measured values.
- Transistor hFE Test Input Jack: Sockets for transistor testing.
- Rotary Switch: Selects the desired measurement function.
- VΩHz COM T- Input Jack: Common input for voltage, resistance, frequency, and temperature.
- COM T- Input Jack: Common input for all measurements.
- 20A Input Jack: Input for high current measurements (up to 20A).
- µAmA T+ Input Jack: Input for microampere and milliampere current measurements.
4. Setup
4.1 Battery Installation
The HP-770D multimeter requires one 9V battery for operation. The battery compartment is located on the back of the device.
- Ensure the multimeter is turned OFF.
- Locate the battery compartment cover on the back of the unit.
- Use a small Phillips head screwdriver to loosen the screw securing the battery cover.
- Remove the battery cover.
- Connect the 9V battery to the battery clip, observing correct polarity (+ to + and - to -).
- Place the battery into the compartment.
- Replace the battery cover and tighten the screw.

Figure 4: Rear view of the HP-770D, showing the battery compartment and the 180° rotating kickstand.
4.2 Test Lead Connection
Always connect the test leads to the correct input jacks for the desired measurement. The HP-770D features a mechanical blocking system to prevent incorrect lead insertion.
- For Voltage, Resistance, Frequency, Capacitance, Diode, Continuity, and Temperature measurements, insert the black test lead into the COM T- jack and the red test lead into the VΩHz jack.
- For Current measurements (µA/mA), insert the black test lead into the COM T- jack and the red test lead into the µAmA T+ jack.
- For high current measurements (up to 20A), insert the black test lead into the COM T- jack and the red test lead into the 20A jack.
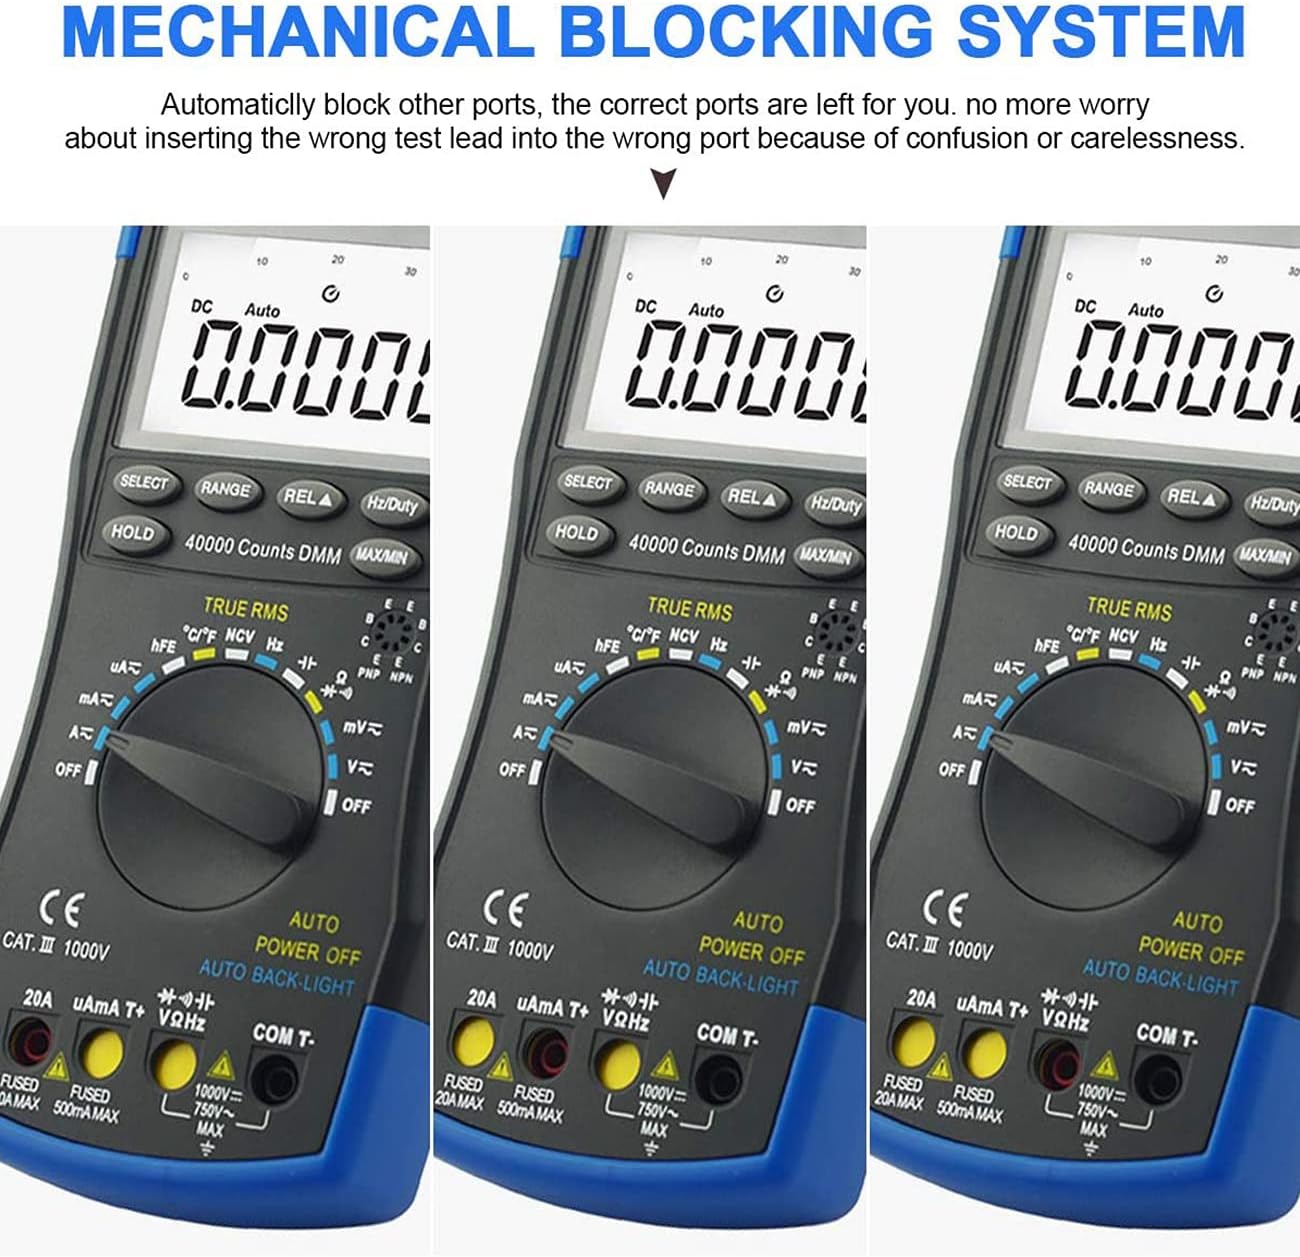
Figure 5: The mechanical blocking system automatically blocks incorrect input ports based on the selected function, enhancing safety.
5. Operating Instructions
Before any measurement, ensure the multimeter is set to the correct function and range, and the test leads are properly connected.
5.1 DC/AC Voltage Measurement
- Turn the rotary switch to the V~ (AC Voltage) or V- (DC Voltage) position.
- Connect the test leads to the circuit in parallel.
- Read the voltage value on the display. Use the SELECT button to toggle between AC and DC if in a combined mode.
5.2 DC/AC Current Measurement
- Turn the rotary switch to the µA~, mA~, or A~ position (for AC or DC current).
- Connect the test leads in series with the circuit.
- Read the current value on the display. Use the SELECT button to toggle between AC and DC if in a combined mode.
5.3 Resistance Measurement
- Turn the rotary switch to the Ω position.
- Ensure the circuit is de-energized before measuring resistance.
- Connect the test leads across the component to be measured.
- Read the resistance value on the display.
5.4 Capacitance Measurement
- Turn the rotary switch to the Capacitance position.
- Ensure the capacitor is fully discharged before connecting the test leads.
- Connect the test leads across the capacitor.
- Read the capacitance value on the display.
5.5 Frequency and Duty Cycle Measurement
- Turn the rotary switch to the Hz position.
- Connect the test leads to the signal source.
- Press the Hz/Duty button to switch between frequency (Hz) and duty cycle (%).
- Read the value on the display.
5.6 Diode Test and Continuity Buzzer
- Turn the rotary switch to the Diode/Continuity position.
- Press the SELECT button to toggle between Diode Test and Continuity.
- Diode Test: Connect the red lead to the anode and black lead to the cathode. The display shows the forward voltage drop. Reverse the leads to check for open circuit.
- Continuity: Connect the test leads across the circuit or component. A continuous beep indicates continuity (low resistance).
5.7 Temperature Measurement
- Turn the rotary switch to the °C/°F position.
- Insert the temperature probe into the VΩHz and COM T- jacks.
- Place the probe tip on or in the object whose temperature is to be measured.
- Press the SELECT button to switch between Celsius (°C) and Fahrenheit (°F).
- Read the temperature value on the display.

Figure 6: The HP-770D can measure temperature using the included probe, suitable for liquids or surfaces.
5.8 Non-Contact Voltage (NCV) Detection
- Turn the rotary switch to the NCV position.
- Move the NCV detection area (top of the meter) close to the wire or power outlet.
- The red and green NCV lights will illuminate, and the buzzer will sound, indicating the presence of AC voltage.

Figure 7: NCV function allows detection of live wires without direct contact, enhancing safety.
5.9 hFE Test (Transistor Test)
- Turn the rotary switch to the hFE position.
- Identify if the transistor is NPN or PNP.
- Insert the transistor leads (Emitter, Base, Collector) into the corresponding hFE test input jacks.
- The display will show the hFE (DC current gain) value.
5.10 Special Functions
- Data Hold (HOLD): Press the HOLD button to freeze the current reading on the display. Press again to release.
- MAX/MIN: Press the MAX/MIN button to display the maximum or minimum value recorded during a measurement session.
- Relative Value (REL): Press the REL button to set the current reading as a reference point, and subsequent measurements will be displayed as a deviation from this reference.
- Auto Backlight: The display backlight automatically adjusts based on ambient light conditions.
- Auto Power Off: The multimeter will automatically power off after a period of inactivity to conserve battery life.
- True RMS: Provides accurate AC measurements for non-sinusoidal waveforms.
6. Maintenance
6.1 Cleaning
To clean the multimeter, wipe the case with a damp cloth and a mild detergent. Do not use abrasives or solvents. Ensure the device is turned off and disconnected from any circuits before cleaning.
6.2 Battery Replacement
When the battery low indicator appears on the display, replace the 9V battery as described in Section 4.1. Always use a fresh 9V battery.
6.3 Fuse Replacement
If the current measurement function fails, the fuse may need replacement. Refer to the specifications for the correct fuse type. Fuse replacement should only be performed by qualified personnel.
- F1 Fuse: 500mA/250V (for µA/mA range)
- F2 Fuse: 20A/250V (for 20A range)
Warning: To avoid electric shock or damage to the meter, never attempt to replace the fuse with the test leads connected to a circuit.
7. Troubleshooting
| Problem | Possible Cause | Solution |
|---|---|---|
| No display or dim display | Low battery; Power off; Faulty display. | Replace battery; Turn on the meter; Contact support. |
| Incorrect readings | Wrong function selected; Incorrect lead connection; Out of range. | Select correct function; Connect leads properly; Select appropriate range or auto-range. |
| Current measurement not working | Blown fuse; Incorrect lead connection. | Check and replace fuse (see 6.3); Ensure leads are in current input jacks. |
| Continuity buzzer not sounding | High resistance; Not in continuity mode. | Check resistance; Ensure rotary switch is on continuity and SELECT button is pressed. |
8. Specifications
| Parameter | Range/Value |
|---|---|
| Display | 40000 Counts |
| Range Select | Auto/Manual Ranging |
| DC Voltage | 40mV/400mV/4V/40V/400V/1000V |
| AC Voltage | 40mV/400mV/4V/40V/400V/750V |
| DC Current | 400µA/4000µA/40mA/400mA/4A/20A |
| AC Current | 400µA/4000µA/40mA/400mA/4A/20A |
| Resistance | 400Ω/4kΩ/40kΩ/400kΩ/4MΩ/40MΩ |
| Capacitance | 9.999nF/99.99nF/999.9nF/9.999µF/99.99µF/999.9µF/9.999mF/99.99mF |
| Frequency | 9.999Hz/99.99Hz/999.9Hz/9.999KHz/99.99KHz/999.9KHz/9.999MHz |
| Temperature | -20℃~1000℃ (-4℉~1832℉) |
| Duty Cycle | 0.1%~99.9% |
| Dimensions | 195 x 88 x 40 mm (7.68 x 3.46 x 1.57 inches) |
| Weight | 350g (0.77lb) |
| Power Source | 9V Battery |
| Safety Standards | IEC-1010, Double Insulation, CAT III Overvoltage |
9. Warranty and Support
The AOPUTTRIVER HP-770D Digital Multimeter is covered by a two-year warranty from the date of purchase. This warranty covers defects in materials and workmanship under normal use.
For technical support, warranty claims, or any inquiries regarding your product, please contact AOPUTTRIVER customer service. Refer to the contact information provided with your product packaging or visit the official AOPUTTRIVER website for assistance.
Please retain your purchase receipt as proof of purchase for warranty purposes.
Related documentsUKHP-770D


Ask a question about this manual
Ask about setup, troubleshooting, compatibility, parts, safety, or missing instructions. Manuals+ will review the question and use this page’s manual context to help answer it.